The frontend ecosystem is an ever-evolving entity that has seen the rise and fall of many libraries and frameworks. This often happens so quickly that other ecosystems can barely keep up.

This is a good thing, however, because without this rapid development, advancement, and competition, we wouldn’t have great frameworks like the new TanStack Start.
This library holds a lot of promise, and in this article, we’re going to explore its capabilities, how it differs from the hundreds of other frameworks that promise the same things, and provide a hands-on implementation by building a full-stack web application.
What is Tanstack Start?
Before diving in, let’s take a moment to understand what TanStack Start is. If you’ve been part of the React ecosystem for a while, the name TanStack might sound familiar. That’s because they are the team behind a suite of popular libraries for React applications, such as Tanstack Query and Router.
Start is a new addition to their suite of React tools. It is a full-stack meta-framework built on React, Vite, and TanStack Router. Unlike typical full-stack meta-frameworks, Start prioritizes a client-side-first developer experience.
According to Tanner Linsley, the mastermind behind TanStack, Start is essentially a fully featured TanStack Router framework with a thin layer of server-side rendering. It is designed to deliver high performance without compromising on developer experience.
For a deeper dive, you can check out our introductory article or explore the official documentation.
What we’re building
We won’t be building anything too complicated: just a simple recipe-sharing website where users can manage recipes (i.e., create, edit, delete, and share recipes with ingredients and instructions) as well as discover new ones.
To submit recipes, users will need to create an account, and for that, we’ll be using BetterAuth. Since we also need to persist data, we’ll use Prisma with a PostgreSQL database.
Here’s a sneak peek of what the final application will look like: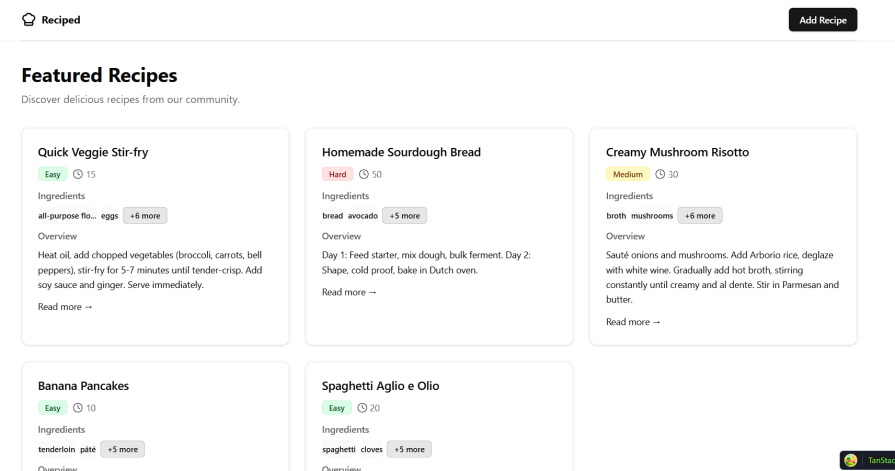
You can check out the live site on Vercel, and if you’d like to dive deeper, the complete project is available on my GitHub repository.
To get started, you’ll need:
- Node.js installed on your machine
- Basic knowledge of Typescript, React, and Tanstack Start
Getting Start-ed
The fastest way to get going with TanStack Start is by using one of the example starter projects available on the Quick Start page of the documentation. For instance, you can clone and run the Basic example project right away with the following command:
npx gitpick TanStack/router/tree/main/examples/react/start-basic start-basic
If you’d prefer to set up your project from scratch, check out TanStack’s guide for a comprehensive walkthrough on configuring your own Start project.
After cloning the project, install the dependencies and start the development server with the following commands:
cd start-basic
npm install
npm run dev
Project structure and auth
Once the project is set up, you can access your app at localhost:3000. You should see a barebones webpage with a functional navigation bar: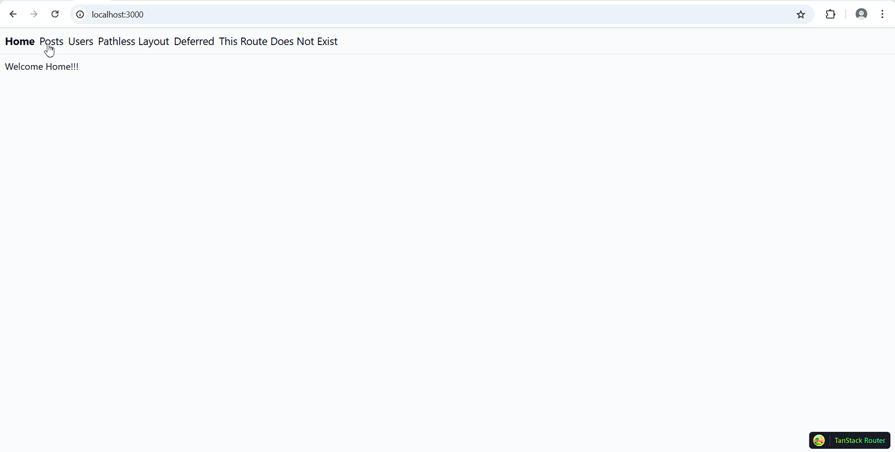
Next, clean up the project by removing boilerplate code and redundant files. If this is your first time doing this, you can refer back to our introductory article on TanStack for guidance on what can safely be removed.
Instead of creating files as we go, we’ll update the project structure and make the necessary changes up front to streamline the development process. This will help keep the process organized and efficient.
Here’s what the final project structure will look like:
├── prisma/
├── src/
│   ├── components/
│   │   ├── DefaultCatchBoundary.tsx
│   │   ├── Header.tsx
│   │   ├── NotFound.tsx
│   │   ├── PostError.tsx
│   │   ├── recipe-card.tsx
│   │   ├── sign-in-modal.tsx
│   │   └── ui/
│   ├── lib/
│   │   ├── auth-client.ts
│   │   ├── auth-middleware.ts
│   │   ├── auth-server.ts
│   │   ├── prisma.ts
│   │   ├── utils.ts
│   │   └── server/
│   │       └── auth.ts
│   ├── hooks/
│   │   └── useFormField.ts
│   ├── routes/
│   │   ├── __root.tsx
│   │   ├── index.tsx
│   │   ├── api/
│   │   │   └── auth/
│   │   │       └── $.ts
│   │   ├── add-recipe/
│   │   │   └── index.tsx
│   │   ├── my-recipes/
│   │   │   └── index.tsx
│   │   └── recipe/
│   │       └── $id/
│   │           ├── index.tsx
│   │           └── edit-recipe/
│   │               └── index.tsx
│   ├── types/
│   │   └── index.ts
│   └── utils/
│       ├── config.ts
│       ├── stringUtils.ts
│       └── serverActions/
│           └── recipes.ts
├── .env
The updated structure isn’t drastically different; we’ve simply added, removed, or adjusted a few routes, files, and folders to better fit our application’s needs. Go ahead and set up this structure in your project.
Setting up auth
The application will list recipes publicly, but users will need to log in before they can submit and share their own. To achieve this, we’ll implement Google social login using Better Auth. The authentication setup will be straightforward, and Better Auth is a great fit here thanks to its simple configuration process and seamless integration with TanStack Start.
Step 1: Install Better Auth
Run the following command to install Better Auth into your project:
npm install better-auth
Step 2: Generate a secret key
Head over to the Installation page in the Better Auth documentation and generate a BETTER_AUTH_SECRET key: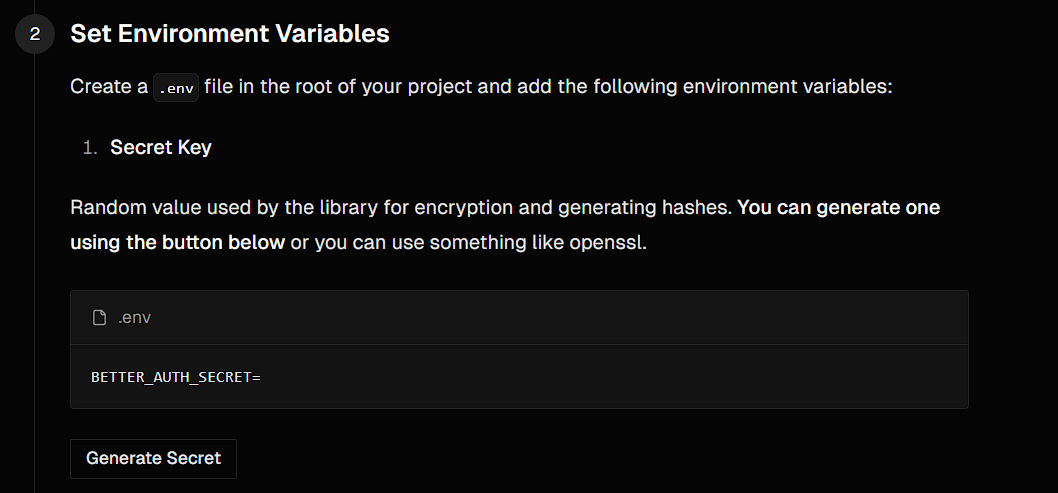
Step 3: Configure environment variables
Copy the generated secret key and add it to your .env file along with the BASE_URL variable, like so:
//.env

BETTER_AUTH_SECRET={secret key}
BASE_URL=http://localhost:3000
Note: This assumes you’ve already created the .env file based on the project structure discussed earlier.
Step 4: Set up Google OAuth
Next, go to the Google Cloud Console and create a new project. Then navigate to:
APIs & Services > Credentials > Authorized redirect URIs
Add the following redirect URI:
http://localhost:3000/api/auth/callback/google
This callback URL will only work during development. For production, be sure to replace localhost with your actual domain.
Configuring the auth provider
The next step is to configure the Google provider in Better Auth. Start by generating a Client ID and Client Secret for your project in the Google Cloud Console: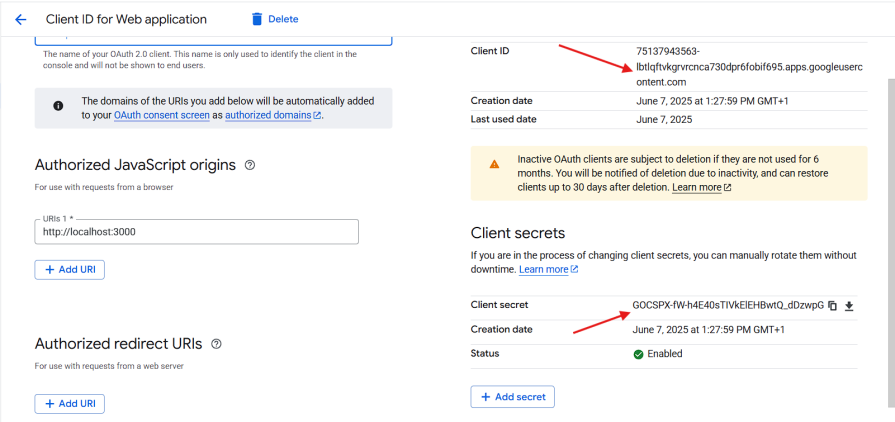
Don’t worry about any exposed keys in this tutorial; these will be revoked before the article goes live.
Once you have these credentials, copy them (i.e Client ID and Client Secret ) from the Google Cloud dashboard and add them to your .env file, alongside the previously added BETTER_AUTH_SECRET and BASE_URL variables:
BETTER_AUTH_SECRET= {secret key}
GOOGLE_CLIENT_ID= {client ID}
GOOGLE_CLIENT_SECRET= {secret key}
BASE_URL=http://localhost:3000
Now that the Google Cloud setup is complete, let’s finish configuring Better Auth. Open the auth.ts file located in the src/lib/server/ directory and add the following code:
import { betterAuth } from "better-auth";
import { reactStartCookies } from "better-auth/react-start";
import { PrismaClient } from "@prisma/client";
import { prismaAdapter } from "better-auth/adapters/prisma";

const prisma = new PrismaClient();

export const auth = betterAuth({
  database: prismaAdapter(prisma, {
    provider: "postgresql",
  }),

  baseURL: process.env.BASE_URL,

  socialProviders: {
    google: {
      clientId: process.env.GOOGLE_CLIENT_ID!,
      clientSecret: process.env.GOOGLE_CLIENT_SECRET!,
    },
  },
  plugins: [reactStartCookies()],
});
Next, open the auth-client.ts file in the same lib directory and add the following:
import { createAuthClient } from "better-auth/react";

const authClient = createAuthClient({
  baseURL: process.env.BASE_URL,
});

export default authClient;
Then, update the file located at routes/api/auth/$ with the following code:
import { createAPIFileRoute } from "@tanstack/react-start/api";
import { auth } from "@/lib/server/auth";

export const APIRoute = createAPIFileRoute("/api/auth/$")({
  GET: ({ request }) => {
    return auth.handler(request);
  },
  POST: ({ request }) => {
    return auth.handler(request);
  },
});
You can learn more about these files and their specific roles in the Better Auth documentation. For now, just keep in mind that they are responsible for instantiating the Better Auth server and client.
At this point, authentication should be fully set up and functional. To test it, you can import the authClient instance into any component and implement basic sign-in and sign-out functionality like this:
  const handleGoogleSignIn = async () => {
    try {
      await authClient.signIn.social({ provider: "google" });
      if (session) {
        onSignInSuccess();
      }
    } catch (err) {
      console.error("Sign in failed:", error);
    }
  };

  const handleSignOut = () => {
    authClient.signOut().then(() => {
      router.invalidate();
    });
  };
However, to keep this article concise, we’ll skip the testing step for now and move on to setting up and integrating a PostgreSQL database using the Prisma adapter.
Setting up a database
Signing in users is just the first step in the authentication process. We also want to store each signed-in user in a database, where we can associate their unique IDs with personalized recipes.
Fortunately, Better Auth makes database integration simple and seamless. It supports multiple databases, including SQL and PostgreSQL, as well as ORMs like Drizzle, Prisma, and others. For this tutorial, we’ll be using the Prisma adapter. You can explore more about supported adapters in the Better Auth documentation.
Step 1: Create a database
Head over to Prisma‘s website and create a new PostgreSQL database. They offer a generous free tier for hobby projects, so you don’t need to worry about costs. Once your database is set up, generate a connection string using your credentials.
Step 2: Add the connection string
Copy the generated connection string and add it to your .env file:
BETTER_AUTH_SECRET= {secret key}
GOOGLE_CLIENT_ID= {client ID}
GOOGLE_CLIENT_SECRET= {secret key}
BASE_URL=http://localhost:3000
DATABASE_URL= {url}
Step 3: Install Prisma
Install Prisma and its required dependencies by running the following command:
npm install @prisma/client@latest @prisma/extension-optimize
Step 4: Generate the Prisma schema
Better Auth requires a schema for each adapter in order to store user data in the database. Run the following command to automatically generate a starter schema:
npx @better-auth/cli generate
If you run into issues with the automatic generation, you can manually set it up:
- Create a
prismadirectory in the root of your project Inside it, create a
schema.prismafileAdd the following schema:
generator client {
  provider = "prisma-client-js"
}

datasource db {
  provider = "postgresql"
  url      = env("DATABASE_URL")
}

model User {
  id            String  @id @default(cuid())
  email         String    @unique
  name          String?
  recipes       Recipe[]
  emailVerified Boolean
  image         String?
  createdAt     DateTime
  updatedAt     DateTime
  sessions      Session[]
  accounts      Account[]

  @@map("user")
}

enum difficultyLevel {
  EASY
  MEDIUM
  HARD
}

model Recipe {
  id           String              @id @default(cuid())
  title        String?
  overview String?
  ingredients  String[]
  steps        String[]
  difficulty   difficultyLevel?
  cookTime     Int?
  isPublic     Boolean          @default(true)
  createdAt    DateTime @default(now())
  authorId     String
  author       User             @relation(fields: [authorId], references: [id])
}

model Session {
  id        String   @id
  expiresAt DateTime
  token     String
  createdAt DateTime
  updatedAt DateTime
  ipAddress String?
  userAgent String?
  userId    String
  user      User     @relation(fields: [userId], references: [id], onDelete: Cascade)

  @@unique([token])
  @@map("session")
}

model Account {
  id                    String    @id
  accountId             String
  providerId            String
  userId                String
  user                  User      @relation(fields: [userId], references: [id], onDelete: Cascade)
  accessToken           String?
  refreshToken          String?
  idToken               String?
  accessTokenExpiresAt  DateTime?
  refreshTokenExpiresAt DateTime?
  scope                 String?
  password              String?
  createdAt             DateTime
  updatedAt             DateTime

  @@map("account")
}

model Verification {
  id         String    @id
  identifier String
  value      String
  expiresAt  DateTime
  createdAt  DateTime?
  updatedAt  DateTime?

  @@map("verification")
}
Then, generate the Prisma client by running:
npx prisma generate
If you used the auto-generation tool (better-auth init prisma), you’ll still need to manually add the Recipe model. To keep things consistent, you can simply replace the generated schema with the version shown above.
Note: You don’t need to worry about connecting the Prisma client to the Better Auth instance inside the auth.ts file; we’ve done this in the previous section.
Step 6: Migrate the schema to your database
Run the following command to push (migrate) the schema to your database:
npx @better-auth/cli migrate
You can verify whether the migration was successful by opening Prisma Studio with the following command:
npx prisma studio
This will open Prisma Studio in a new browser tab. If everything was set up correctly, you should see your models (such as User and Recipe) listed in the sidebar: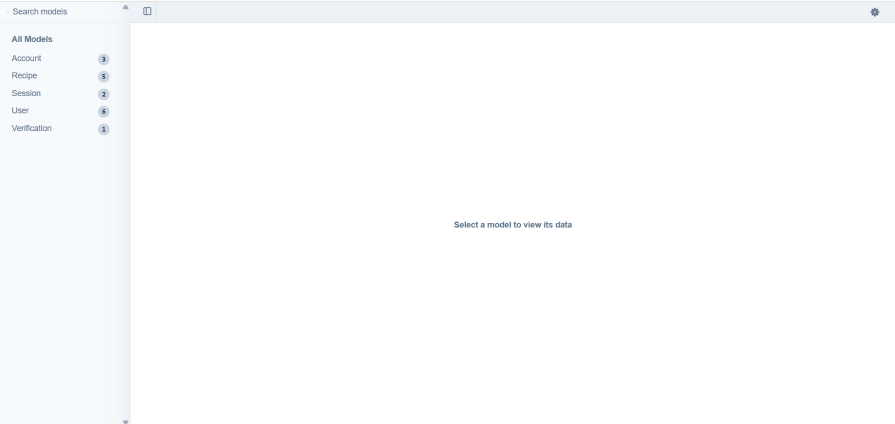
That wraps up the database integration and the core of our application.
Building the UI
We’ll be building the UI using Shadcn, so before going further, you’ll need to first install the packages. Run the following command to do so:
npx shadcn@canary init
Note: Shadcn requires Tailwind CSS to be installed in your project. If Tailwind isn’t already set up, refer to the official Tailwind CSS documentation for installation and configuration instructions.
Creating server functions
To populate the UI components, we’ll need to query the database to either fetch the list of recipes, add new ones, or update and delete existing entries. We’ll use TanStack Start’s createServerFn utility to define server functions that handle these operations seamlessly.
Start by opening the recipes.ts file located in the utils/server-actions directory, and add the following code:
import { PrismaClient, Recipe } from "@prisma/client";
import { getUserID } from "@/lib/auth-server";
import { createServerFn, json } from "@tanstack/react-start";
import { RecipeInput } from "../types";

const prisma = new PrismaClient();

export const getRecipes = createServerFn({ method: "GET" }).handler(
  async () => {
    const recipes = await prisma.recipe.findMany({
      where: { isPublic: true },
    });
    if (!recipes) {
      throw new Error("Failed to fetch recipes");
    }
    return recipes;
  }
);

export const getRecipeById = createServerFn({ method: "GET" })
  .validator((id: string) => id)
  .handler(async ({ data }) => {
    const recipe = await prisma.recipe.findUnique({
      where: { id: data },
      include: {
        author: true,
      },
    });
    if (!recipe) {
      throw new Error(`Recipe with ID ${data} not found`);
    }
    return recipe;
  });

export const getAuthorRecipes = createServerFn({ method: "GET" })
  .validator((authorId: string) => authorId)
  .handler(async ({ data }) => {
    const recipes = await prisma.recipe.findMany({
      where: { authorId: data },
      include: { author: true },
    });
    if (!recipes) {
      throw new Error(`No recipes found for author with ID ${data}`);
    }

    return recipes;
  });

export const createRecipe = createServerFn({ method: "POST" })
  .validator((data: RecipeInput) => data)
  .handler(async ({ data }) => {
    // Ensure the user is authenticated and has an author ID
    const authorId = await getUserID();
    if (!authorId) {
      throw new Error("Author ID is required to create a recipe");
    }

    try {
      const { title, overview, ingredients, steps, difficulty, cookTime } =
        data;
      const newRecipe = await prisma.recipe.create({
        data: {
          title,
          overview,
          ingredients,
          steps,
          difficulty,
          cookTime,
          authorId: authorId,
        },
      });
      if (!newRecipe) {
        throw new Error("Failed to create recipe");
      }
    } catch (error) {
      console.error("Error creating recipe:", error);
      throw new Error("Failed to create recipe");
    }
  });

export const updateRecipe = createServerFn({ method: "POST" })
  .validator((data: Recipe) => data)
  .handler(async ({ data }) => {
    try {
      const {
        id,
        title,
        overview,
        ingredients,
        steps,
        difficulty,
        cookTime,
        isPublic,
      } = data;
      const updatedRecipe = await prisma.recipe.update({
        where: { id },
        data: {
          title,
          overview,
          ingredients,
          steps,
          difficulty,
          cookTime,
          isPublic,
        },
      });
      if (!updatedRecipe) {
        throw new Error(`Failed to update recipe with ID ${id}`);
      }
      return updatedRecipe;
    } catch (error) {
      console.error("Error updating recipe:", error);
      throw new Error("Failed to update recipe");
    }
  });
Here’s a breakdown of the server functions in the code block above:
getRecipes: Queries the Prisma database and returns all recipes where theisPublicfield is set to truegetRecipeById: Retrieves a single recipe based on its uniqueidgetAuthorRecipes: Fetches all recipes created by the currently authenticated useraddRecipe: Adds a new recipe to the database using the provided data (e.g., title, ingredients, instructions, etc.)removeRecipe: Deletes a recipe based on itsid. Typically, this action is restricted to the original authorupdateRecipe: Updates a recipe’s content, such as thetitle,ingredients, orinstructionsupdateRecipePrivacy: Toggles the recipe’s visibility by changing itsisPublicfield
The createServerFn utility also provides a validator method, which allows you to validate the data being passed into your server functions. In the example above, we’re only performing basic type validation for inputs in the POST methods:
.validator((data: RecipeInput) => data)
As a challenge, you can improve this by implementing more sophisticated validation, either manually or by using a schema validation library like Zod, Joi, or Yup. These tools provide stronger guarantees against malformed data and are highly recommended for improving the security and reliability of your server logic.
Now that our server functions are set up and working correctly, we can move on to populating the application pages with data from these functions. But before that, let’s create two important UI components: Header and RecipeCard.
Header and RecipeCard
To create the header component, go to the Header.tsx file in the component directory and add the following code:
// Header.tsx

import { ChefHat, LogOut, Pizza } from "lucide-react";
import { Link, useNavigate, useRouter } from "@tanstack/react-router";

import { Button } from "@/components/ui/button";
import {
  DropdownMenu,
  DropdownMenuContent,
  DropdownMenuItem,
  DropdownMenuSeparator,
  DropdownMenuTrigger,
} from "@/components/ui/dropdown-menu";
import { Avatar, AvatarFallback, AvatarImage } from "@/components/ui/avatar";
import authClient from "@/lib/auth-client";
import { useState } from "react";
import SignInModal from "./sign-in-modal";

export function Header() {
  const { data: session } = authClient.useSession();
  const navigate = useNavigate();
  const router = useRouter();

  const [showSignInModal, setShowSignInModal] = useState(false);

  const handleCreateRecipe = () => {
    if (session) {
      navigate({ to: "/add-recipe" });
    } else {
      setShowSignInModal(true);
    }
  };

  const handleSignInSuccess = () => {
    setShowSignInModal(false);
    navigate({ to: "/add-recipe" });
  };

  const handleSignOut = () => {
    authClient.signOut().then(() => {
      router.invalidate();
    });
  };

  return (
    <header className="sticky mx-auto top-0 z-50 max-w-7xl *: border-b bg-background/95 backdrop-blur supports-[backdrop-filter]:bg-background/60">
      <div className="container flex h-16 items-center justify-between">
        <div className="flex items-center gap-2">
          <Link to="/" className="flex items-center gap-2">
            <ChefHat className="h-6 w-6" />
            <span className="hidden font-bold sm:inline-block">Reciped</span>
          </Link>
        </div>
        <div className="flex items-center gap-4">
          <Button onClick={handleCreateRecipe}>Add Recipe</Button>
          {session && (
            <>
              <DropdownMenu>
                <DropdownMenuTrigger asChild>
                  <Button
                    variant="ghost"
                    className="relative h-8 w-8 rounded-full"
                  >
                    <Avatar className="h-8 w-8">
                      <AvatarImage src={session.user.image || ""} alt="User" />
                      <AvatarFallback>
                        {session.user.name.charAt(0).toUpperCase()}
                      </AvatarFallback>
                    </Avatar>
                  </Button>
                </DropdownMenuTrigger>
                <DropdownMenuContent align="end" className="w-56">
                  <div className="flex items-center justify-start gap-2 p-2">
                    <div className="flex flex-col space-y-1 leading-none">
                      <p className="font-medium">{session.user.name}</p>
                      <p className="text-xs text-muted-foreground">
                        {session.user.email}
                      </p>
                    </div>
                  </div>
                  <DropdownMenuSeparator />
                  <DropdownMenuItem asChild>
                    <Link to="/my-recipes" className="cursor-pointer">
                      <Pizza className="mr-2 h-4 w-4" />
                      <span>My Recipes</span>
                    </Link>
                  </DropdownMenuItem>
                  <DropdownMenuSeparator />
                  <DropdownMenuItem
                    className="cursor-pointer text-destructive focus:text-destructive"
                    onClick={handleSignOut}
                  >
                    <span>Sign out</span>
                  </DropdownMenuItem>
                </DropdownMenuContent>
              </DropdownMenu>
            </>
          )}
          <SignInModal
            open={showSignInModal}
            onOpenChange={setShowSignInModal}
            onSignInSuccess={handleSignInSuccess}
          />
        </div>
      </div>
    </header>
  );
}
This code includes the usual header elements: a logo and a button to add a new recipe. You’ll also notice that we’re using the user session to conditionally render content. If a user session exists, we display the user’s profile image. When the user clicks the “Add Recipe” button, they are either shown a sign-in modal (if not logged in) or redirected to the create-recipe page.
We’ll leave the Header component as it is for now and move on to rendering the recipe cards. These cards will display basic information about each publicly shared recipe.
To get started, open the recipeCard component and add the following code:
import { useState } from "react";
import { MoreVertical, Clock, Edit, Trash2, Lock } from "lucide-react";

import { Badge } from "@/components/ui/badge";
import { Card, CardContent, CardHeader } from "@/components/ui/card";
import { Link } from "@tanstack/react-router";
import { Recipe as prismaRecipe } from "@prisma/client";
import authClient from "@/lib/auth-client";
import { getIngredientName } from "@/utils/stringUtils";
import { difficultyConfig } from "@/utils/config";
import { Avatar, AvatarFallback, AvatarImage } from "@radix-ui/react-avatar";

interface RecipeCardProps {
  recipe: prismaRecipe;
  onEdit?: (id: string) => void;
  onDelete?: (id: string) => void;
  onTogglePrivacy?: (id: string) => void;
}

export default function RecipeCard({
  recipe,
  onDelete,
  onTogglePrivacy,
}: RecipeCardProps) {
  const { data: session } = authClient.useSession();
  const isAuthor = session?.user.id === recipe.authorId;
  const [isDeleting, setIsDeleting] = useState(false);

  const handleDelete = async () => {
    setIsDeleting(true);

    await new Promise((resolve) => setTimeout(resolve, 1000));
    onDelete?.(recipe.id);
    setIsDeleting(false);
  };

  return (
    <Card className="group relative overflow-hidden transition-all hover:shadow-xl border-2 border-border/50 hover:border-border bg-card/50 backdrop-blur-sm h-full">
      <CardHeader className="pb-3">
        <div className="flex items-start justify-between gap-2">
          <div className="flex-1 space-y-3">
            <Link to={`/recipe/${recipe.id}` as string} className="block">
              <h3 className="font-semibold text-lg leading-tight line-clamp-2 hover:text-primary transition-colors">
                {recipe.title}
              </h3>
            </Link>
            <div className="flex items-center gap-2 flex-wrap">
              {recipe.difficulty && (
                <Badge
                  variant="outline"
                  className={difficultyConfig[recipe.difficulty].color}
                >
                  {difficultyConfig[recipe.difficulty].label}
                </Badge>
              )}
              <div className="flex items-center gap-1 text-sm text-muted-foreground">
                <Clock className="h-4 w-4" />
                <span>{recipe.cookTime}</span>
              </div>
            </div>
          </div>

          {isAuthor && (
            <div className="relative h-8 w-8">
              <Avatar className="h-8 w-8">
                <AvatarImage
                  className="rounded-full"
                  src={session.user.image || ""}
                  alt="User"
                />
                <AvatarFallback>
                  {session.user.name.charAt(0).toUpperCase()}
                </AvatarFallback>
              </Avatar>
            </div>
          )}
        </div>
      </CardHeader>

      <CardContent>
        {recipe.ingredients && recipe.ingredients.length > 0 && (
          <div>
            <h4 className="font-medium mb-2 text-sm text-muted-foreground">
              Ingredients
            </h4>
            <div className="flex flex-wrap mb-2 gap-1.5">
              {recipe.ingredients.slice(0, 2).map((ingredient, index) => (
                <Badge
                  key={index}
                  variant="secondary"
                  className="text-xs py-1 px-0 bg-muted/50 hover:bg-muted/70 transition-colors"
                >
                  {getIngredientName(ingredient)}
                </Badge>
              ))}
              {recipe.ingredients.length > 2 && (
                <Badge
                  variant="outline"
                  className="text-xs px-2.5 py-1 bg-primary/10 text-primary hover:bg-primary/20 transition-colors border border-primary/20"
                >
                  +{recipe.ingredients.length - 2} more
                </Badge>
              )}
            </div>
          </div>
        )}
        <div>
          <h4 className="font-medium mb-2 text-sm text-muted-foreground">
            Overview
          </h4>
          <p className="text-sm leading-relaxed line-clamp-4">
            {recipe.overview}
          </p>
          <Link
            to={`/recipes/${recipe.id}` as string}
            className="inline-block mt-3 text-sm text-primary hover:underline"
          >
            Read more →
          </Link>
        </div>
      </CardContent>
    </Card>
  );
}
Next, go to the main index.tsx file and add the following code:
import { createFileRoute, redirect } from "@tanstack/react-router";
import authClient from "@/lib/auth-client";
import { getUserID } from "@/lib/auth-server";
import { getRecipes } from "@/utils/serverActions/recipes";
import RecipeCard from "@/components/recipe-card";

export const Route = createFileRoute("/")({
  component: Home,
  beforeLoad: async () => {
    const userID = await getUserID();
    return {
      userID,
    };
  },
  loader: async () => {
    const recipes = await getRecipes();
    if (!recipes) {
      throw new Error("Failed to fetch recipes");
    }
    return recipes;
  },
});

function Home() {
  const recipes = Route.useLoaderData();

  return (
    <div className="min-h-screen flex flex-col max-w-7xl mx-auto">
      <main className="flex-1 container py-8">
        <div className="mb-8">
          <h1 className="text-3xl font-bold mb-2">Featured Recipes</h1>
          <p className="text-muted-foreground">
            Discover delicious recipes from our community.
          </p>
        </div>
        <div className="grid grid-cols-1 md:grid-cols-2 lg:grid-cols-3 gap-6">
          {recipes.map((recipe: any) => (
            <RecipeCard key={recipe.id} recipe={recipe} />
          ))}
        </div>
      </main>
    </div>
  );
}
Here, we call the getRecipes server function to fetch the list of publicly shared recipes from the database. We then iterate over the results and pass the necessary props to the RecipeCard component to render each recipe.
At this point, if you return to your browser, you should see a list of recipe cards, provided you’ve either seeded your database or manually added some entries using Prisma Studio: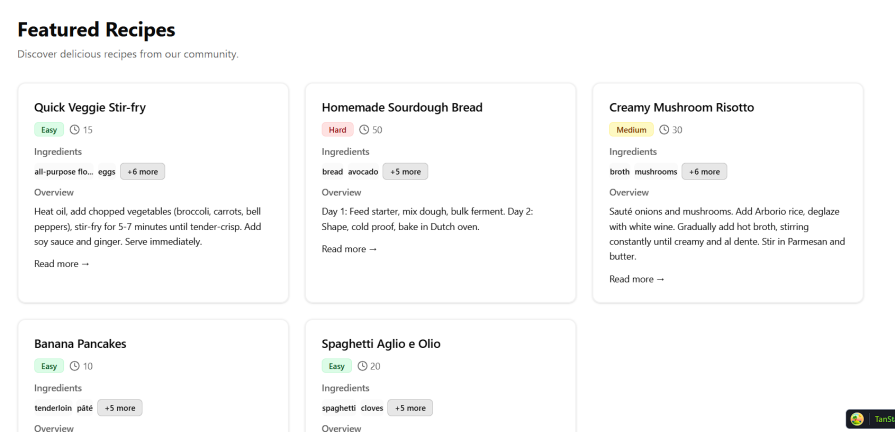
Notice how we still aren’t rendering the Header component. That’s because we need to include it at the layout level so that it appears consistently across all pages in the application.
To do this, navigate to the routes/_root.tsx file. Then, import the Header.tsx component and include it in the layout like so:
// _root.tsx

import { Header } from "@/components/Header";
...
function RootDocument({ children }: { children: React.ReactNode }) {
  return (
    <html>
      <head>
        <HeadContent />
      </head>
      <body className="">
        <Header />
        <hr />
        {children}
        <TanStackRouterDevtools position="bottom-right" />
        <Scripts />
      </body>
    </html>
  );
}
With this setup, the Header component should now render correctly across all pages of the application: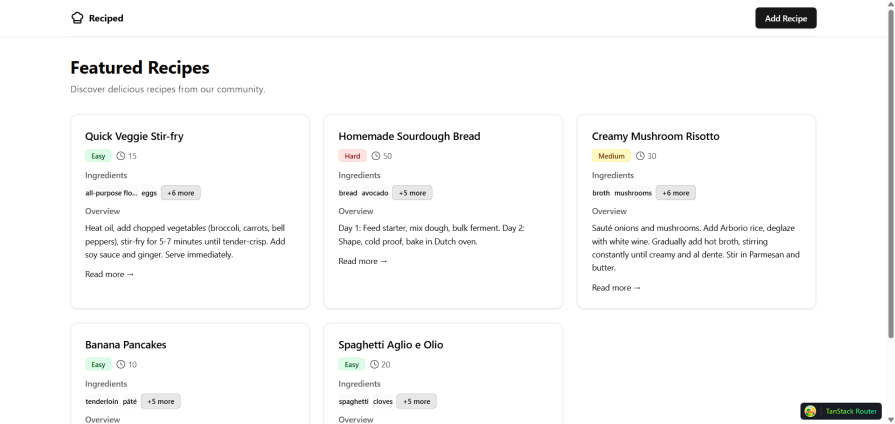
To make the Add Recipe button on the Header component work as expected (i.e. to display a sign-in modal if a user isn’t authenticated), we need to create the modal component.
To do this, go to the signInModal.tsx within the component/ folder and add the following code:
// signinModal.tsx

import {
  Dialog,
  DialogContent,
  DialogDescription,
  DialogHeader,
  DialogTitle,
} from "@/components/ui/dialog";
import { Button } from "@/components/ui/button";
import authClient from "@/lib/auth-client";

interface SignInModalProps {
  open: boolean;
  onOpenChange: (open: boolean) => void;
  onSignInSuccess: () => void;
}

export default function SignInModal({
  open,
  onOpenChange,
  onSignInSuccess,
}: SignInModalProps) {
  const { data: session, isPending, error } = authClient.useSession();

  const handleGoogleSignIn = async () => {
    try {
      await authClient.signIn.social({ provider: "google" });
      if (session) {
        onSignInSuccess();
      }
    } catch (err) {
      console.error("Sign in failed:", error);
    }
  };

  return (
    <Dialog open={open} onOpenChange={onOpenChange}>
      <DialogContent className="sm:max-w-md">
        <DialogHeader>
          <DialogTitle>Sign in to create recipes</DialogTitle>
          <DialogDescription>
            You need to be signed in to create and manage your recipes. Sign in
            with your Google account to get started.
          </DialogDescription>
        </DialogHeader>

        <div className="flex flex-col gap-4 py-4">
          <Button
            onClick={handleGoogleSignIn}
            disabled={isPending}
            className="w-full"
            size="lg"
          >
            <img src="/google.svg" alt="Logo" className="w-5 h-5" />
            {isPending ? "Signing in..." : "Continue with Google"}
          </Button>

          <p className="text-xs text-muted-foreground text-center">
            By signing in, you agree to our Terms of Service and Privacy Policy.
          </p>
        </div>
      </DialogContent>
    </Dialog>
  );
}
In this code, we use the handleGoogleSignIn function to trigger authentication with the Google provider via Better Auth.
Now, when a user clicks the “Add Recipe” button, the modal will appear and guide them through the authentication process:
At this point, it would make sense to create the single recipe page (a dynamic route), since we’ve already implemented the recipe cards. However, because we’re using a file-based routing system, building an edit-recipe page for each recipe would require nesting it inside the individual dynamic route.
To keep things organized, we’ll hold off on setting up the dynamic pages until we build out the full CRUD functionality.
Creating the CRUD pages
Technically, we only need to create the pages for adding and updating recipe records, as well as the single recipe page for each recipe. Since we’re already reading from the database and rendering recipe cards on the homepage, that part of the logic is complete, leaving us with just the Create, Update, and Delete portions of CRUD to implement.
add-recipe page
We’ll begin by creating the add-recipe page. This page will contain a form with dynamic fields, similar to the edit-recipe page. However, there will be a few key differences in functionality and behavior.
To get started, navigate to the add-recipe folder inside the routes/ directory and add the following code:
import {
  createFileRoute,
  Link,
  redirect,
  useNavigate,
} from "@tanstack/react-router";

import type React from "react";

import { useState } from "react";

import { ArrowLeft, Plus, X } from "lucide-react";

import { Button } from "@/components/ui/button";
import { Input } from "@/components/ui/input";
import { Label } from "@/components/ui/label";
import { Textarea } from "@/components/ui/textarea";
import {
  Select,
  SelectContent,
  SelectItem,
  SelectTrigger,
  SelectValue,
} from "@/components/ui/select";
import { Card, CardContent, CardHeader, CardTitle } from "@/components/ui/card";
import { Badge } from "@/components/ui/badge";
import { getUserID } from "@/lib/auth-server";
import { createRecipe } from "@/utils/serverActions/recipes";
import { difficultyLevel } from "@/utils/config";
import { useFormField } from "@/hooks/useFormField";

export const Route = createFileRoute("/add-recipe/")({
  component: RouteComponent,
  beforeLoad: async () => {
    const userID = await getUserID();
    return {
      userID,
    };
  },
  loader: async ({ context: ctx }) => {
    // Ensure the user is authenticated
    if (!ctx.userID) {
      throw redirect({ to: "/" });
    }
  },
});

function RouteComponent() {
  const navigate = useNavigate();
  const [isSubmitting, setIsSubmitting] = useState(false);

  const [formData, setFormData] = useState({
    title: "",
    difficulty: difficultyLevel.EASY,
    cookTime: "",
    overview: "",
  });

  const [ingredients, setIngredients] = useState<string[]>([""]);
  const [steps, setSteps] = useState<string[]>([""]);

  const {
    addIngredient,
    removeIngredient,
    updateIngredient,
    addStep,
    removeStep,
    updateStep,
  } = useFormField(setIngredients, setSteps, steps, ingredients);

  const handleSubmit = async (e: React.FormEvent) => {
    e.preventDefault();
    setIsSubmitting(true);

    try {
      await createRecipe({
        data: {
          ...formData,
          cookTime: formData.cookTime ? Number(formData.cookTime) : null,
          ingredients: ingredients.filter((i) => i.trim()),
          steps: steps.filter((s) => s.trim()),
        },
      });

      navigate({ to: "/" });
    } catch (error) {
      console.error("Failed to add recipe:", error);
    } finally {
      setIsSubmitting(false);
    }
  };

  const isFormValid =
    formData.title &&
    formData.difficulty &&
    formData.cookTime &&
    ingredients.some((i) => i.trim()) &&
    steps.some((s) => s.trim());

  return (
    <div className="min-h-screen flex flex-col">
      <main className="flex-1 container py-8">
        <div className="max-w-4xl mx-auto">
          {/* Header */}
          <div className="flex items-center gap-4 mb-6">
            <Button variant="ghost" size="sm" asChild>
              <Link to="/">
                <ArrowLeft className="h-4 w-4 mr-2" />
                Back to Recipes
              </Link>
            </Button>
          </div>

          <div className="mb-8">
            <h1 className="text-3xl font-bold mb-2">Add New Recipe</h1>
            <p className="text-muted-foreground">
              Share your delicious recipe with the community.
            </p>
          </div>

          <form onSubmit={handleSubmit} className="space-y-8">
            {/* Basic Information */}
            <Card>
              <CardHeader>
                <CardTitle>Basic Information</CardTitle>
              </CardHeader>
              <CardContent className="space-y-4">
                <div className="space-y-2">
                  <Label htmlFor="title">Recipe Title</Label>
                  <Input
                    id="title"
                    placeholder="Enter recipe title..."
                    value={formData.title ?? ""}
                    onChange={(e) =>
                      setFormData({ ...formData, title: e.target.value })
                    }
                    required
                  />
                </div>

                <div className="grid grid-cols-1 md:grid-cols-2 gap-4">
                  <div className="space-y-2">
                    <Label htmlFor="difficulty">Difficulty</Label>
                    <Select
                      value={formData.difficulty ?? ""}
                      onValueChange={(value) =>
                        setFormData({
                          ...formData,
                          difficulty: value as difficultyLevel,
                        })
                      }
                      required
                    >
                      <SelectTrigger>
                        <SelectValue placeholder="Select difficulty" />
                      </SelectTrigger>
                      <SelectContent>
                        <SelectItem value="EASY">Easy</SelectItem>
                        <SelectItem value="MEDIUM">Medium</SelectItem>
                        <SelectItem value="HARD">Hard</SelectItem>
                      </SelectContent>
                    </Select>
                  </div>

                  <div className="space-y-2">
                    <Label htmlFor="cookTime">Cook Time</Label>
                    <Input
                      id="cookTime"
                      placeholder="e.g., 30 min"
                      value={formData.cookTime ?? ""}
                      onChange={(e) =>
                        setFormData({
                          ...formData,
                          cookTime: e.target.value,
                        })
                      }
                      required
                    />
                  </div>
                </div>

                <div className="space-y-2">
                  <Label htmlFor="overview">Quick overview</Label>
                  <Textarea
                    id="overview"
                    placeholder="Brief overview of the recipe..."
                    value={formData.overview ?? ""}
                    onChange={(e) =>
                      setFormData({ ...formData, overview: e.target.value })
                    }
                    rows={3}
                  />
                </div>
              </CardContent>
            </Card>

            {/* Ingredients */}
            <Card>
              <CardHeader>
                <div className="flex items-center justify-between">
                  <CardTitle>Ingredients</CardTitle>
                  <Button
                    type="button"
                    variant="outline"
                    size="sm"
                    onClick={addIngredient}
                  >
                    <Plus className="h-4 w-4 mr-2" />
                    Add Ingredient
                  </Button>
                </div>
              </CardHeader>
              <CardContent className="space-y-3">
                {ingredients.map((ingredient, index) => (
                  <div key={index} className="flex gap-2">
                    <Input
                      placeholder={`Ingredient ${index + 1}...`}
                      value={ingredient}
                      onChange={(e) => updateIngredient(index, e.target.value)}
                      className="flex-1"
                    />
                    {ingredients.length > 1 && (
                      <Button
                        type="button"
                        variant="ghost"
                        size="sm"
                        onClick={() => removeIngredient(index)}
                      >
                        <X className="h-4 w-4" />
                      </Button>
                    )}
                  </div>
                ))}
              </CardContent>
            </Card>

            {/* Steps */}
            <Card>
              <CardHeader>
                <div className="flex items-center justify-between">
                  <CardTitle>Steps</CardTitle>
                  <Button
                    type="button"
                    variant="outline"
                    size="sm"
                    onClick={addStep}
                  >
                    <Plus className="h-4 w-4 mr-2" />
                    Add Step
                  </Button>
                </div>
              </CardHeader>
              <CardContent className="space-y-3">
                {steps.map((step, index) => (
                  <div key={index} className="flex gap-2">
                    <Badge variant="outline" className="mt-2 flex-shrink-0">
                      {index + 1}
                    </Badge>
                    <Textarea
                      placeholder={`Step ${index + 1}...`}
                      value={step}
                      onChange={(e) => updateStep(index, e.target.value)}
                      className="flex-1"
                      rows={2}
                    />
                    {steps.length > 1 && (
                      <Button
                        type="button"
                        variant="ghost"
                        size="sm"
                        onClick={() => removeStep(index)}
                        className="mt-2"
                      >
                        <X className="h-4 w-4" />
                      </Button>
                    )}
                  </div>
                ))}
              </CardContent>
            </Card>

            {/* Submit */}
            <div className="flex gap-4">
              <Button
                type="submit"
                disabled={!isFormValid || isSubmitting}
                className="flex-1 md:flex-none"
              >
                {isSubmitting ? "Adding Recipe..." : "Add Recipe"}
              </Button>
              <Button type="button" variant="outline" asChild>
                <Link to="/">Cancel</Link>
              </Button>
            </div>
          </form>
        </div>
      </main>
    </div>
  );
}
The JSX code for the form is fairly straightforward, and the formData state should be easy to follow. The only potentially confusing part is the handleSubmit function:
const handleSubmit = async (e: React.FormEvent) => {
    e.preventDefault();
    setIsSubmitting(true);

    try {
      await new Promise((resolve) => setTimeout(resolve, 2000));

      await createRecipe({
        data: {
          ...formData,
          cookTime: formData.cookTime ? Number(formData.cookTime) : null,
          ingredients: ingredients.filter((i) => i.trim()),
          steps: steps.filter((s) => s.trim()),
        },
      });
      console.log("Recipe added:", {});

      navigate({ to: "/" });
    } catch (error) {
      console.error("Failed to add recipe:", error);
    } finally {
      setIsSubmitting(false);
    }
  };
Since the ingredients and steps arrays are managed as separate states, we need to construct a new data object that combines all the necessary fields into a single payload, including those from the formData state.
You’ll also notice that we’re explicitly overriding the cookTime value. This ensures it is cast to a number, as required by the database schema.
At this point, the page should render something like this in your browser: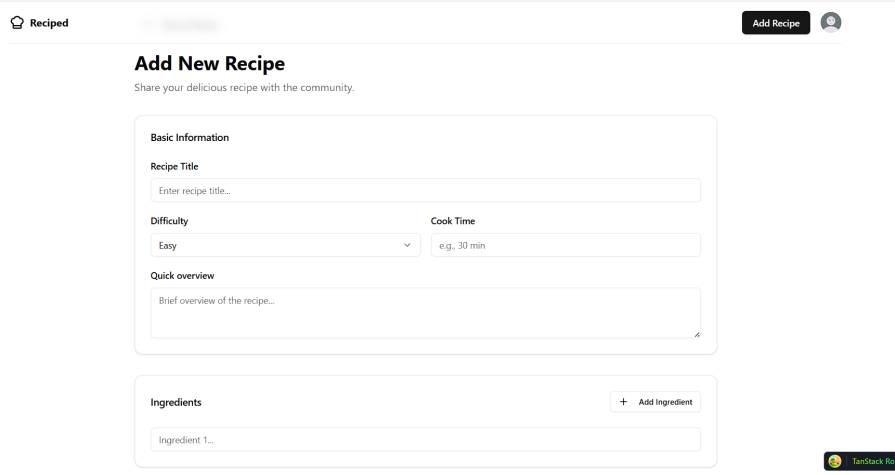
Edit-recipe page
As mentioned earlier, the content of both pages is quite similar, so the code for the edit-recipe page will largely mirror the add-recipe page. As a result, we removed identical code in the code block below. You should just copy the code in the add-recipe and only use the code below to make necessary changes:
export const Route = createFileRoute("/recipe/$id/edit-recipe/")({
  component: RouteComponent,
  beforeLoad: async () => {
    const userID = await getUserID();
    return {
      userID,
    };
  },
  loader: async ({ params, context: ctx }) => {
    // Ensure the user is authenticated
    ...

    // Validate that the recipe ID is provided
    const { id } = params;
    if (!id) {
      throw new Error("Recipe ID is required");
    }

    const recipe = await getRecipeById({
      data: id,
    });

    return { id, recipe };
  },
});

function RouteComponent() {
  const navigate = useNavigate();
  const { id, recipe } = Route.useLoaderData();

  const [isSubmitting, setIsSubmitting] = useState(false);
  const [formData, setFormData] = useState({
    ...recipe,
  });

  const [ingredients, setIngredients] = useState<string[]>([
    ...recipe.ingredients,
  ]);
  const [steps, setSteps] = useState<string[]>([...recipe.steps]);

    // Destructure helper functions from `useFormField`
    ...

  const handleSubmit = async (e: React.FormEvent) => {
    e.preventDefault();
    setIsSubmitting(true);

    try {
      await new Promise((resolve) => setTimeout(resolve, 1000));
      await updateRecipe({
        data: {
          ...formData,
          ingredients: ingredients.filter((i) => i.trim()),
          steps: steps.filter((s) => s.trim()),
        },
      });

      navigate({ to: `/recipe/${id}` });
    } catch (error) {
      console.error("Failed to create recipe:", error);
    } finally {
      setIsSubmitting(false);
    }
  };

   // Form input validation check
   ...

  return (
    <div className="min-h-screen flex flex-col">
      <main className="flex-1 container py-8">
        <div className="max-w-4xl mx-auto">
          {/* Header */}
          <div className="flex items-center gap-4 mb-6">
            <Button variant="ghost" size="sm" asChild>
              <Link to="/recipe/$id" params={{ id }}>
                <ArrowLeft className="h-4 w-4 mr-2" />
                Back to {recipe.title?.slice(0, 15)}
              </Link>
            </Button>
          </div>

          <div className="mb-8">
            <h1 className="text-3xl font-bold mb-2">Edit Recipe</h1>
            <p className="text-muted-foreground">
              Update the "<i>{recipe.title}</i>" recipe details.
            </p>
          </div>

          <form onSubmit={handleSubmit} className="space-y-8">
            {/* Basic Information */}
            <Card>
              <CardHeader>
                <CardTitle>Basic Information</CardTitle>
              </CardHeader>
              <CardContent className="space-y-4">
                <div className="space-y-2">
                  <Label htmlFor="title">Recipe Title</Label>
                  <Input
                    id="title"
                    placeholder="Enter recipe title..."
                    value={formData.title ?? ""}
                    onChange={(e) =>
                      setFormData({ ...formData, title: e.target.value })
                    }
                    required
                  />
                </div>

                <div className="grid grid-cols-1 md:grid-cols-2 gap-4">
                  <div className="space-y-2">
                    <Label htmlFor="difficulty">Difficulty</Label>
                    <Select
                      value={
                        formData.difficulty?.toLocaleLowerCase() ?? "Medium"
                      }
                      onValueChange={(value) =>
                        setFormData({
                          ...formData,
                          difficulty: value as typeof formData.difficulty,
                        })
                      }
                      required
                    >
                      <SelectTrigger>
                        <SelectValue placeholder="Select difficulty" />
                      </SelectTrigger>
                      <SelectContent>
                        <SelectItem value="easy">Easy</SelectItem>
                        <SelectItem value="medium">Medium</SelectItem>
                        <SelectItem value="hard">Hard</SelectItem>
                      </SelectContent>
                    </Select>
                  </div>

                  <div className="space-y-2">
                    <Label htmlFor="cookTime">Cook Time</Label>
                    <Input
                      id="cookTime"
                      placeholder="e.g., 30 min"
                      value={formData.cookTime ?? ""}
                      onChange={(e) =>
                        setFormData({
                          ...formData,
                          cookTime: Number(e.target.value),
                        })
                      }
                      required
                    />
                  </div>
                </div>

                <div className="space-y-2">
                  <Label htmlFor="overview">Quick overview</Label>
                // Quick overview textarea
                ...
                </div>
              </CardContent>
            </Card>

            {/* Ingredients */}
            <Card>
              <CardHeader>
            // Ingredient field section
            ...
              </CardContent>
            </Card>

            {/* Steps */}
            <Card>
              <CardHeader>
            // Steps field section
            ...
              </CardContent>
            </Card>

            {/* Submit */}
            <div className="flex gap-4">
              <Button
                type="submit"
                disabled={!isFormValid || isSubmitting}
                className="flex-1 md:flex-none"
              >
                {isSubmitting ? "Updating Recipe..." : "Update Recipe"}
              </Button>
              <Button type="button" variant="outline" asChild>
                <Link to="/">Cancel</Link>
              </Button>
            </div>
          </form>
        </div>
      </main>
    </div>
  );
}
The main difference here is that we’re using the params parameter of the loader callback to retrieve the dynamic route parameter, id, which represents the selected recipe’s ID. This id is then passed to the getRecipeById server function to fetch the corresponding recipe data.
Another important difference is how we handle initial state values. Instead of initializing form fields with empty strings or arrays (as we did on the add-recipe page), we populate them with the existing recipe data. This pre-fills the form with the current details, making it easy for users to update and resubmit the recipe:
Single recipe page
Lastly, we’ll create a single recipe page, a dynamic route that displays detailed information about a specific recipe. From this page, users will also be able to navigate to the edit-recipe page and perform additional actions, such as deleting a recipe or toggling its privacy status.
In TanStack Start, dynamic route parameters are represented using the $ symbol. This is why we have a $ folder inside the recipe/ route directory, which maps to dynamic paths like /recipe/:id.
└── recipe/
│   │       └── $id/
│   │           ├── index.tsx
With this folder structure, TanStack Start automatically generates a dynamic route at /recipe/$id, where $id represents the dynamic path parameter. For example, visiting /recipe/1 would provide the route parameter { id: '1' }.
We can then use this id to fetch and display the corresponding recipe details from the database, similar to what we did in the edit-recipe page.
I wanted to clarify this upfront to prevent any potential confusion. For a deeper understanding of routing in TanStack Start, you can always refer to the official TanStack Start documentation.
Now, let’s move forward. Open the index.tsx file inside the /recipe/$id directory and add the following code to implement the single recipe page:
import { Button } from "@/components/ui/button";
import { Badge } from "@/components/ui/badge";
import { Card, CardContent, CardHeader, CardTitle } from "@/components/ui/card";
import {
  DropdownMenu,
  DropdownMenuContent,
  DropdownMenuItem,
  DropdownMenuSeparator,
  DropdownMenuTrigger,
} from "@/components/ui/dropdown-menu";
import { createFileRoute, Link } from "@tanstack/react-router";
import {
  Trash2,
  ArrowLeft,
  Clock,
  Edit,
  Lock,
  MoreVertical,
} from "lucide-react";
import { difficultyConfig } from "@/utils/config";
import { getRecipeById } from "@/utils/serverActions/recipes";
import authClient from "@/lib/auth-client";

export const Route = createFileRoute("/recipe/$id/")({
  component: RouteComponent,
  loader: async ({ params }) => {
    const { id } = params;
    const recipe = getRecipeById({
      data: id,
    });
    return recipe;
  },
});

function RouteComponent() {
  const recipe = Route.useLoaderData();

  const { data: session } = authClient.useSession();
  const isAuthor = session?.user.id === recipe.authorId;

  return (
    <div className="min-h-screen flex flex-col">
      <main className="flex-1 container py-8">
        <div className="max-w-4xl mx-auto">
          {/* Header */}
          <div className="flex items-center gap-4 mb-6">
            <Button variant="ghost" size="sm" asChild>
              <Link to="/">
                <ArrowLeft className="h-4 w-4 mr-2" />
                Back to Recipes
              </Link>
            </Button>
          </div>

          {/* Recipe Header */}
          <div className="flex items-start justify-between gap-4 mb-8">
            <div className="flex-1">
              <h1 className="text-3xl font-bold mb-4">{recipe.title}</h1>
              <div className="flex items-center gap-4 flex-wrap">
                <Badge
                  variant="outline"
                  className={
                    recipe.difficulty
                      ? difficultyConfig[recipe.difficulty].color
                      : ""
                  }
                >
                  {recipe.difficulty
                    ? difficultyConfig[recipe.difficulty].label
                    : ""}
                </Badge>
                <div className="flex items-center gap-1 text-muted-foreground">
                  <Clock className="h-4 w-4" />
                  <span>{recipe.cookTime}</span>
                </div>
                {isAuthor && !recipe.isPublic && (
                  <Badge
                    variant="outline"
                    className="bg-gray-100 text-gray-600"
                  >
                    <Lock className="mr-1 h-3 w-3" />
                    Private
                  </Badge>
                )}
              </div>
              <p className="text-sm text-muted-foreground mt-2">
                Created by {recipe.author.name} on{" "}
                {new Date(recipe.createdAt).toLocaleDateString()}
              </p>
            </div>

            {isAuthor && (
              <div className="flex items-center gap-2">
                <Button asChild>
                  <Link to="/recipe/$id/edit-recipe" params={{ id: recipe.id }}>
                    <Edit className="h-4 w-4 mr-2" />
                    Edit Recipe
                  </Link>
                </Button>

                <DropdownMenu>
                  <DropdownMenuTrigger asChild>
                    <Button variant="outline" size="sm">
                      <MoreVertical className="h-4 w-4" />
                    </Button>
                  </DropdownMenuTrigger>
                  <DropdownMenuContent align="end" className="w-48">
                    <DropdownMenuItem className="cursor-pointer">
                      <Lock className="mr-2 h-4 w-4" />
                      {recipe.isPublic ? "Make Public" : "Make Private"}
                    </DropdownMenuItem>
                    <DropdownMenuSeparator />
                    <DropdownMenuItem className="cursor-pointer text-destructive focus:text-destructive">
                      <Trash2 className="mr-2 h-4 w-4" />
                      Delete Recipe
                    </DropdownMenuItem>
                  </DropdownMenuContent>
                </DropdownMenu>
              </div>
            )}
          </div>

          <div className="grid grid-cols-1 lg:grid-cols-3 gap-8">
            {/* Ingredients */}
            <div className="lg:col-span-1">
              <Card>
                <CardHeader>
                  <CardTitle>Ingredients</CardTitle>
                </CardHeader>
                <CardContent>
                  <ul className="space-y-2">
                    {recipe.ingredients?.map((ingredient, index) => (
                      <li
                        key={index}
                        className="text-sm flex items-start gap-2"
                      >
                        <span className="w-2 h-2 bg-primary rounded-full mt-2 flex-shrink-0" />
                        {ingredient}
                      </li>
                    ))}
                  </ul>
                </CardContent>
              </Card>
            </div>

            {/* Instructions */}
            <div className="lg:col-span-2">
              <Card>
                <CardHeader>
                  <CardTitle>Instructions</CardTitle>
                </CardHeader>
                <CardContent>
                  <ol className="space-y-4">
                    {recipe.steps?.map((step, index) => (
                      <li key={index} className="flex gap-4">
                        <span className="flex-shrink-0 w-6 h-6 bg-primary text-primary-foreground rounded-full flex items-center justify-center text-sm font-medium">
                          {index + 1}
                        </span>
                        <p className="text-sm leading-relaxed pt-0.5">{step}</p>
                      </li>
                    ))}
                  </ol>
                </CardContent>
              </Card>
            </div>
          </div>
        </div>
      </main>
    </div>
  );
}
What we’re doing here is essentially the same as in the edit-recipe page. We extract the id from the params object and use it to fetch a single recipe record from the database. The key difference is that, instead of populating form fields for editing, we’re simply rendering the recipe details directly on the page for viewing.
Note: To keep this article focused, I’ve omitted the helper functions, custom Hooks, and types that support these pages. You can find them in the project repository under the utils and hooks directories. Specifically, look into the config.ts, stringUtils.ts, and useFormField.ts files, along with other utilities in the hooks folder.
If everything has been set up correctly, your page should now look similar to the screenshot below: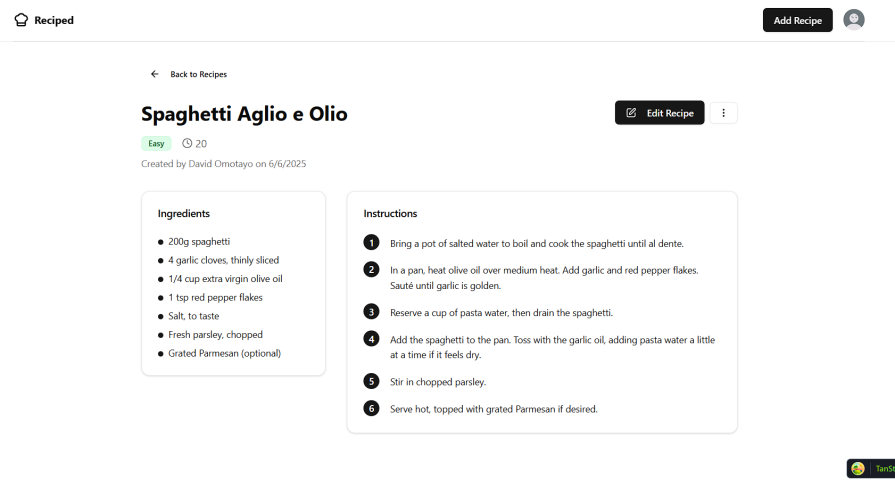
That’s it; our application is now fully set up and ready to use! But before we wrap up, there’s one more important detail to address: our routes aren’t yet protected.
The UI alone isn’t enough to keep malicious actors out of pages they shouldn’t access. For example, if someone obtains a recipe ID, they could directly navigate to the edit page and make unauthorized changes to the database, as shown in the GIF below: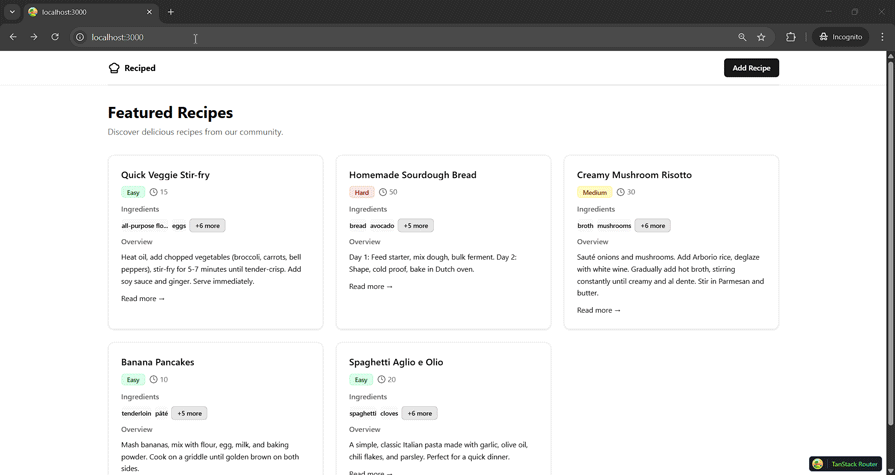
Protecting routes
Like many modern frameworks, route protection in TanStack Start can be handled through middleware. Unlike frameworks where middleware contains the full authentication logic, in TanStack Start, middleware mainly serves to retrieve the user’s context, specifically the user’s id.
This context is then passed to the page’s loader function, where we can check whether the user is authenticated.
If you look back at the add-recipe and edit-recipe pages, you’ll notice the following snippet inside their loader callbacks:
beforeLoad: async () => {
    const userID = await getUserID();
    return {
      userID,
    };
  },
  loader: async ({ context: ctx }) => {
    if (!ctx.userID) {
      throw redirect({ to: "/" });
    }
  },
This code does exactly what we just discussed. It retrieves the user id from the middleware context using the getUserID function before the page loads, which is the purpose of the beforeLoad callback.
The ID is then made available in the loader callback via the context parameter, where we check whether it exists. If it doesn’t, the user is redirected to the homepage.
As you can see, the implementation is fairly straightforward. However, for it to work correctly, we first need to define the context. To do that, open the auth-server.ts file inside the lib/ directory and add the following code:
import { createServerFn } from "@tanstack/react-start";

export const getUserID = createServerFn({ method: "GET" })
  .handler(async ({ context }) => {
    return context?.user?.id;
  });
This is the implementation of the getUserID function we used in the beforeLoad callback. Its sole purpose is to extract the user’s ID from the context. However, at this stage, it doesn’t yet have access to the context.
To fix that, the next step is to set up the middleware that defines the context. Open the auth-middleware.ts file and add the following code:
import { getHeaders } from "@tanstack/react-start/server";
import { createMiddleware } from "@tanstack/react-start";
import authClient from "./auth-client";

const { getSession } = authClient;

export const authMiddleware = createMiddleware().server(async ({ next }) => {
  const { data: session } = await getSession({
    fetchOptions: {
      headers: getHeaders() as HeadersInit,
    },
  });
  return await next({
    context: {
      user: {
        id: session?.user?.id,
        name: session?.user?.name,
        image: session?.user?.image,
      },
    },
  });
});
Now that we have our context set up, we can pass it to the server function as needed:
import { createServerFn } from "@tanstack/react-start";
import { authMiddleware } from "./auth-middleware";

export const getUserID = createServerFn({ method: "GET" })
  .middleware([authMiddleware])
  .handler(async ({ context }) => {
    return context?.user?.id;
  });
Since we’ve already implemented the necessary checks in the loader callbacks for both the add-recipe and edit-recipe pages, users who log out while on a protected route will automatically be redirected to the homepage, as shown in the GIF below:
Note: For this automatic redirection to work, the session needs to be invalidated through the router, just like we did in the handleSignOut function inside the Header.tsx file.
const handleSignOut = () => {
    authClient.signOut().then(() => {
      router.invalidate();
    });
  };
Conclusion
We’ve covered a lot in this article, and I hope it’s given you a solid understanding of how TanStack Start works in practice. Together, we’ve built the core functionality of our application, from authentication and database integration to UI components and route protection. But the project is still a work in progress.
Key features such as recipe deletion, a My Recipes page, and the ability to toggle a recipe’s privacy status are still missing. To deepen your understanding of TanStack Start and put what you’ve learned into practice, I encourage you to try implementing these features on your own.
If you get stuck or want to dive deeper, you can find the complete source code on my GitHub repository.
Happy hacking!
The post A step-by-step guide to building a full-stack app with TanStack Start appeared first on LogRocket Blog.
This post first appeared on Read More