Managing user interactions becomes increasingly important as frontend applications scale. Attaching an event listener to every interactive element is a poor practice because it can lead to tangled code, higher memory consumption, and performance bottlenecks. That’s where event delegation comes in.
Every interactive web page is built on the Document Object Model (DOM) and its event system. When you click a button, type into an input, or hover over an image, an event is triggered. But it doesn’t just happen in isolation, it travels through the DOM tree in a process called event propagation.
For developers building modern web applications, understanding event delegation isn’t just “nice to have”, it’s essential. Here’s why:
- Enhances efficiency – Hundreds or thousands of individual event listeners can drain memory and CPU. Event delegation centralizes handling, improving responsiveness and reducing overhead
- Minimizes complexity – Handling events in one place makes the codebase cleaner, easier to navigate, and simpler to debug, without obscure listeners scattered everywhere
- Maintains functionality – Event delegation seamlessly supports dynamically added elements. Your application stays responsive, even as the DOM updates in real time
Understanding DOM event propagation
Before we dive into delegation, it’s important to understand how events travel through the DOM. This journey, known as event propagation unfolds in three distinct phases.
The three phases
When an event is triggered on a DOM element, it doesn’t simply reach the target and stop. Instead, it passes through these stages:
- Capturing phase – The journey starts at the
windowlevel, moving down the DOM tree through each ancestor element until it reaches the target’s parent. Event listeners withuseCapture = true(the third argument inaddEventListener) are triggered here - Target phase – At this stage, the event reaches the intended target element. All listeners directly attached to this element are fired
- Bubbling phase – After hitting the target, the event “bubbles” back up the DOM, from the target’s parent to its grandparent, and so on, until it reaches the
window. By default, most event listeners operate in this phase
You can read a comprehensive article that unpacks how event propagation works in vanilla JavaScript.
How events flow in the DOM tree
<div id="grandparent">
  <div id="parent">
    <button id="child">Click Me</button>
  </div>
</div>
If you click the <button id="child">, here’s the flow of a click event:
- Capturing –
window->document-><html>-><body>-><div id="grandparent">-><div id="parent"> - Target –
<button id="child"> - Bubbling –
<button id="child">-><div id="parent">-><div id="grandparent">-><body>-><html>->document->window
We can inspect the event phase using event.eventPhase:
const grandparent = document.getElementById('grandparent');
const parent = document.getElementById('parent');
const child = document.getElementById('child');

grandparent.addEventListener('click', (event) => {
  console.log('Grandparent - Phase:', event.eventPhase, 'Target:', event.target.id);
}, true); // Capturing phase

parent.addEventListener('click', (event) => {
  console.log('Parent - Phase:', event.eventPhase, 'Target:', event.target.id);
}, true); // Capturing phase

child.addEventListener('click', (event) => {
  console.log('Child - Phase:', event.eventPhase, 'Target:', event.target.id);
}); // Bubbling phase (default)

grandparent.addEventListener('click', (event) => {
  console.log('Grandparent (Bubbling) - Phase:', event.eventPhase, 'Target:', event.target.id);
}); // Bubbling phase

parent.addEventListener('click', (event) => {
  console.log('Parent (Bubbling) - Phase:', event.eventPhase, 'Target:', event.target.id);
}); // Bubbling phase
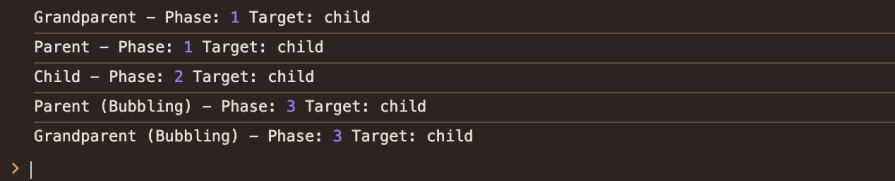
When you click the “Click Me” button, the console output will reveal the sequence of phases in action, showing how the event first captures its way down the DOM tree before bubbling back up:
Event delegation basics
Now that we understand event propagation, let’s explore how to leverage it for efficient event handling.
What is event delegation?
Event delegation is a method of adding an event listener to a parent element of multiple child elements instead of adding to each child individually. When an event happens on a child element, it triggers the listener on the parent, which checks to see which child triggered the event.
Consider a simple list <ul> with <li> items:
<ul id="myList">
  <li>Item 1</li>
  <li>Item 2</li>
  <li>Item 3</li>
  <li>Item 4</li>
</ul>
Instead of adding a click listener to each <li>:
const listItems = document.querySelectorAll('#myList li');
listItems.forEach(item => {
  item.addEventListener('click', (event) => {
    console.log(`Clicked on: ${event.target.textContent}`);
  });
});
With event delegation, you attach one listener to the <ul> parent:
const myList = document.getElementById('myList');

myList.addEventListener('click', (event) => {
  // Check if the clicked element is an <li>
  if (event.target.tagName === 'LI') {
    console.log(`Clicked on: ${event.target.textContent}`);
  }
});
In this example, when any <li> is clicked, the click event bubbles up to myList. The single event listener on myListthen checks event.target.tagName to confirm it was an <li> that triggered the event, and acts accordingly:

Why it matters
Event delegation is highly beneficial because:
- Rather than having the potential of adding hundreds or thousands of listeners, a few parent containers would suffice, greatly reducing the memory footprint
- Fewer listeners improve the browser’s overall system memory usage and reduce the workload on the JavaScript engine in terms of event management and dispatching
- It supports dynamically created elements, which is incredibly beneficial( learn more about dynamically creating JavaScript elements with event handlers). Assuming new
<li>elements are added to#myListafter a page has loaded (for instance, after an API call), the listener on#myListwill still work. There is no need to reattach listeners
Common pitfalls in event delegation
While event delegation is powerful, it’s not without its caveats. Understanding these pitfalls will help you implement it more reliably.
event.target vs event.currentTarget
These two properties are often confused, but they serve different purposes:
event.targetis the specific element that triggered the event. In aul > liexample, clicking an<li>makes that<li>theevent.target, even though the listener is attached to the<ul>event.currentTargetis the element the event listener is actually attached to. In our delegatedul > liexample, if the listener is onmyList(the<ul>), thenevent.currentTargetwill always bemyList
When to use each
- Use
event.targetwhen you need to determine which child element was clicked or interacted with in a delegated setup - Use
event.currentTargetwhen you need a reference to the element with the listener itself, such as when removing the listener or performing actions on the container after the event:
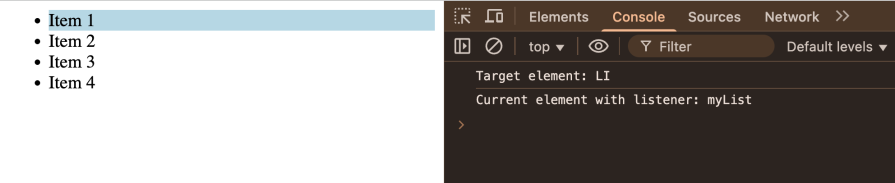
myList.addEventListener('click', (event) => {
  console.log('Target element:', event.target.tagName);
  console.log('Current element with listener:', event.currentTarget.id);

  if (event.target.tagName === 'LI') {
    event.target.style.backgroundColor = 'lightblue'; // Modify the clicked LI
  }
});
stopPropagation() and stopImmediatePropagation()
While these techniques can be potent in managing event flow, they can undermine the impact of delegated handlers.
event.stopPropagation()– This method will only allow the event to stop bubbling or capturing up or down the DOM tree. If this is executed in a child element’s event handler, then any delegated listeners on its ancestors will not be able to access the eventevent.stopImmediatePropagation()– This is not a copy-paste ofstopPropagation(). Its similarities end where this effect is added: it prevents further event propagation as well as prevents any other listeners bound to the same element from being executed
There are some contexts in which they disrupt delegated handlers, for example: A child element’s event handler calling stopPropagation will create a void of functionality for any delegated listeners placed higher in the DOM hierarchy. The delegated listener will not receive the event. This is especially troublesome for analytics, centralized UI logic, or accessible custom control functions.
In such cases, using stopPropagation() and stopImmediatePropagation() is not adviced except if there are good reasons. Most of the time, some other techniques like the event object’s properties or managing some component’s state, will let the events flow without adding unexpected consequences.
Shadow DOM and event propagation
Shadow DOM forms a component’s internal structure and styles the border that encapsulates the component. This part of the Web Components affects the flow of events:
- Events re-targeting – While an event bubbles out of a Shadow DOM, the
event.targetproperty will reset its pointer to the Shadow Host (the custom element). This is an encapsulation and security measure. The outside world does not need to know what parts make up your component - The
composedflag – Some events do not cross the shadow boundary. Events that arecomposed(for exampleclick,keydown, and others) will break the bonds of the Shadow DOM and will continue to the next stage, the light DOM. Events withcomposed: false(such asfocusandblur) will remain inside the shadow boundary and thus will only be observed within the Shadow DOM - The
bubblesflag – Thebubblesflag is used to create custom events. For custom events to cross the shadow boundaries,bubbles: trueandcomposed: truemust be set:
// Inside a Web Component's Shadow DOM
class MyShadowComponent extends HTMLElement {
constructor() {
super();
const shadowRoot = this.attachShadow({ mode: 'open' });
shadowRoot.innerHTML = ``;
shadowRoot.querySelector('#shadowButton').addEventListener('click', (e) => {
console.log('Inside Shadow DOM click:', e.target.id);
});
}
}
customElements.define('my-shadow-component', MyShadowComponent);
// In the Light DOM (main document)
document.body.innerHTML += ``;
document.body.addEventListener('click', (e) => {
console.log('Outside Shadow DOM click:', e.target.tagName);
});
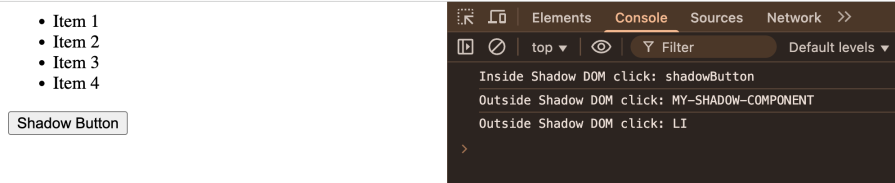
This example demonstrates how event.target changes when an event crosses the shadow boundary. When delegating events with Shadow DOM, remember that your delegated listener in the light DOM will receive the shadow host as event.target. You’ll need to listen to events on the shadow host itself or consider creating custom events within your web component and dispatching them with bubbles: true and composed: true:
Events that don’t bubble (and workarounds)
While most common UI events bubble, there are notable exceptions that cannot be delegated using the standard bubbling mechanism.
Non-bubbling events
The most prominent non-bubbling events include:
focus– Fires when an element receives focusblur– Fires when an element loses focusmouseenter– Fires when the pointer enters an elementmouseleave– Fires when the pointer leaves an element
Why they don’t bubble
Such events can’t normally be triggered because of the way the browser works, as well as for past compatibility concerns. focus and blur were meant to trigger on the specific element that takes or loses focus, and thus, there is no bubbling. mouseenter and mouseleave pair with mouseover and mouseout (which do bubble); however, unlike mouseover and mouseout, mouseenter and mouseleave only trigger when the pointer is at the element (not at its child elements).
So, since you can’t delegate these events using bubbling, you need to use alternative strategies, which include:
- Using
focusin/focusoutinstead offocus/blur:focusandblurevents cannot be delegated through bubbling, butfocusinandfocusoutevents, which users can interact with. These are excellent replacements for delegated focus/blur handling:
const form = document.getElementById('myForm'); // A parent element containing input fields

form.addEventListener('focusin', (event) => {
  if (event.target.tagName === 'INPUT' || event.target.tagName === 'TEXTAREA') {
    console.log(`Input focused: ${event.target.id}`);
    event.target.classList.add('focused-input');
  }
});

form.addEventListener('focusout', (event) => {
  if (event.target.tagName === 'INPUT' || event.target.tagName === 'TEXTAREA') {
    console.log(`Input blurred: ${event.target.id}`);
    event.target.classList.remove('focused-input');
  }
});

- Manually dispatching custom events: For
mouseenter/mouseleaveor other non-bubbling events wherefocusin/focusoutaren’t suitable, you can attach individual listeners to the child elements and then manually dispatch a custom event from that child, ensuring it bubbles and is composed. This gives you fine-grained control:
const items = document.querySelectorAll('.item'); // Many items

items.forEach(item => {
  item.addEventListener('mouseenter', (e) => {
    const customHoverEvent = new CustomEvent('item-hover', {
      bubbles: true,
      composed: true,
      detail: { itemId: e.target.id, action: 'entered' }
    });
    e.target.dispatchEvent(customHoverEvent);
  });
});

// Delegated listener on a parent
document.getElementById('container').addEventListener('item-hover', (e) => {
  console.log('Delegated hover event:', e.detail.itemId, e.detail.action);
});
- Although not directly related to event delegation, MutationObserver allows you to react to changes in the DOM tree, such as elements being added or removed. In rare edge cases where you need to attach listeners to dynamically added elements that don’t bubble, and other techniques won’t work, you can use a MutationObserver to detect new elements and bind listeners to them.
However, this reintroduces the processing overhead that event delegation is meant to avoid. For that reason, use this approach sparingly, and only as a last resort when all other options have been exhausted:
const observer = new MutationObserver((mutationsList) => {
  for (const mutation of mutationsList) {
    if (mutation.type === 'childList') {
      mutation.addedNodes.forEach(node => {
        if (node.nodeType === 1 && (node.tagName === 'INPUT' || node.querySelector('input'))) {
          const inputElement = node.tagName === 'INPUT' ? node : node.querySelector('input');
          if (inputElement) {
            inputElement.addEventListener('focus', () => {
              console.log('Focus (individual listener):', inputElement.id);
            });
          }
        }
      });
    }
  }
});

observer.observe(document.body, { childList: true, subtree: true });
Because of the performance impact of attaching many individual listeners, this is typically not recommended. Use focusin/focusout whenever possible.
Event delegation in frameworks
Modern JavaScript frameworks often optimize for and utilize techniques such as event delegation, even if they abstract away DOM events and their related actions.
How react implements delegation
Every browser has its way of managing native events, and for this reason, React created its event delegation strategy called the synthetic event system. This system demonstrates advanced event delegation techniques.
Most of the event listeners up to React 17, for instance, onClick and onChange, were associated with document, where React’s synthetic event system would block and process them. After standardizing and re-distributing them to relevant components, React would fire native events. This was an efficient event delegation since only a handful of listeners were attached to the document‘s higher tiers.
React’s synthetic event system ensures consistent behavior across browsers, even for complex, deeply nested structures (see our guide comparing React tree components).
Changes in React 17+ and React 18+
- React 17 – React is no longer attaching events to the
document. Now it attaches them to the root DOM container where your React tree is mounted (e.g.root.render(<App />) adds listeners to<div id="root">). This aims to improve gradual upgrade support (running multiple React versions on the same page) of React applications and non-React applications and frameworks that rely on document-level event handlers. It is still delegation because React is still distributing the handling of events in different places, but where React delegates events has changed - React 18 – Further refined the synthetic event system with the implementation of Automatic Batching. It is not an event delegation change, but it uses the event system to consolidate multiple state updates caused by a single event to one update and one re-render. React still delegates a lot of the event’s internal architecture to improve performance and consistency across browsers
Vue, Svelte, and Angular comparison
Each framework approaches event handling and delegation with its nuances:
| Framework | Event Binding Syntax | How Event Handling Works | Need for Manual Delegation | Notes |
|---|---|---|---|---|
| Vue | @click or v-on:click | Uses standard DOM listeners and Vue attaches and detaches them through its reactivity system efficiently | Not always required, but useful for highly dynamic lists | Vue’s virtual DOM handles most delegation automatically |
| Svelte | on:click | Compiled to native event listeners for direct targets | Generally unnecessary due to smart compilation, but may help for large dynamic lists | No runtime; sparse dynamic output reduces the need for delegation |
| Angular | (click) | Uses native DOM listeners; change detection keeps DOM updates smooth | Optional for large lists if dynamic output causes issues | HostListener supports listening to host or global targets and enables delegation |
Conclusion
Event delegation streamlines event handling by attaching a single listener to a parent element. When a child triggers an event, it bubbles up to the parent, reducing memory usage and simplifying code.
This technique shines when managing large sets of similar elements, like list items or buttons especially if they’re generated dynamically. A parent listener can handle events from newly added elements without extra configuration.
Not all events bubble – focus, blur, mouseenter, and mouseleave are exceptions. For these, use alternatives like focusin, focusout, or custom bubbling events.
To identify the exact element that triggered the event, rely on event.target. Avoid stopPropagation() unless absolutely necessary, as it prevents events from reaching your delegated handler.
When working with Shadow DOM, events may not bubble as expected, use the composed flag to allow them to pass through shadow boundaries.
Before you commit to your implementation, ask yourself:
- Am I using the fewest listeners possible while still targeting events effectively?
- Am I capturing the correct event targets?
- Does my solution work across browsers, with Shadow DOM, and for all bubbling events?
Event delegation works across stacks, React, Vue, Angular, or plain JavaScript and is a key technique for building fast, scalable, and maintainable UIs.
The post The deep internals of event delegation: When bubbling isn’t enough appeared first on LogRocket Blog.
This post first appeared on Read More