A flexible workflow to convert text layers in Figma into Notion databases.

The interaction between Figma and Notion sucks.
Part of having a more strategic role as a designer is participating in the conversations that shape the direction of the work.
You may do a lot of work in Figma, but for most people, Notion is where serious discussions about work planning and scope happen.
Why would you want to bring Figma text layers into Notion databases?
It’s way easier to track the progress on design work in Notion databases rather than in Figma.
Opening and navigating Figma takes more mental effort — especially for non-designers — than Notion.
It’s also mentally taxing and distraction-prone to switch between Notion and Figma. Every time you switch apps, you risk being distracted by Slack or email.
And sure, you can copy and paste your text layers one by one into a Notion database, but that is incredibly tedious, time-consuming, and not the best use of your brain.
The workflow
The workflow I’m sharing lets you copy a virtually unlimited number of text layers and import them into a new Notion database with useful properties like numbers and priority. You can also add statuses and other fields if you want.

As an example, I’m going to use a heuristic audit I did recently for Zoios as an example. But you can apply the principles to your own workflow.
Step 1: Setting up
I screenshotted the entire flow of the feature we’re working on and dropped the screens in Figma.
Pro tip: Give your screens a serial number for easier reference. It’s especially useful when you have 20+ screens or when you’re working with 2 or more sections of a product. I use the initial of the feature “Surveys” and a numeral e.g. S01, S02, S03… and so on.

Step 2: Make an annotations component
I always have a design system I call “Presentation kit” which has components I use to annotate and showcase work. These are not part of our UI but are incredibly useful for presenting, hence the name.
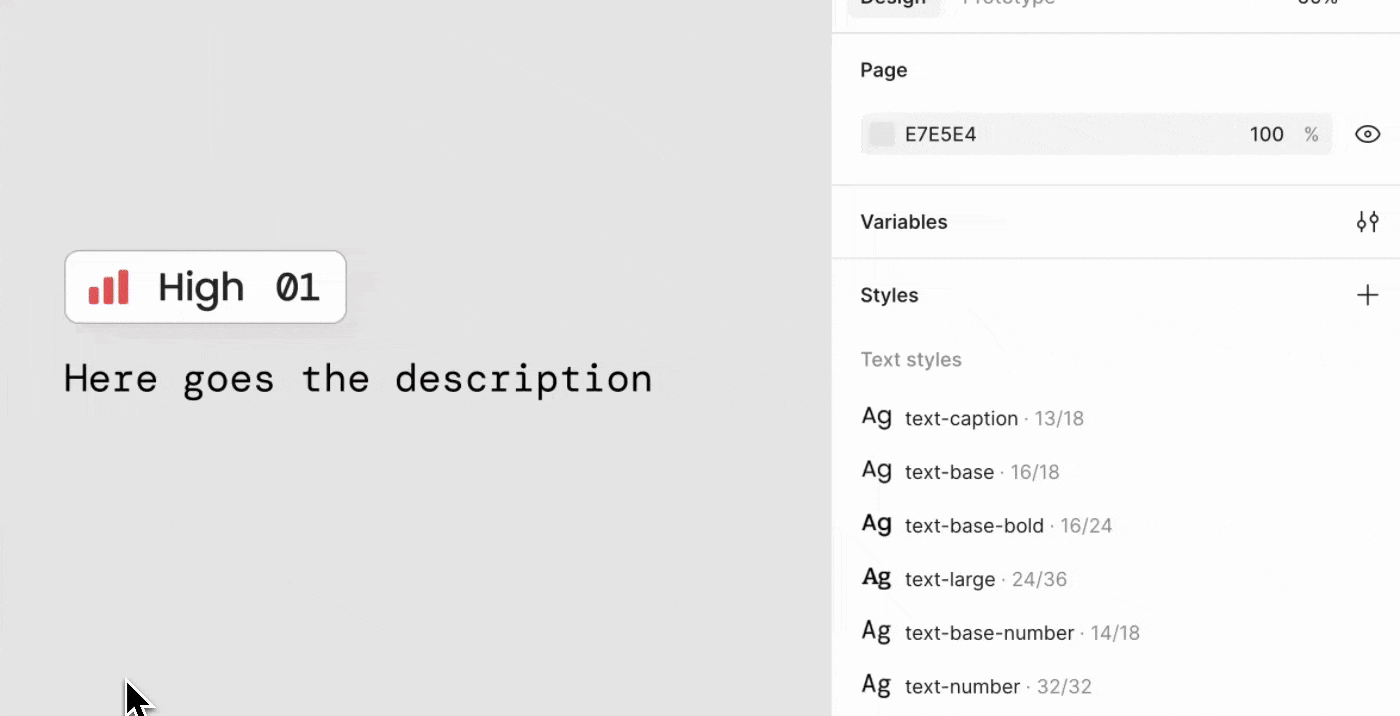
For annotations, I made a component with
- A numeral
- A priority icon, inspired by Linear’s
- A priority label, for more clarity
- A description

It has the following properties:
- Priority, in the form of toggles
- A text-based numeral field
- A text-based description field
- An “all fields” toggle, I’ll explain what it does in a sec.

These properties allow me to quickly modify the component for the type of annotation I need.
I push this component of my Presentation kit public library so I can use it across all our Figma files.
Step 3: Annotate your file
I use my annotation component to drop prioritized comments below each screen.

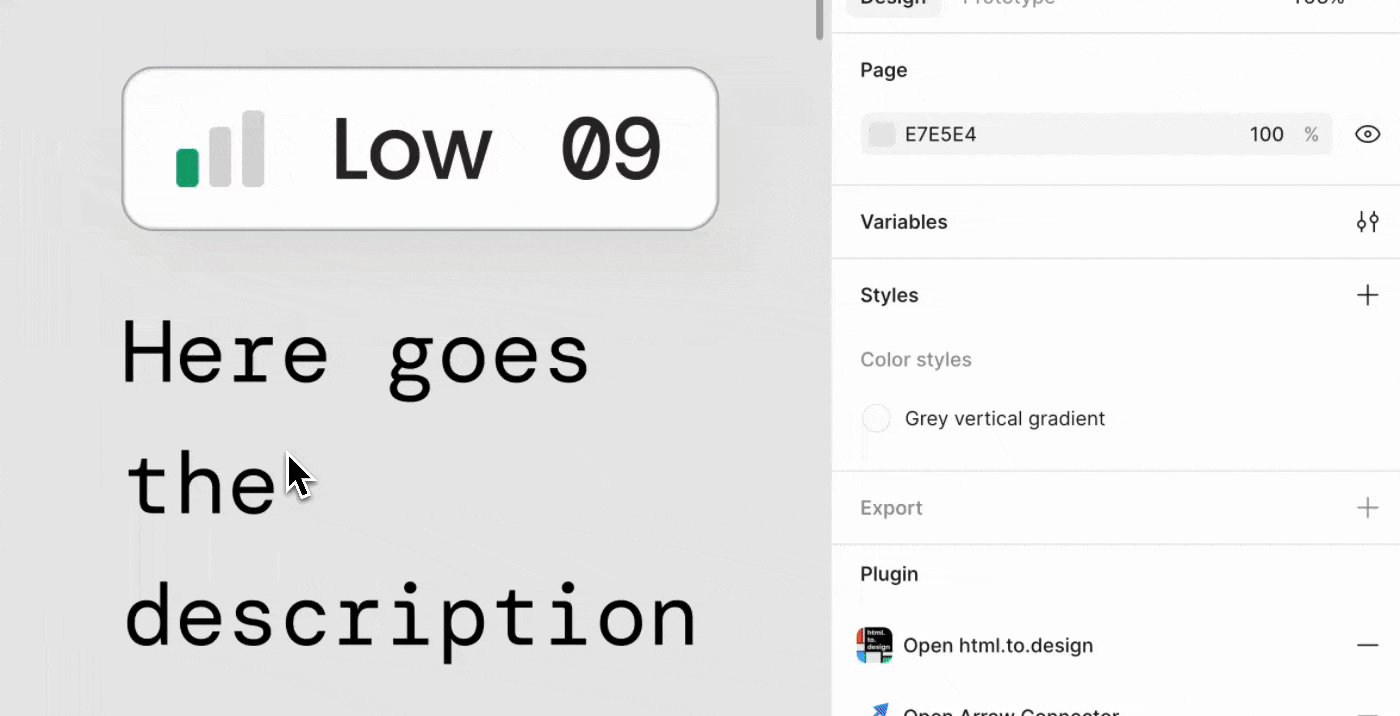
When comments are related to a specific part of a screen, I use a variation of my annotation component to indicate that. This is where the “All fields” toggle comes in handy.
I set the visibility of the description and the priority label to be controlled by that toggle, which gives me a minimalistic version I can use to indicate specific parts in a screen.


Step 4: Ready your annotation components for export
When you’re done annotating your file, it’s time to convert the text to CSV.
When you copy a component in Figma and paste it into a text-based app, what you get is the content of the text layers in that component, which is neat.
The problem is that the order of those text layers is based on their position in the Figma canvas, not their name or order in the layers panel.
To fix that, copy all the annotation components and put them on the side. Then press ⇧+A to place them into an auto-layout frame and sort it vertically.

You have to order the layers manually from top to bottom. This is a bit tedious, but it’s necessary for the next steps.
Once you have sorted your annotations, copy all of them. You can easily do this by selecting the auto-layout frame, pressing ⏎ and then ⌘+C.
Step 5: Create a CSV
Paste the content of your clipboard into a text editor or any AI chat you prefer. I’m using VS Code and Copilot, but any AI should work.
You’ll see all the text of your annotations in this order:
- Priority label
- Numeral
- Description

If the layers are not in order, double-check that they are in the right order in the auto-layout frame we created in the previous step.
To create the CSV, use this prompt:
Format this text into a CSV with 3 columns:
Priority, Number and Description.
Give it a header row.
It should give you something like this:

Save it to your computer as a CSV.
Step 6: Import your CSV into a Notion database
In a Notion page, press / and type Import CSV, and then ⏎. This will open a wizard where you can upload your CSV.
In the first screen, upload your file and select “Create a new database”. Click Map CSV headers and on the second page, you can select the type of Notion property each column in your CSV should be. I find that the defaults are pretty good.
Once you’re done, you’ll see that the database appears as a new page. If you rather have it appear on the same page, press ⋮⋮ icon on the left, right at the top, you’ll see Turn to inline database.
A very cool thing is that Notion will smartly assign properties to each field based on its content. For example, it will interpret things like “No started, in progress, done” as a status column.
Step 7 (optional): Formatting
Now that you have your database in Notion, you can reorder or add columns and change their properties.

To recap
As with all workflows, this is one out of many ways to accomplish the same thing. My goal was to share a very flexible process for you to adapt the parts that are useful to your specific case. In summary:
- You can create a status component in Figma with as many fields as you need.
- You can copy the context of the text layers of those components and format them as a CSV using AI.
- That CSV can be imported into a Notion database, converting each field to properties like priority, number, status, and description.
![]()
Making Figma and Notion play ball was originally published in UX Collective on Medium, where people are continuing the conversation by highlighting and responding to this story.
This post first appeared on Read More