Skip Figma and prototype where your product already lives
Prototyping and testing new product features or concepts usually means starting from scratch with a blank design canvas. The workflow looks a little like this: UX designers build product screens in Figma, pass the designs for feedback, then developers recreate the same screens in code. Though this is the traditional design and development process we’re used to, the workflow can be slow and redundant.
Not only does this established process cause inefficiency in product development, but it’s disconnected from the actual product, losing context and real user-interaction behavior.
But what if you can adapt your design and development workflow to skip the unnecessary rework and keep the user’s context? Being able to prototype directly on your live website’s product pages, like tweaking layouts or exploring features, allows you to cut the time and resources needed to implement and test new ideas.

By vibe coding straight from your website, you keep the design process realistic to the user’s experience, and keep design and implementation in sync from the start.
You may be thinking of ways you can streamline your own design-development process or if vibe coding is right for you and your team. To answer these questions, let’s explore vibe coding’s benefits and limits when using live websites, demo tools that enable this workflow, and review use cases to determine where this process can be integrated within the design process.
Benefits and limits of vibe coding with your website
Instead of starting the vibe code process from Figma or Sketch designs, you can cut straight to your live product. Vibe coding directly on your website avoids duplicate effort (e.g., creating the same UI mockup with slight variations), and keeps the user’s context that gets lost in design tools. This results in prototypes that not only look realistic, but behave like the actual product — making them easier to validate with both users and stakeholders.
For more of an introduction to vibe coding and how it fits in the UX process, check out this article: “Testing your UX ideas with vibe coding.”
Benefits to your website
- Speed: By modifying spacing, colors, or users flows right on your site, you eliminate the extra steps of remaking your product screens in any design tool — cutting hours (or even days) from the iteration cycle.
- Accuracy: Vibe coding in your website keeps behaviors like hover states, responsiveness, and navigation (typically lost in design tools), so the prototype reflects real user interactions with the product.
- Testing confidence: Because changes are made on top of real product flows, usability testing offers reliable feedback (which you don’t get from artificial prototypes in Figma or Sketch).

Limits with vibe coding
- Messy code: Depending on the tool, vibe coding can generate code that’s great for exploration but is not production-ready; developers will need to evaluate and possibly rebuild the code.
- Security risks: When working with live sites or sites with required user sign-in, you need to be careful about exposing sensitive data like user info, tokens, or private content.
- Not scalable for large systems: Vibe coding works well for small tweaks and user flows, but is not a replacement for building complex features or keeping consistency across platforms.

How to start vibe coding with your site
There are plenty of vibe coding tools out there today, but not many let you vibe code directly from your live website. Most focus on creating one to multi-page user flows from a few design mockups from Figma or from AI prompts. These prototypes and the AI-generated code can be helpful, but keep you one step removed from your actual product.
Let’s get into Anima’s “web to code” feature and Chrome extension to demo how you can vibe code directly from your (or any public) website, then look into other similar tools that offer vibe coding from your live site.
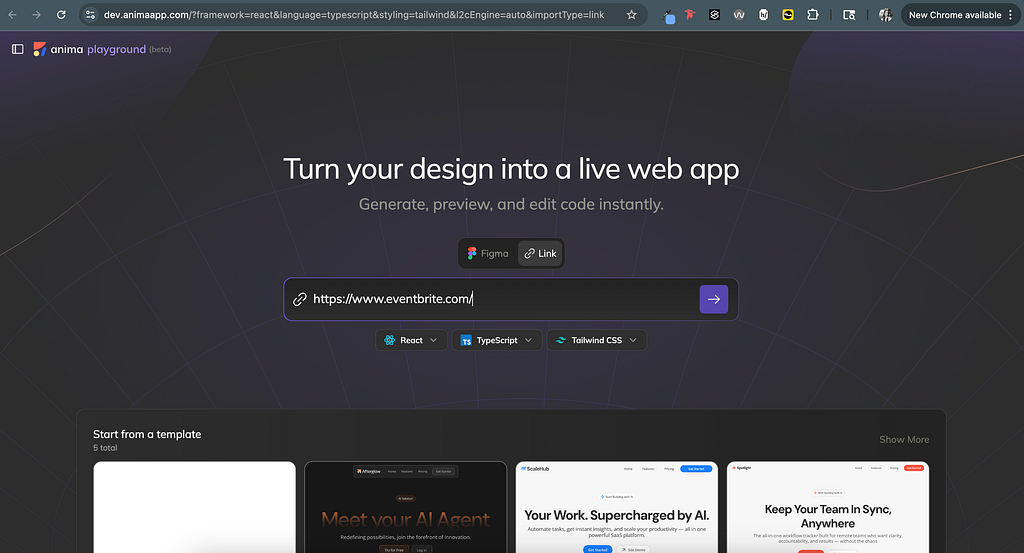
“Web to code” demo
- Copy your website’s URL and paste it into Anima’s web to code tool
- Choose your preferred framework, language, and styling (or keep the default options), then select the “arrow” icon button
Note: Anima automatically recognizes your Design System’s UI components; when it creates additional pages, it will reuse the components to maintain consistency.
3. After selecting the arrow icon button, you’re asked if you’re using the website as inspiration or if you own/ have right to the website; select the applicable option
Note: For the purpose of the demo, I used Eventbrite’s website so I selected “Use as inspiration.” You can use any public website in addition to your personal or company website.
4. The tool scans and builds the site page from the URL; this can take a couple minutes depending on the website’s asset complexity
5. Once the build is finished, compare the URL to the output for any discrepancies (Anima’s output is pretty consistent with the input)

6. Prompt the AI assistant for any needed tweaks; I prompted, “Make the grid section a list view” and “Add a sidebar to filter events by category”
Note: Make smaller, bite-sized adjustments at a time so the prompts are more clear to the AI assistant — giving better results.

7. Continue to make adjustments until the output is good-to-go, then select “Publish” for the prototype link or select “Download code” (depending on if you’re user testing or pushing code into a repository)
There is also a Web-to-code Chrome extension to select a specific page from any public website and generate its code-build in Anima’s playground. So instead of toggling back-and-forth between Anima and your site, you can move directly from the site to Anima.

Other tools to explore
- HTML to Framer: Framer offers a Chrome extension that lets you copy one to multiple design elements from any public website, then paste it into your Framer project. This is dependent on if you house your website in Framer (and also doesn’t allow for code modifications), but is an easy way to grab design elements as starting points.

- Mockflow’s URL to wireframe: Mockflow offers a feature to convert sections or full pages from live websites into editable wireframes. This feature is similar to Anima’s web-to-code feature since it provides an easy way to explore ideas, but Mockflow doesn’t produce editable code like Anima does.

- Wireframeit: The Wireframeit Chrome extension also converts live websites into editable designs that can be exported into Figma or as images. Again, this tool doesn’t focus on code production or output, but offers a way to extract design assets from your browser to Figma.

Where vibe coding fits in your workflow
Vibe coding isn’t about replacing Figma (or your favorite design tool), wireframes, or high-fidelity prototypes; it’s about complementing them. Vibe coding speeds up specific points in the workflow where product teams usually get stuck. For instance, designers can generate and test small design tweaks from their existing website without remaking each UI mockup, as well as validate ideas with prototypes that provide real interactions.
By integrating vibe coding into your design-development process, you can cut unnecessary steps while gaining the output from traditional prototypes. Let’s look into where product teams can most benefit, then look at when vibe coding shouldn’t be used.
For designers
- Ideate with user context: Instead of designing mockups on static canvases or creating artificial prototypes, you can generate changes on your actual product pages and see how they behave.
- Validate with users: Using vibe-coded prototypes for user testing gets more realistic feedback versus clickable prototypes made in Figma or Sketch (also prevents “glitchy” prototypes).
- Avoid design tool integration: Many vibe coding tools are integrated with only Figma (excluding other design tools); with live-site prototyping, designers without Figma can still vibe code.

For developers
- Experiment faster: Vibe coding lowers the barrier to testing since developers can make edits without creating a new dev environment each time; so you can validate the change before committing code.
- Prototype without damage: Since developers are working in a “playground” environment, they can try new things without worrying about breaking the main repository (or anything else).
For product teams
- Close the handoff gap: Since designers and developers are working from the same context, there are fewer misinterpretations compared to developers implementing from design files and specs.
- Condense design cycles: Vibe coding eliminates redundant steps, like recreating the same UI mockup over and over again, so ideas can move from concept to testable prototype in a day or two instead of weeks.

When not to use vibe coding
- Brand new features: When there is no existing product page or user flow to build from in the existing website, you need to start with wireframes in design tools instead of vibe coding.
- Complex user journeys: For multi-step user flows or branching paths, traditional prototyping helps you map everything clearly because vibe coding may miss important context.
- Design Systems: Design libraries require structured, reusable foundations to create UI components and patterns that are better defined and used in tools like Figma.
- High-level concepts: When you need to present and communicate abstract ideas or early-stage concepts to stakeholders, low-fidelity wireframes or static user journeys are often more effective.
Conclusion
Vibe coding directly on your live website changes how teams can explore new ideas. This process reduces the redundant work in traditional design-to-dev workflows, while keeping user interactions accurate and in-context.
Not only is vibe coding from your website a workflow shift, it aligns design and implementation from the start of any iteration cycle — balancing quality, speed, and collaboration while building a better product experience.
![]()
Vibe code straight from your website was originally published in UX Collective on Medium, where people are continuing the conversation by highlighting and responding to this story.
This post first appeared on Read More