
A spec-first workflow for building with agentic AI
This article was featured in The Replay, LogRocket’s weekly newsletter for dev leaders. Subscribe here.
Agentic AI has become a hot topic amongst software developers in recent months. As usage of LLMs has become increasingly popular, many developers are switching to agentic AI services to build projects.
One point of contention with agentic AI is that productivity is always limited without proper context. Solid context is crucial in streamlining agentic AI tools, as it guards against things like hallucinations and inefficiencies with software development.
Having a working specification that you use with agentic AI helps even more, as it provides a structured approach to building your project. With agentic AI tools, you can both generate a specification and then incrementally work through that specification on projects.
For the purposes of this post, I’ll be referring to this process of first creating and then using a specification as a “spec-first” workflow.
This post is timely, as AWS recently produced a tool called Kiro, which provides a paid service for the process of building and using a specification with agentic AI tools. GitHub also recently released the CLI tool Spec Kit, which guides agentic AI services with a process that builds a specification and then has agentic AI services act on it.
I will not be covering Kiro or Spec Kit in this post, but I reference them as evidence that many people have realized the value of a spec-first approach.
I’ll walk through a small intro on agentic AI and then a method to build a spec-first workflow. I will be using Claude Code, but the same process could be applied to Microsoft’s Copilot or any other agentic AI tool that you may use.
What is agentic AI?
If you are reading this post, I’m going to assume that you are already familiar with the way that LLMs can be used with AI tools like Claude or ChatGPT. If you’d like a more in-depth explanation of LLMs, please look at my previous LogRocket post, How to use Claude to build a web app.
Additionally, just to clarify: I’ll be making a distinction between agentic AI and “conversational AI.” I consider “conversational AI” as interacting with the turn-based services that you get while using ChatGPT or Claude apps.
When I say “agentic AI,” I am referring to an AI system that can act autonomously to achieve goals. This is different than using a service that just responds to individual prompts. AI agents can not only plan, but it can also execute complex tasks and make decisions along the way.
Whereas conversational AI requires constant inputs and turn-based interactions, agentic AI acts as a collaborator to directly do tasks on your projects.
A real-world example of agentic AI
AI agents can plan and set goals. It can break down complex objectives into smaller tasks that can be iterated on. This is particularly powerful when you want to conduct data analysis or gather data on a topic.
An example would be if you prompted an agentic AI tool to, “help me develop a training plan for running a half-marathon.”
An agentic AI tool would take this prompt and ask questions like “what is your current running experience?” or “what is your goal mile pace?” to build context. The AI agent would then use these clarifying questions to structure a set of tasks for a training plan to run a half-marathon.
What makes agentic AI so special?
The ability to connect agentic AI to other tools or services takes its abilities even farther. Through the use of Model Context Protocol (MCP), you can enable an agentic AI tool to interface with external APIs, other databases, web searches, and much more.
Once you begin interacting with an AI agent, you can build context through both long and short-term memory. This is key to success.
You can ask an agentic AI tool to do a task, and then ask it again to do something else with little information. It will retain the context of the previous steps as it works.
There are lots of tricks to building context. But the point is that agentic AI is very similar to collaborating with a team member. The context is crucial to positive outcomes, as more context allows the AI to better work through what you ask it.
A typical development workflow with agentic AI
Agentic AI can also make decisions and adjust its approach without constant input. If an approach fails, the agent can see this and attempt an alternative.
In software development, this can be seen when there are compilation errors with a project, and the AI has to adjust the configuration. Agentic AI can also help with debugging issues, analyze logs when it sees errors, and adjust code to suit.
The planning and context with agentic AI tools allow you to create a workflow. The efficiency and developer experience of this workflow are fully dependent on how much or how little context is provided.
A typical workflow with agentic AI would be:
1. start with a  general question or specific request
2. AI asks clarifying questions as to what to do
3. AI agent creates a plan
4. Agent prompts the user for permission to proceed
5. Agent begins executing the plan and adjusts along the way (asking permission if deviating from the plan)
6. The developer and agent continue iterating until the goal is achieved
7. Agent summarizes and reports the results back
The usage of “spec-first” workflows increases the already highly productive qualities of agentic AI.
What is a “spec-first” workflow?
Now that we’ve covered some basics on agentic AI, let’s focus on spec-first development.
Just to reiterate from earlier, we are defining “spec-first” development as a process of first creating and then using a specification with agentic AI tools. This means getting an AI agent to create the specification, and then passing that specification incrementally to the same tool to act and build software.
Traditionally, software development has been a process of getting requirements and then building those requirements. The concept of a spec-first workflow is very similar.
Waterfall and agile are the two approaches that have been historically used for software development:
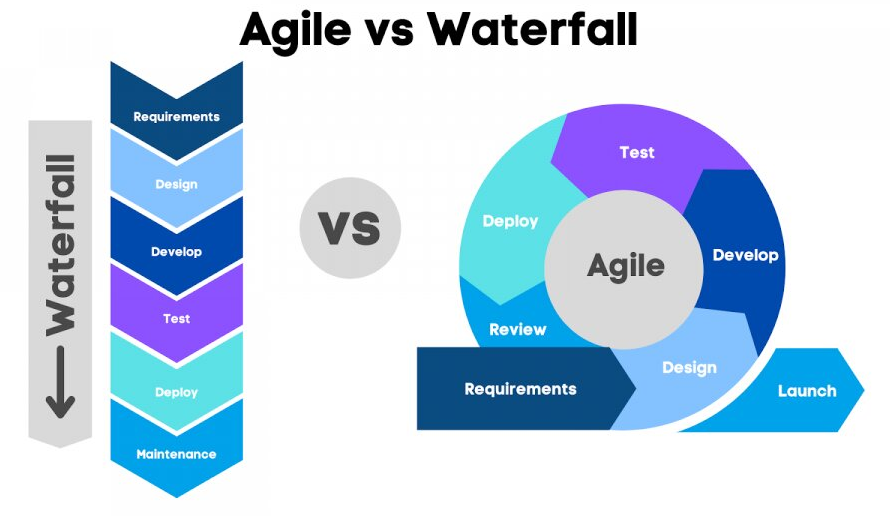
The waterfall approach to software development is known for defining all the requirements up front, developing, and then testing at the end of the process.
On the other hand, the agile approach involves breaking a project into iterative cycles of development with regular interaction between software developers and users.
You could potentially execute spec-first workflows with each approach to software development. However, I have generally found the agile process of iterating over smaller requirements and deliverables to work better.
Using some basic prompts, you can ideate on a concept for a project and make it into a project plan. This project plan can then be executed piece by piece with agentic AI tools.
Taking some concepts from the agile world, you would have the work broken down into hierarchical steps:
- High-level epics
- Several features under one epic
- Several stories under each feature
- Several tasks under each story
At a high level, a spec-first workflow would look like this:
- Initial project idea
- Propose the project idea to agentic AI tools
- Build a specification that can be broken into smaller pieces (ideally stories → features → epics like those used in an Agile process)
- Build out smaller epics/features/stories/tasks until you have a set of small work items that can then be individually built and completed by an agentic AI tool
- Present the smaller tasks incrementally to the agentic AI tool
Once the tasks are broken down, building everything is done iteratively, just as you would in any software project. The goal is to have each step of your specification small enough that it can be done efficiently.
Using project management tools like Jira or Linear helps greatly with organizing projects. However, a simple Markdown or text file with a list of items could work here as well. The central goal is to have a specification that can be tracked.
In the next few sections, I will walk through what this process looks like for a sample application.
Specifically I am going to attempt to build a copy of Apple’s Reminders iOS App. I will be using https://expo.dev/ for the development as well.
1. Creating a specification
The first step is to propose your idea to an AI agent to iterate over a working specification. From here on in this post, I’ll be using Claude Code as my agentic AI tool of choice, but you could use this same process with any of the other options available.
Skipping past the initial Claude Code setup, I will dive right in and start a Claude Code session. In this session, I will first propose my idea to build a specification through a solid intro prompt that lays out as much detail as possible about what I want to build:
I would like to build an iOS app that is similar to Apple’s Reminders app. I want to call it “Harvey Reminders” (named after my Dog) and want to do similar functionality where I can enable the user to save and update reminders on their iPhone directly. The data management will be done entirely on the device and no data is sent to a cloud service for persistence etc. I also would like to allow the app to send the user Notifications using Apple’s notification service when reminders are due. As an added feature, I would like to be able to do speech to text translation where the user can tap a button and ask the app to create a reminder for them. I would like the speech to text feature for reminder creation to prompt the user once to verify the reminder they want to create before creating it. Can you help me build a project specification in a markdown file called PROJECT_SPEC.md based on the data that I have presented so far. If you have any suggestions for better features or more simplistic approaches to anything, please let me know as well.
Within that initial prompt, notice a few things:
- A general outline of the idea
- Architectural specifics like where data is stored
- Advanced features like speech-to-text and notifications
- A name and place to store the specification created
- An ask for any advice or suggestions for advanced features
This intro prompt is very detailed, but the nice part about agentic AI is that you could start more vague and refine your idea before asking to formally generate a specification.
To keep this process necessarily simple, I’m doing all of this in a Markdown file. This is not required, but it provides a solid document format to get you started.
After presenting that prompt to Claude Code, I got the following response:
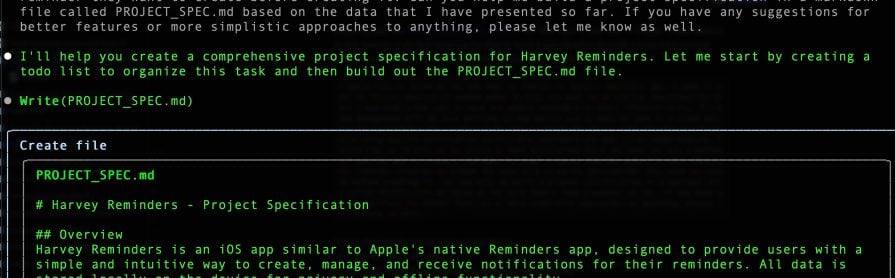
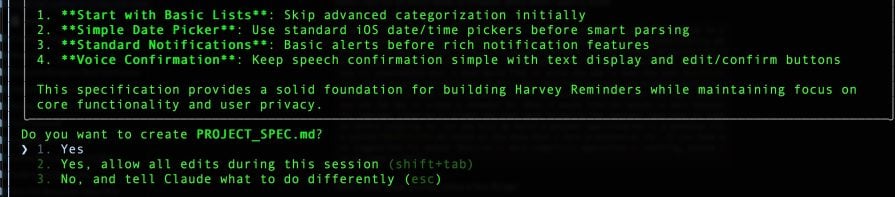 Claude Code presents what it plans to create for my project specification. I accept the proposed work and allow it to create the Markdown file. Notice how it summarizes the work done after it has finished:
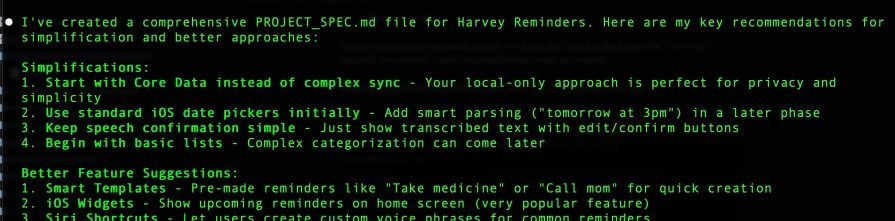
Now, within the Markdown file created, I realized I forgot to include the use of https://expo.dev/ for tooling. So I ask the agentic AI to include that, and it proposes a change:
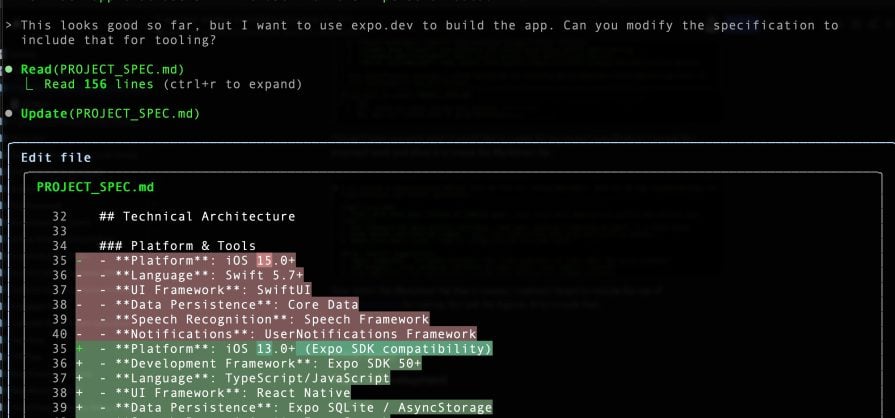
I could further refine the specification before continuing, if I wanted to add or remove things like features or architectural points.
I accept that change, and then it finds additional places to modify. We’re specifically using the Expo packages in place of the full native app integration:
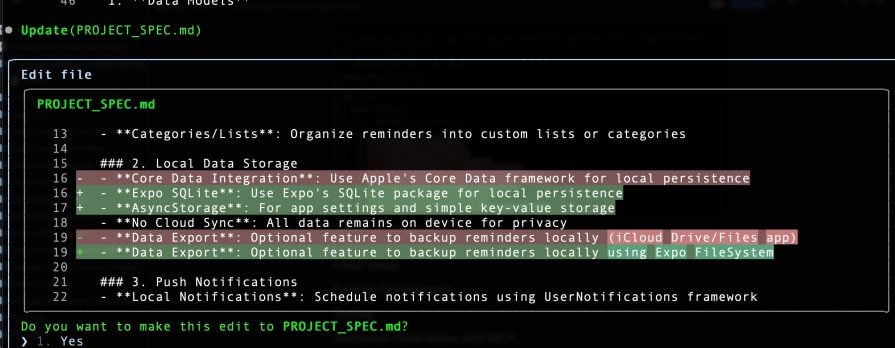
I continue to iterate over the changes until the project specification is now focused on Expo development:
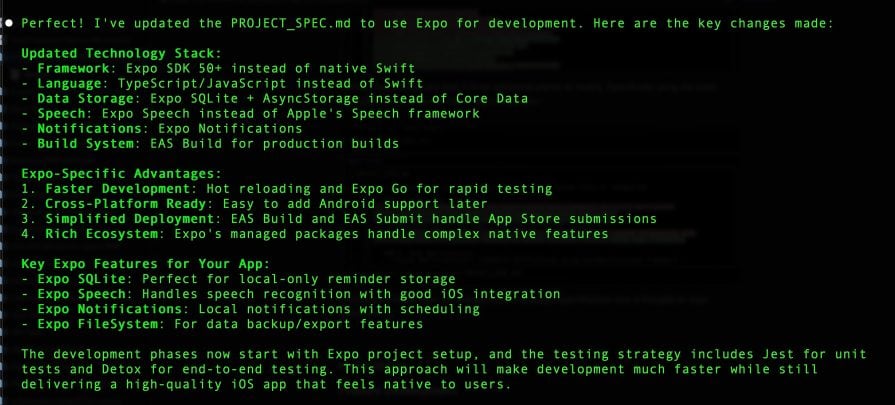
With those changes in place, I now have what appears to be a comprehensive specification:

One thing to note is that Claude Code specifically laid out development phases:
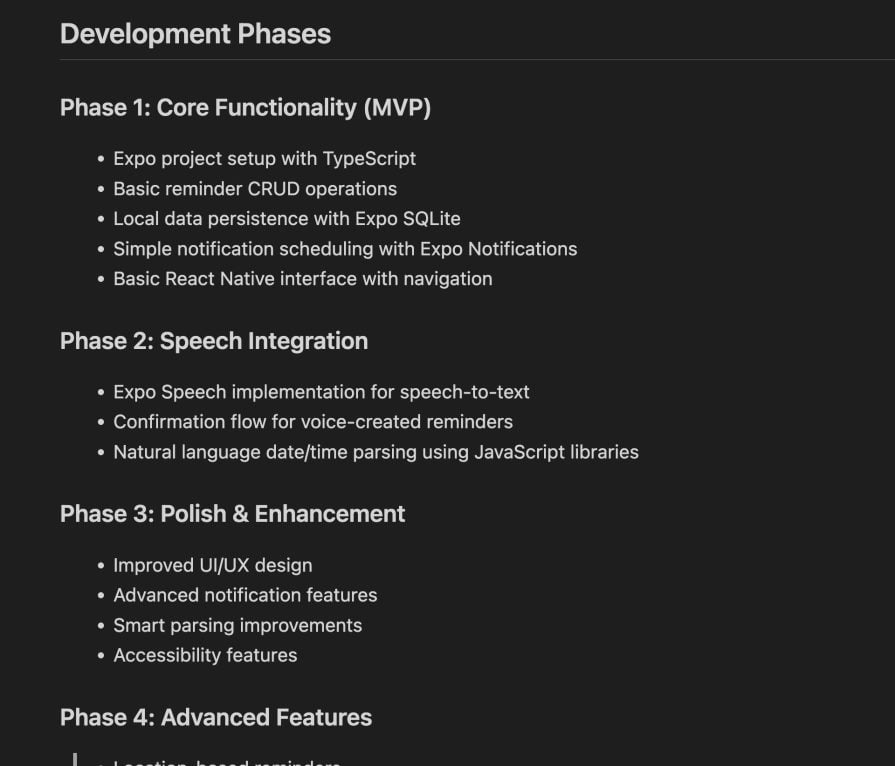
I want to use these development phases to build out the app with Claude Code. I ask Claude Code to refactor these development phases into epics/features/stories that I can specifically pass to them to do work:
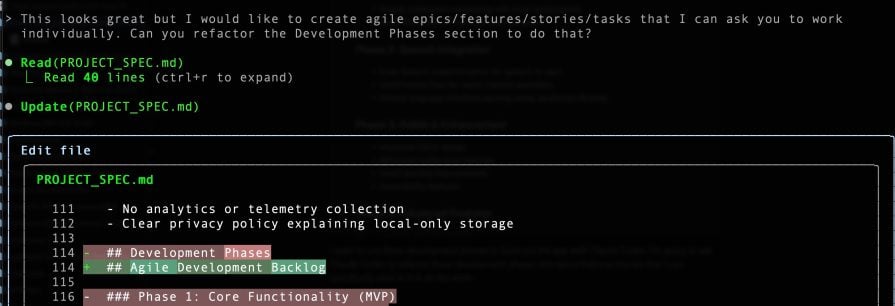
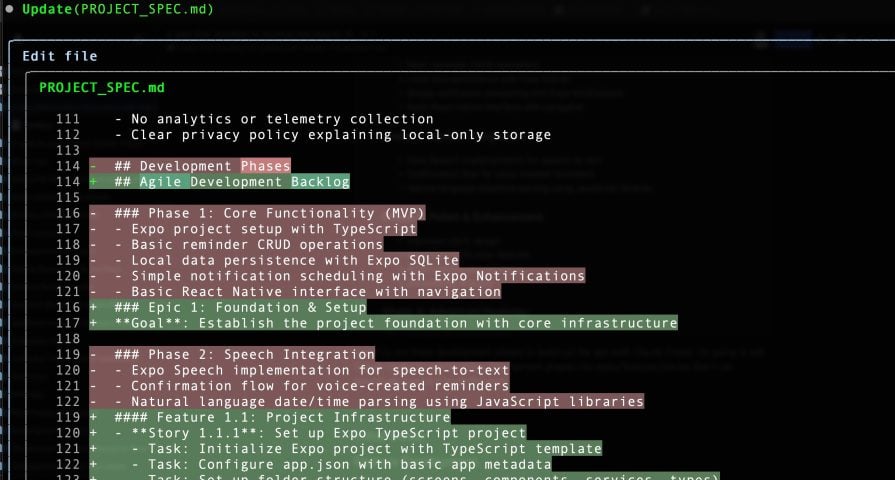
As a result of that interaction, the Development Phases section is now Agile Development Backlog.
I can now ask Claude to, “please work story 1.1.1 in the project specification,” and it can read this specification and know where to look:
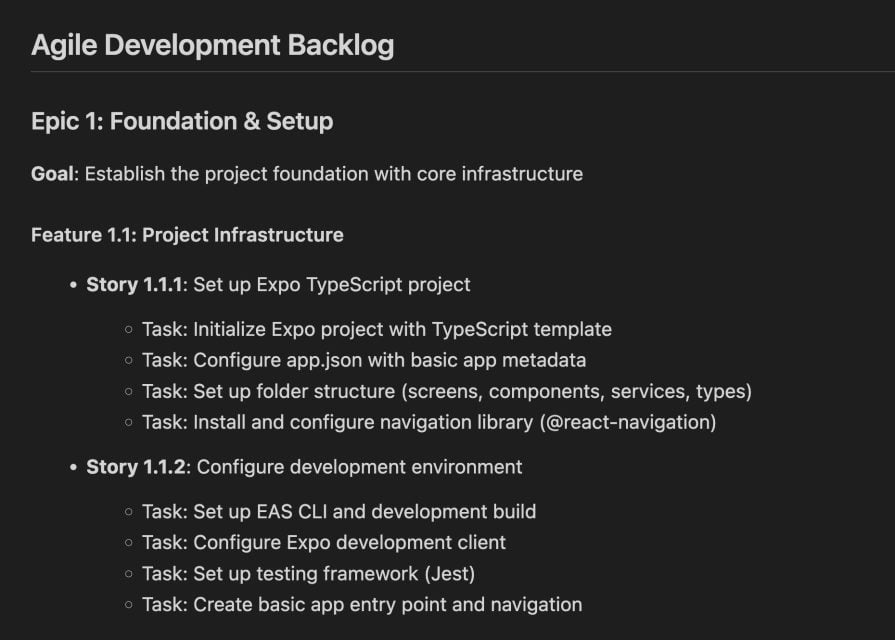
Just as a cosmetic change, I’m also going to ask Claude Code to create checkboxes next to each task that it can check off so I can visually inspect each story’s completion:
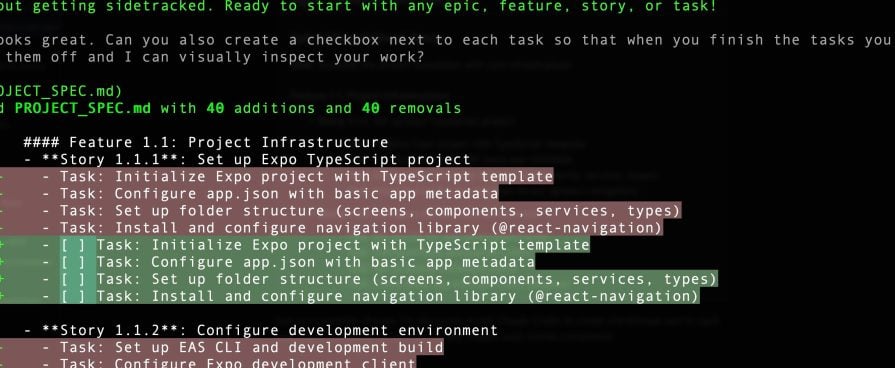
Claude Code then adds the checkboxes just as I asked: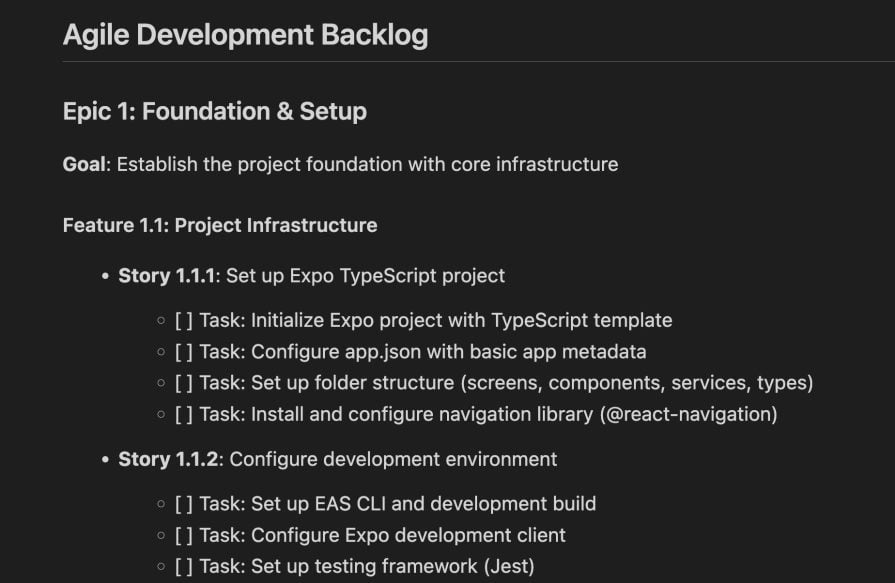
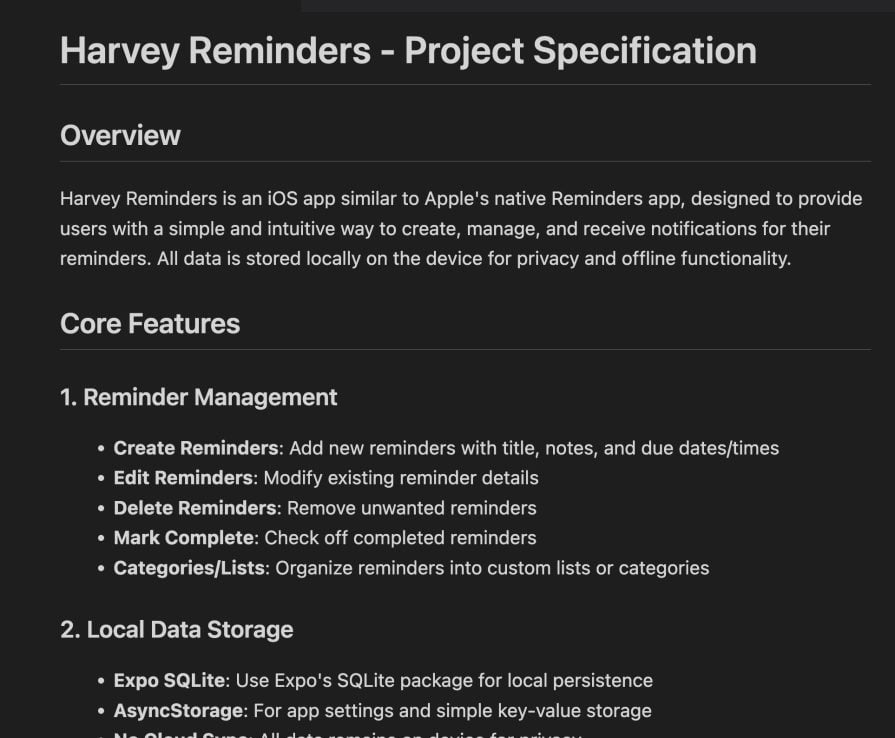
At this point, we have a specification along with a set of tasks that can be individually passed to the agentic AI to do the work. The specification includes an overview and feature list:
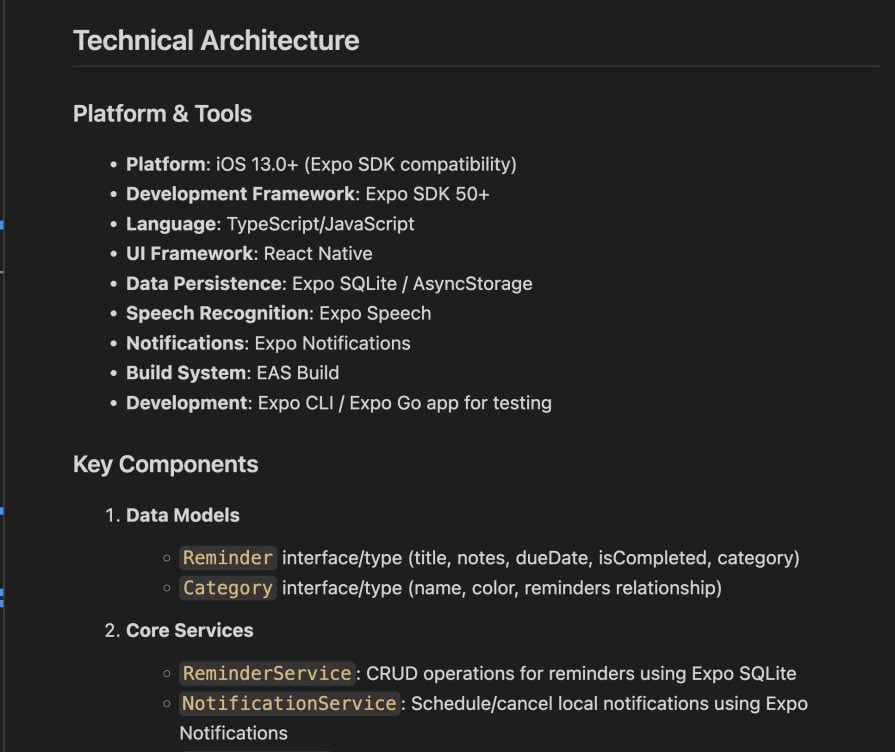
The specification also includes a breakdown of technical architecture and key components:
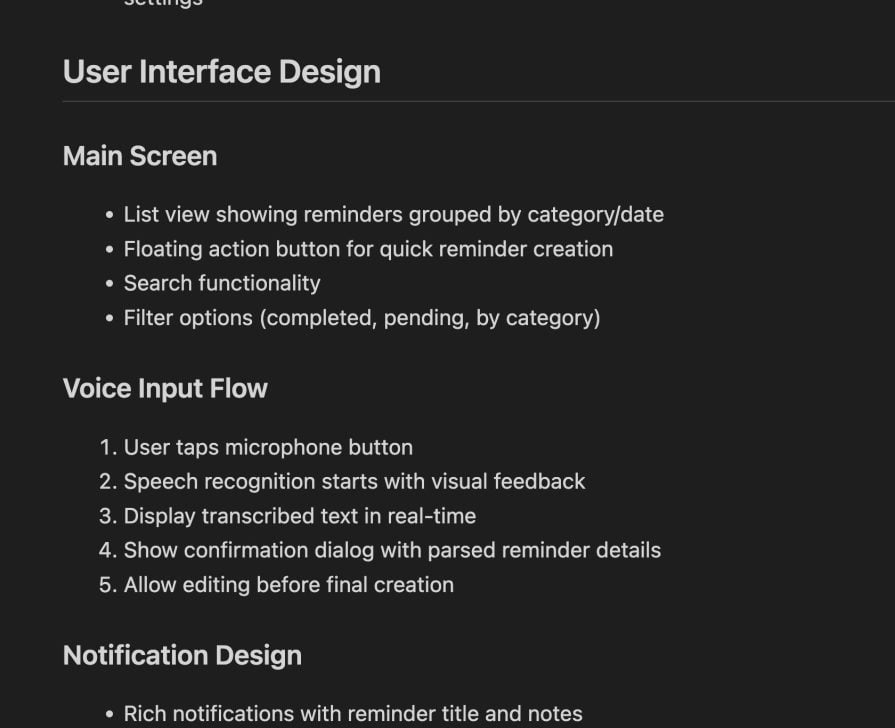
There is also a section on the user interface and visual design:
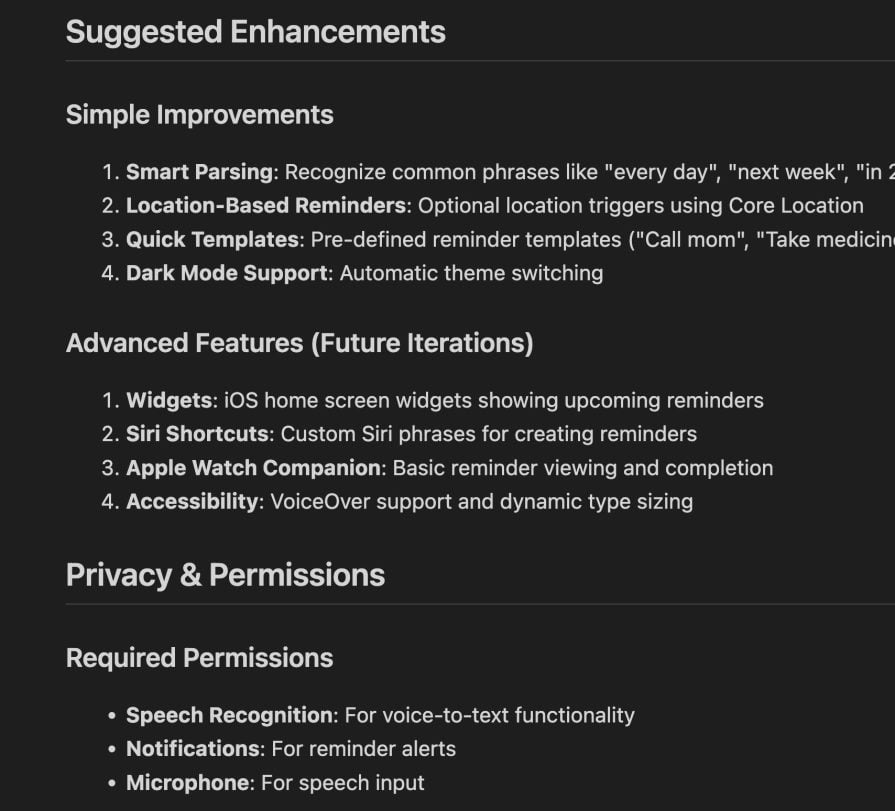
The AI has even included suggested enhancements as well as a section on privacy management:
Overall, this specification has everything I would need to start building the application, including:
- A full feature list
- Technical architecture, including platform and key components
- Visual design
- Suggested enhancements
- Privacy and permission management
- Full agile story backlog
- Technical considerations for performance, strategy, and deployment with Expo
- Recommended simplifications for development
With a specification created, I can now move on to building the application. The specification enables efficient development, as it provides guidance and a path for the AI tools to follow.
As I stated earlier, solid context is a must-have before beginning work. Without context, AI tools can be open to hallucinations where things will be incorrectly or only partially implemented. Without context, the AI-to-developer interaction can also be frustrating, as there are multiple corrections required before proceeding to different stages of development.
One other thing to note is that some tools, like Claude Cod, encourage planning. Look at Anthropic’s Claude Code Best Practices:
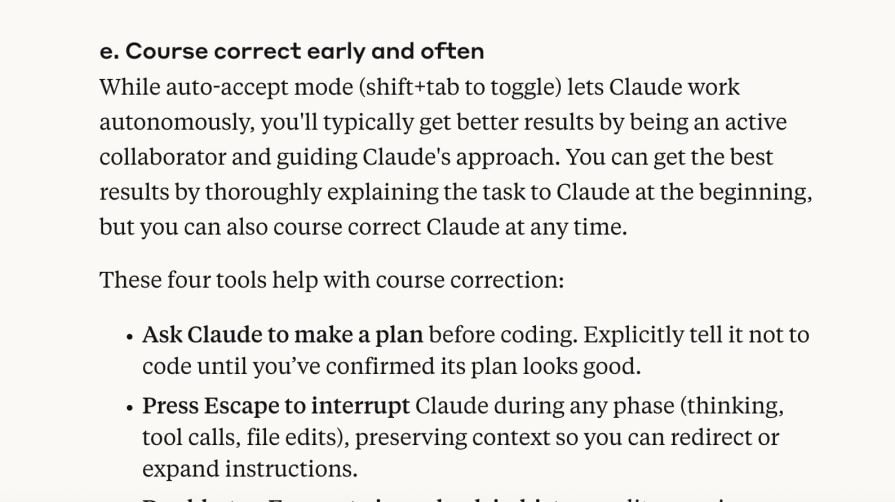
The usage of the plan mode helps. But in a greater sense, just having a structure to what you ask Claude Code greatly improves your productivity.
I have found this to be true in my experience, both on large and small projects. It helps boost the quality of the developer experience with agentic AI tools in general. In a later section, I will describe my experiences and some lessons learned with this spec-first approach.
2. Initial setup of your project
Once you have a specification written, the next step is to scaffold the environment for the agentic AI to work in.
You can get any of the agentic AI tools to do the scaffolding for you, but I’ve found that if you handle this first part yourself, it gives you more control and is generally just easier.
When I say “handle this part yourself,” I just mean running the necessary CLI commands or framework initialization to give the AI agent somewhere to work. Sometimes the tools can get confused if there are multiple ways to set things up. By doing the initial setup yourself, you can cater your environment and project to the styles you prefer.
Since our project is built with Expo, I went ahead and asked Claude Code what the process is to set it up. Since Claude Code already had the context of our previous conversations and the working specification, it output a set of steps that I could follow for the project immediately:

Here is what Claude Code gave me as the setup process:
To create an Expo project focused on iOS development, follow these steps:
1. Install Expo CLI globally:
npm install -g @expo/cli
2. Create new project with TypeScript template:
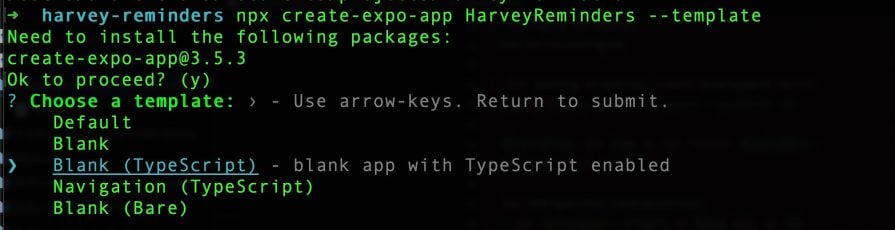
npx create-expo-app HarveyReminders --template
Choose the "Blank (TypeScript)" template when prompted.
3. Navigate to project directory:
cd HarveyReminders
4. Configure for iOS-focused development in app.json:
{
"expo": {
"name": "Harvey Reminders",
"slug": "harvey-reminders",
"platforms": ["ios"],
"ios": {
"bundleIdentifier": "com.yourname.harveyreminders",
"buildNumber": "1",
"supportsTablet": true
}
}
}
5. Install EAS CLI for building:
npm install -g eas-cli
6. Configure EAS Build:
eas build:configure
7. For testing on device, create development build:
eas build --profile development --platform ios
Alternative: Use Expo Go for initial development:
npx expo start --ios
Key iOS-specific considerations:
- Set "platforms": ["ios"] to focus only on iOS
- Configure bundleIdentifier for App Store
- Use eas build for production builds
- Test on physical iOS devices using development builds
This setup gives you a TypeScript-based Expo project optimized specifically for iOS development.
I already had the expo cli and eas-cli installed from a previous project. So I was able to go ahead and create the project with:
npx create-expo-app HarveyReminders --template
This first step created a HarveyReminders project alongside the project spec file that I had created in the previous step (I am using VSCode):
With this initial project setup, I went through and ran it locally just to verify everything compiles. When I was happy with this first setup, I was ready to move on to using Claude Code to actually start working on the agile stories that it had created.
3. Feature development
In the previous step, I created the Expo project with Expo and the eas-cli. Since I have my project and the PROJECT_SPEC.md file done, I also want to create a claude.md. With Claude Code specifically, a claude.md file is read in by default whenever you start a session.
There are similar methods of doing this with other agentic AI tools. This provides some quick context in each session, which helps the agentic AI tools follow whatever you want to be done with your standard development processes. The claude.md file I created included the following sections:
## Project Context
Harvey Reminders is an iOS app similar to Apple's native Reminders app, designed to provide users with a simple and intuitive way to create, manage, and receive notifications for their reminders. All data is stored locally on the device for privacy and offline functionality.
> copied from the PROJECT_SPEC.md file

## Development Workflow
For all development tasks do the work within the `HarveyReminders` folder. Also present a plan for the work before doing anything, and apply a checkmark to the associated story within the `PROJECT_SPEC.md` file when it is completed.
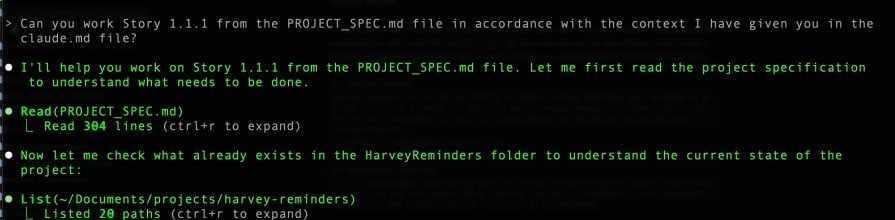
Claude Code initially builds context by reading in the spec file and project. It next proposes changes to fulfill the requested story:
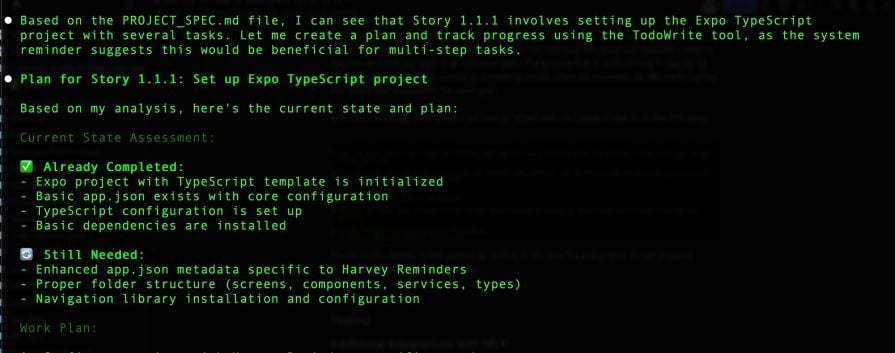
Notice in this stage that Claude Code identified that I had already set up the Expo project. The first story 1.1.1 included that setup. Since it was already done, Claude Code could then move on.
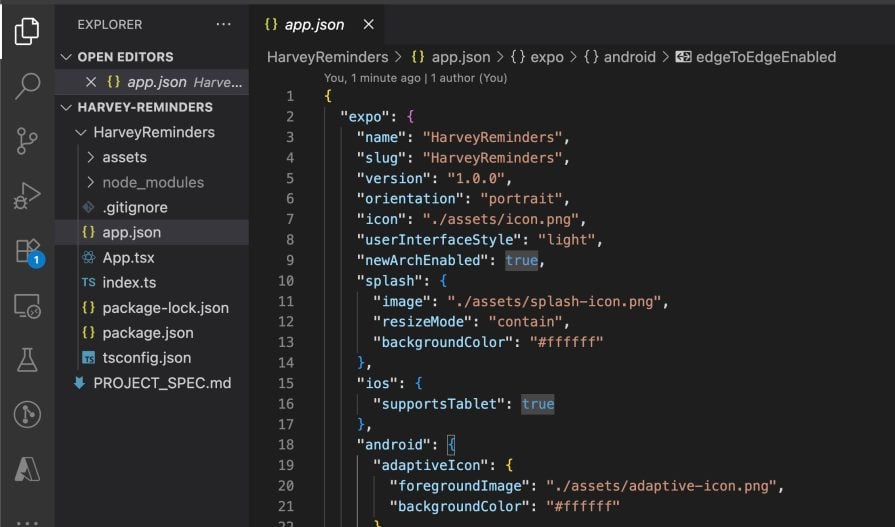
The next steps for Claude Code are to build the app.json file and set up things like folder structure:
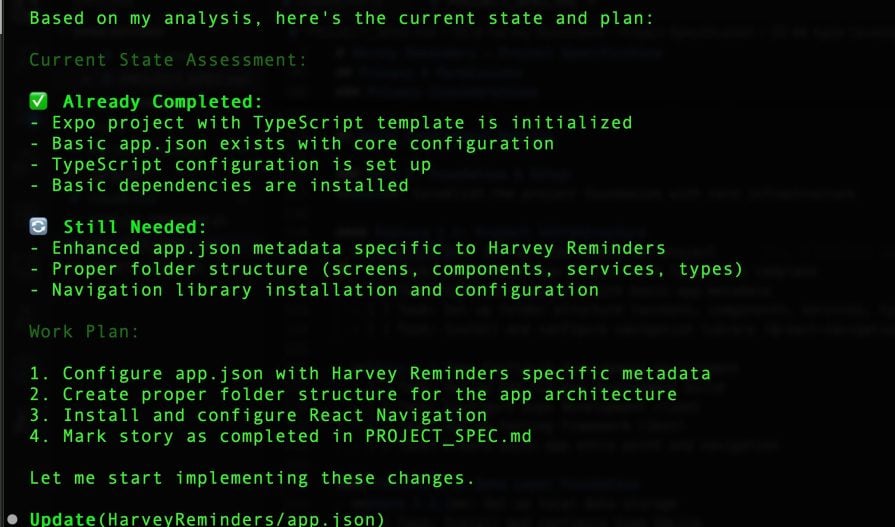
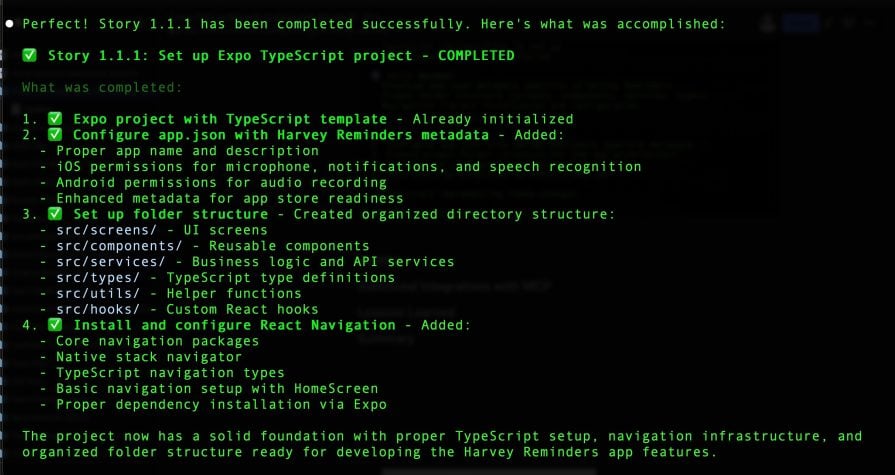
Once I allow it to proceed, it presents me with several prompts for changes and then creates a summary of what it has done:
From here, a good process is to run it locally to verify functionality.
Next, create a feature branch and open a PR with the branch. Having PRs is good because it helps manage the work incrementally and only merges into the master branch when ready. This usage of PRs helps keep the work in manageable chunks versus letting the AI do it all at once.
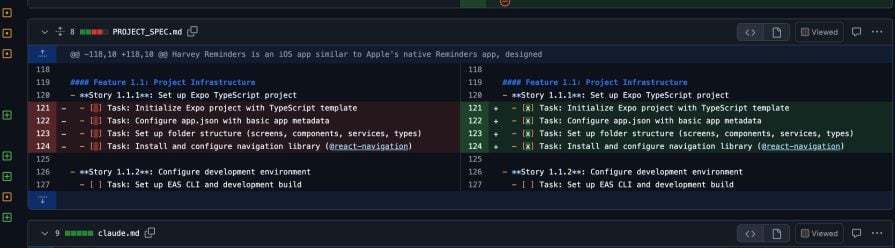
Following up, here is an open PR with the file changes that correspond to the story 1.1.1 shown as edits:

In this same PR, Claude Code went ahead and checked off the items for story 1.1.1:
The next steps with this process would be to ask Claude Code to continue iterating through each story that was written in the backlog section.
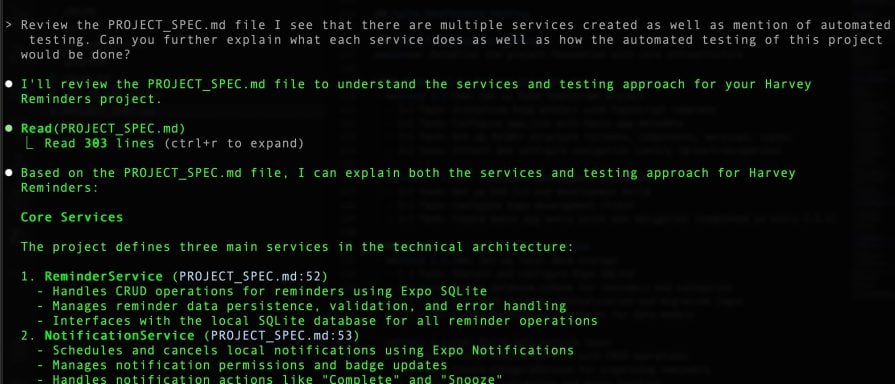
Anytime during this process, you can ask the agentic AI about the spec that was created. Reviewing the spec that Claude Code created, I see that it is creating multiple services and also mentions automated testing. Asking about the services and testing resulted in the following:
Skipping ahead, here is what it looks like when I asked it to work on story 1.2.2, which is creating the data services for the app to use:
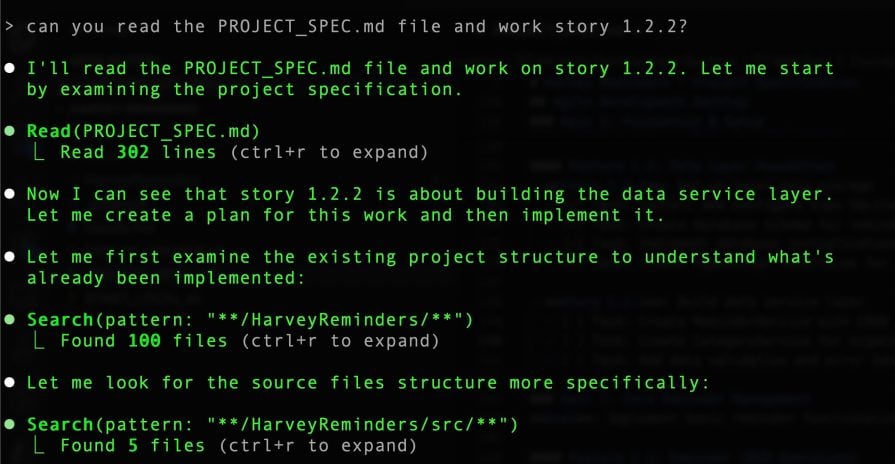
Just as it did with my first story, it first reads the spec file and then examines the project to understand what is to be done.
Next, it works through each service and proposes the changes before acting on them. Here it proposes the creation of the Category Service:
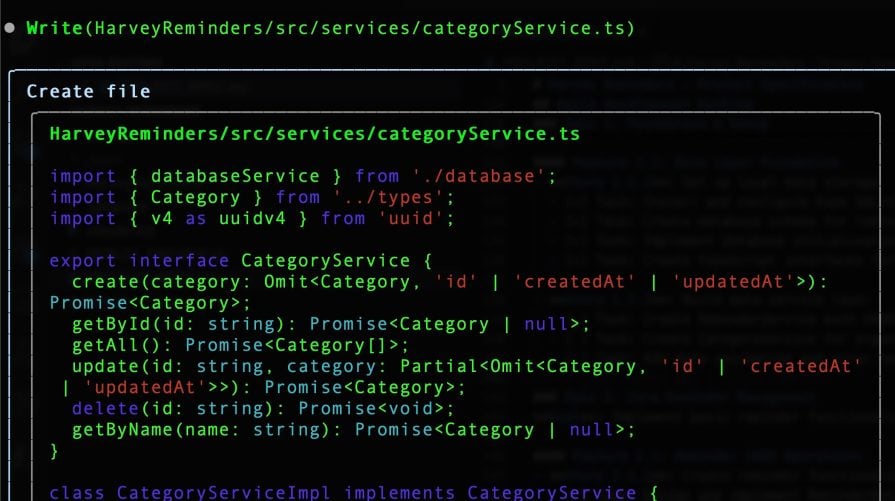
Finally, when it finishes this stage, it summarizes the work it did:
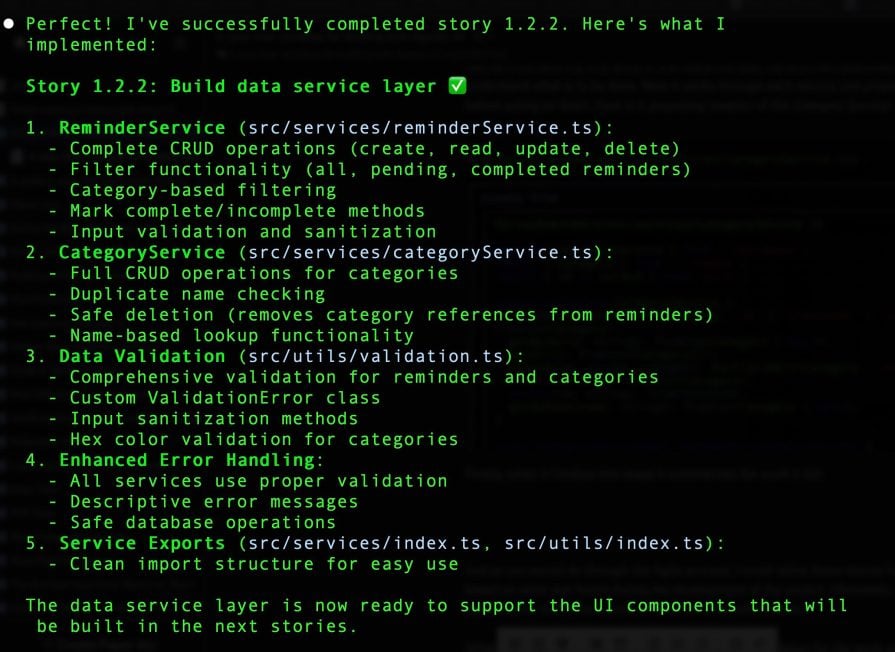
Modifying the existing spec, it also checks off the story 1.2.2 as done:

The next step from here is to open a PR and merge that change, just like I did with the last one.
So far, I’ve just been directly asking it to work on the stories as they are developed. I could, however, refine these stories further or modify them based on what was found during the development of the project. Ultimately, the project specification is still the source of truth for what will be done.
What I have gone through up to this point sets the foundation for the work, and the next steps would be to iterate through the different backlog stories and actually build the project.
Given the scope of this post, I will stop walking through the process here. However, you can imagine what the next iterations of this process would look like.
4. Additional integrations with MCP
So far, I’ve only discussed building a specification with a single markdown file. For smaller projects, this could work just fine. However, if you have a larger project, it would help if you could rely on project management software like Linear or Jira.
There are MCP servers that are available for project management systems, where you can get agentic AI tools to write out the specs and create things like epics/features/tasks/stories.
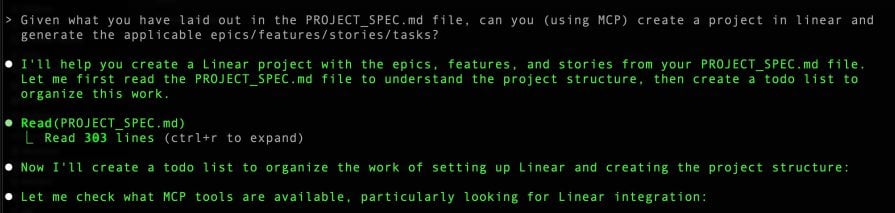
Utilizing MCP, you can get tools like Claude Code to convert a spec file into artifacts (like stories), which can then be further refined:
In my example project, I followed the Linear MCP setup with Claude Code and went ahead and passed in the project specification file that was created earlier:
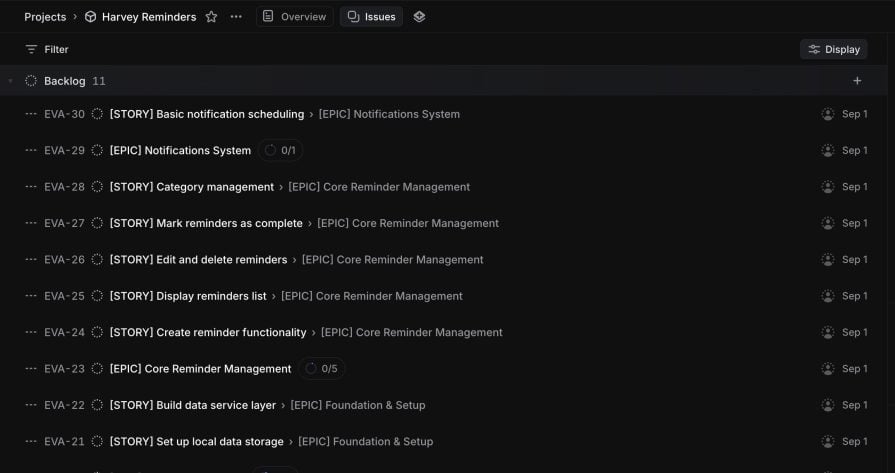
 After a few more prompts and iterations of creating artifacts in linear, the end product is an agile project broken out into features:
From here, using Claude Code and MCP, I could ask Claude to work stories from Linear instead of the project specification file. I could even connect the stories to PRs, and have Claude Code mark these stories as done in Linear when they get completed.
There are a lot of options when you get into project management software. The general approach with either the Markdown file or Linear that I have shown here gives you an idea of where you could start.
Lessons learned from our spec-first workflow with agentic AI
I’ve covered the spec-first approach and described how one could use this process to build applications. I’ve had both positive and negative experiences when putting the spec-first workflow into action on projects.
Working incrementally enhances version control and debugging
First, I’d like to mention that without the spec-first approach, I have had several negative experiences using AI tools. If you do not provide the right amount of context, it’s easy for an AI tool to run off and make sweeping changes to a project. Several small changes are always better than broad-scoping modifications to any project. The spec-first approach helps guide the tools to do what you want — how you want.
Doing work in small chunks or PRs also greatly helps with spec-first workflows. I have found that utilizing version control, like what you have with GitHub, helps to be able to clearly see what is being done as the project grows.
When I initially started using agentic AI, I didn’t do that. I quickly found that it is easy to lose sight of what has been done. This usage of version history is really helpful when debugging an issue or trying to understand what change made a specific behavior start happening.
Refining tasks is very important
It’s easy for the AI tools to oversimplify complex work. Thus, it’s important to refine the tasks that you have laid out into small enough pieces that you can manage the work.
If you do not refine the work, the AI will make massive code changes, which can get out of hand quickly. In one project, I ended up redoing a set of tasks because the AI had made sweeping changes to a large number of files that included multiple features at the same time. This made testing difficult, and the reason I re-did the work was so I could test it properly and ensure that what was changed was what I wanted.
Context is your most powerful asset
Another difficult part of this process is having to deal with AI assumptions. Sometimes these assumptions can be good, but they can also cause issues. In my example project, the AI assumed I would want unit testing and end-to-end testing as I built features.
The AI also assumed I would want to leverage specific test libraries like Jest and encouraged best practices. It didn’t ask me about these tests or libraries. I agreed to them because I had used them before and understood what was happening. It would have been easy to miss that if I had just blindly trusted the AI without verifying the changes through the PR process that I mentioned earlier.
If you provide the right amount of context and guardrails, the tools will be able to quickly and efficiently execute the work that you give them. Without these guardrails, the AI will start pursuing solutions that you have not asked it to.
For example, in one of my projects, I was unable to connect to Linear, so Claude Code started attempting to find alternative methods of project management. These alternative methods included attempting to install third-party libraries and even sending me to other services.
I had to stop the tool from continuing down this path and just needed to locally authenticate with Linear to resolve the issue. However, if I had allowed it, Claude Code would have connected me to a different service, and I could have ended up with several changes I never asked for.
Connecting to project management tools increases project visibility
Speaking of Linear — connecting work with a Linear board has also been a great way to manage work.
I’ve been able to utilize the process to link PRs and changes directly to the specification that I built. This has helped to track progress and validate changes through regular development workflows. Having the project in Linear also provided me with a good amount of visibility regarding what’s been done vs. what is left to do.
Having stories generated individually also gave me more opportunity to refine the work and what I would want as acceptance criteria.
Remember: AI is an assistant, not a replacement
Another way to manage the AI getting out of hand is to not rely on it to fully accomplish tasks. What this means in practice is just asking the AI to do one thing, and then you’ll finish the task or do something else with it.
This is different than just having the AI blindly do everything for you. The AI can be prone to errors, or just not implement something the way you had envisioned. As a developer using AI, it is important to always have the final authority on what code is actually changed.
The claude.md and /history folder are your friends
Using things like the claude.md file also greatly helps with hallucinations, as it forces the AI to follow a development process similar to what a regular developer would do. This means that if you wanted to do things like always including tests with every feature, the AI would attempt to do that automatically.
One limitation I found with Claude Code specifically is its conversation history. Whenever you start a Claude Code session, it does not have a record of the previous work, and you have to provide it with contextual information so that it can properly iterate and work through complex tasks.
A way I got around this was to have it write out Markdown files to a /history folder. Every time it does a task, I would ask Claude Code to make a new Markdown file. Then, when I start a Claude Code session, I would ask it to review the /history folder to get up to speed on what the project has done.
You could likely accomplish this same thing by asking it to look at your Git history. Unfortunately, this also eats up tokens very quickly, so it may not be the most efficient method to accomplish the goal. Having a specification file like I had in my sample project is a more efficient way to potentially accomplish the same thing.
Despite the extra work, spec-first development is worth it
Overall, I have found that the spec-first approach is a great help, even though it adds work. Similar to many things in software development, early investment in a process makes the longer-term activities easier.
I highly recommend this approach (or some variation of this) to improve work with agentic AI tools in particular. As I mentioned, I also recommend always viewing the AI agent as a collaborator, and not the only person working on the project.
Conclusion
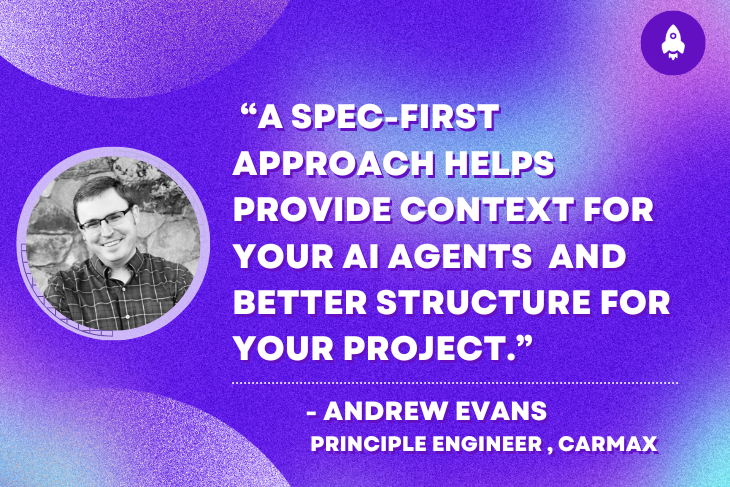
In short, a spec-first approach helps provide context to your AI agents and better structure for
your project.
In this post, I presented the concept of spec-first development with agentic AI. I covered agentic AI at a high level and proceeded to work through a sample project with the spec-first approach.
Most of what I’ve covered in this post is easily applied to smaller projects, but it can also be expanded to include work on a larger scale. As I’ve repeated, context is a powerful asset in working with AI agents. If you have a larger project, you can ask tools like Claude Code to review the project and build context.
You could also get an agentic AI tool to generate a spec file specific to a task you want to accomplish on a big project. The key takeaway from this is to hone in the focus of the AI tool on the work that needs to be done.
Using agentic AI can greatly improve productivity for individuals and teams. With the right steps, a spec-first approach can guide agentic AI tools and greatly streamline a workflow.
I hope this post has helped you to gain an understanding of the spec-first approach with AI agents. I encourage you to attempt something similar with your projects. Thanks for reading my post!
The post A spec-first workflow for building with agentic AI appeared first on LogRocket Blog.
This post first appeared on Read More