
Vitest 4 adoption guide: Overview and migrating from Jest
Editor’s note: This article was updated by Ikeh Akinyemi in December 2025 to cover Vitest 4, include expanded coverage of new Vitest 4 capabilities like stable Browser Mode and visual regression testing, and outline the process for migrating from Jest to Vitest.

Vitest is a powerful testing library built on top of Vite that has exploded in popularity since its initial release. You can use Vitest for a range of testing needs, such as unit, integration, end-to-end (E2E), snapshot, and performance testing of functions and components.
This versatile testing library works seamlessly with many popular JavaScript frontend frameworks, including React, Vue, Angular, Svelte, Lit, SolidJS, Alpine.js, Preact, Ember.js, and Backbone.js. You can also use Vitest in Node.js on the backend, and it supports full-stack frameworks such as Next.js and Nuxt.js.
With the release of Vitest 4 in October 2025, migrating from Jest to Vitest has become dramatically easier. If you’ve been eyeing Vitest’s instant startup times and native ESM support but dreading the thought of manually refactoring thousands of tests, that barrier is now gone. Modern codemods can automatically handle the heavy lifting, transforming jest.fn() to vi.fn(), jest.spyOn() to vi.spyOn(), and dozens of other API differences in minutes.
In this article, we’ll cover everything you need to know about Vitest, from understanding what makes it special to actually migrating an existing Jest project to Vitest 4. We’ll look at its features, limitations, and how to make the switch with minimal friction.
What is Vitest?
Vitest is a blazingly fast testing framework with out-of-the-box hot module reload (HMR), TypeScript, ECMAScript module (ESM), and JSX support. The HMR support ensures that only tests related to current changes are run, while JSX support is powered by esbuild under the hood.
Vitest is described as Jest-compatible, meaning that tests previously based on Jest work seamlessly with little or no changes. This compatibility is now even more practical thanks to automated migration tools that can convert your entire Jest test suite automatically. Furthermore, although Vitest is built on top of Vite, it can still be used in many JavaScript and TypeScript projects that weren’t originally set up with Vite.
Vitest 4: The migration moment
The release of Vitest 4 marked a significant milestone for teams considering migration. Key updates include:
- Stable Browser Mode: The experimental tag has been removed, making browser-based testing production-ready with providers like Playwright and WebdriverIO.
- Visual regression testing: Built-in screenshot comparison with
toMatchScreenshot()for catching UI changes. - Playwright Traces support: Generate and analyze traces for debugging complex browser interactions.
- Improved debugging: Better VS Code extension integration with “Debug Test” buttons and
--inspectflag support. - Enhanced type safety: Type-aware Hooks with
test.extendand newexpect.assertfor narrowing types.
These improvements make Vitest 4 not just a faster alternative to Jest, but a more complete testing solution
Background of Vitest
According to the creator of Vitest, Anthony Fu, when Vite was initially released in 2020, it came with a bunch of nice features, such as HMR and ESM support.
However, since it was new and relied on the browser for module evaluation (which means serving the source file to the user one file after the other), there was no way to run Vite-powered apps without the browser.
This meant that existing testing libraries could not properly run tests for Vite-powered projects, and the Vite team couldn’t find a testing library to recommend for Vite. Jest, the most popular testing library at that time, was able to partially run tests for Vite-powered apps, but it didn’t yet support async transformation and ESM.
So, a member of the Vite team, Matias Capeletto, suggested that they create their own tool to help run Vite-powered apps outside the browser. They came up with the Vitest and reserved it on npm before even deciding to build a testing framework.
Although Vitest is similar to Jest in API design, you’re far more likely to run into import and export issues with Jest, which is somewhat shocking since most modern JavaScript frameworks heavily depend on that feature. Vitest has the same powerful features Jest does, but follows a more modern approach with out-of-the-box import, export, and TypeScript support.
Migrating from Jest to Vitest
Let’s be honest, you probably have a Jest codebase you’ve been wanting to migrate for a while, and with the modern codemods release, this process is now largely automated.
Manually migrating tests is tedious and error-prone. Every jest.fn() needs to become vi.fn(), every jest.spyOn() becomes vi.spyOn(), and configuration files need complete restructuring. For a codebase with hundreds or thousands of tests, this could take days or weeks of developer time.
Automated codemods solve this by parsing your code and applying transformations automatically. The most popular and battle-tested option is the jest/vitest codemod from codemod.com, which handles the vast majority of Jest-to-Vitest API conversions.
Here’s what a standard Jest test file looks like in a React project:
// Button.test.js
import { render, screen, fireEvent } from '@testing-library/react';
import Button from './Button';

describe('Button component', () => {
  it('calls onClick handler when clicked', () => {
    const handleClick = jest.fn();
    render(<Button onClick={handleClick}>Click me</Button>);

    const button = screen.getByText('Click me');
    fireEvent.click(button);

    expect(handleClick).toHaveBeenCalledTimes(1);
  });

  it('renders with correct text', () => {
    const spy = jest.spyOn(console, 'log');
    render(<Button>Test Button</Button>);

    expect(screen.getByText('Test Button')).toBeInTheDocument();
    spy.mockRestore();
  });
});
And here’s a typical jest.config.js:
// jest.config.js
module.exports = {
  testEnvironment: 'jsdom',
  setupFilesAfterEnv: ['<rootDir>/jest.setup.js'],
  moduleNameMapper: {
    '\.(css|less|scss|sass)$': 'identity-obj-proxy',
  },
  transform: {
    '^.+\.(js|jsx|ts|tsx)$': ['babel-jest', { presets: ['@babel/preset-react'] }],
  },
};
The fastest way to migrate is using npx with the codemod CLI. In your project root, run:
npx codemod jest/vitest
The codemod will scan your project for Jest test files, then transform jest.* API calls to vi.* equivalents whilst updating the imports from 'jest' to 'vitest'. It also converts Jest globals to explicit imports and handles edge cases like jest.mock() → vi.mock() calls.
After running the codemod, your test file looks like this:
// Button.test.js
import { render, screen, fireEvent } from '@testing-library/react';
import { describe, it, expect, vi } from 'vitest';
import Button from './Button';

describe('Button component', () => {
  it('calls onClick handler when clicked', () => {
    const handleClick = vi.fn();
    render(<Button onClick={handleClick}>Click me</Button>);

    const button = screen.getByText('Click me');
    fireEvent.click(button);

    expect(handleClick).toHaveBeenCalledTimes(1);
  });

  it('renders with correct text', () => {
    const spy = vi.spyOn(console, 'log');
    render(<Button>Test Button</Button>);

    expect(screen.getByText('Test Button')).toBeInTheDocument();
    spy.mockRestore();
  });
});
Your jest.config.js becomes vitest.config.js:
// vitest.config.js
import { defineConfig } from 'vitest/config';

export default defineConfig({
  test: {
    environment: 'jsdom',
    setupFiles: ['./vitest.setup.js'],
    css: true, // Vitest handles CSS imports natively
  },
});
The automation makes the migration easy, but here’s a list of what you’ll need to handle manually:
- Configuration files (though the transformation is straightforward)
- Complex custom matchers
- Unusual Jest plugins or transformers
- Test setup files may need minor tweaks
Next, after running the codemod, install Vitest and remove Jest:
npm uninstall jest @types/jest
npm install -D vitest
If you’re testing React components:
npm install -D @testing-library/react @testing-library/jest-dom jsdom
Then update your package.json scripts:
{
  "scripts": {
    "test": "vitest",
    "test:ui": "vitest --ui",
    "test:coverage": "vitest --coverage"
  }
}
That’s it! Run npm test and your tests should work immediately, often with significantly faster execution times thanks to Vitest’s ESM-first architecture and HMR support.
How Vitest works
Vitest takes a file — e.g., summarize.test.ts — and runs it through a compiler like react-vite or a rollup plugin. Then, it processes the file into a framework-agnostic format that can be run in ESM or CommonJS. This means you can quickly reload and rerun tests.
In comparison, a testing library like Jest takes a test file and runs it through packages like babel-preset-env, babel-ts, and babel-react before finally converting it to CommonJS and running the test.
Interestingly, Vitest keeps a sort of cache in the form of import maps of every dependency involved in our test. So, when there’s a file change related to a test that we’re running, then only the associated tests are run again. Vitest accomplishes this by using the Vite bundler under the hood, which has the HMR feature attached to it.
Generally, re-running tests on Vitest is much faster because it doesn’t bundle the test files over and over. Instead, it only re-bundles the specific files that changed.
Suppose we have a JSX component that looks like this:
// Example.jsx

export const ScienceClass = () => {
   return (
          <>
            <Physics />
            <Chemistry />
            <Biology />
            <Mathematics />
            <ComputerScience />
          </>
)}
Let’s say you run a test using Vitest for the component above, and it takes about 100ms to run. Then, if you make a change or swap the <Biology /> component with a different component like <Agriculture />, Vitest will only rebundle the <Agriculture /> component or bundle the new component, and might take even a shorter period, like 20ms, to complete the test.
However, when you use other testing libraries like Jest, then upon any file change, it will re-bundle the whole component and take probably the same amount of time it took for the test to be run initially.
Why use Vitest?
The number one reason to use Vitest is that it supports TypeScript and ESM out of the box. You don’t have to configure anything, install any plugins, or spend an afternoon debugging why your CSS imports are breaking. If you write import styles from './Button.css' in your test file, Vitest just handles it. If your tests are in TypeScript, Vitest runs them without needing ts-jest or a custom Babel configuration. This alone is enough to justify migration for most teams.
But there’s more to the story. Vitest has quietly become one of the most pleasant testing experiences in the JavaScript ecosystem, and a lot of that comes down to developer experience decisions that compound over time.
The developer experience is legitimately better
Vitest can be installed and used immediately without any configuration. If you want to customize your setup, you create a vite.config.ts or vitest.config.ts file. Since Vitest is built on top of Vite, it uses the same minimal configuration format.
Developers who are already using Vite don’t have to learn a new config system, they just add a test section to their existing Vite config. For developers coming from Jest, the learning curve is almost nonexistent because Vitest deliberately mimics Jest’s API.
With Vitest 4, the DX improvements have reached a new level. The VS Code extension now has a “Debug Test” button that works seamlessly with browser tests. You can click a single button and step through your Playwright-based browser tests with full DevTools access.
If you prefer manual debugging, you can start Vitest with the --inspect flag and connect to Chrome DevTools yourself. This kind of integration used to require complex configuration in Jest; in Vitest 4, it just works.
Inline tests are genuinely useful
One feature that doesn’t get enough attention is inline testing. With Vitest, you can write tests directly inside your source files instead of creating separate .test.ts files. This might sound weird if you’ve never tried it, but it’s incredibly convenient for utility functions and small modules.
Here’s how it works. Let’s say you have an add.ts file with a simple function:
// add.ts

/** A function that accepts a list of numbers and sums it up */
export default function add(...numbers: number[]) {
  return numbers.reduce((acc, curr) => acc + curr, 0);
}

// Inline test for the add function
if (import.meta.vitest) {
  const { describe, expect, it } = import.meta.vitest;

  describe("add function", () => {
    it("returns 0 with no numbers", () => {
      expect(add()).toBe(0);
    });

    it("returns correct value when numbers are passed", () => {
      expect(add(25, 40, 1)).toBe(66);
    });
  });
}
The if (import.meta.vitest) check ensures that the test code only runs when Vitest is executing. In production builds, this entire block gets stripped out automatically. To enable this feature, you just need to update your vite.config.ts:
// vite.config.ts
import { defineConfig } from "vitest/config";

export default defineConfig({
  test: {
    includeSource: ["src/**/*.{js,ts}"],
  },
});
Now Vitest will scan your entire src folder for inline tests, not just files ending in .test.ts or .spec.ts. If you’re using TypeScript, you’ll also need to add "types": ["vitest/importMeta"] to your tsconfig.json to fix the type errors.
// tsconfig.json
{
  "compilerOptions": {
    ...
    /* The fix to the inline test warning */
    "types": ["vitest/importMeta"]
  },
  ...
}
Inline tests aren’t for every situation; large test suites should still belong in separate files. But for small utility functions and pure logic, they’re incredibly convenient. You keep the test right next to the implementation, and you never have to jump between files.
Hot module replacement makes test-driven development actually pleasant
This is the feature that makes Vitest feel magical in practice. When you save a file, Vitest doesn’t rerun your entire test suite. It only reruns the tests that are affected by the change you just made. If you modify a single component, only the tests for that component run. If you change a utility function that’s imported by five different test files, only those five files run.
This is possible because Vitest uses Vite’s module graph to track dependencies. Vite already knows which modules import which other modules, and it has to know this for HMR to work during development. Vitest just leverages that same dependency graph for test execution. The result is a test runner that feels instant in watch mode, even for large codebases.
If you’re coming from Jest, the difference is startling. Jest’s watch mode is fine, but it doesn’t have the same level of granular dependency tracking. When you change a file, Jest often reruns more tests than necessary because it’s being conservative. Vitest can be precise because it has Vite’s module graph telling it exactly what changed.
Vitest 4 adds production-ready browser testing
One of the biggest updates in Vitest 4 is that Browser Mode is no longer experimental. You can now write tests that run in a real browser environment using Playwright or WebdriverIO, and Vitest will handle the orchestration. This is huge for teams that need to test browser-specific APIs, complex UI interactions, or visual rendering.
Setting up browser testing used to require separate tools like Cypress or Playwright Test. Now you can do it directly in Vitest with a configuration that looks like this:
import { defineConfig } from 'vitest/config'
import { playwright } from '@vitest/browser-playwright'

export default defineConfig({
  test: {
    browser: {
      provider: playwright({
        launchOptions: {
          slowMo: 100,
        },
      }),
    },
  },
})
You write tests using the same Vitest API you’re already familiar with, but they execute in a real browser. You can interact with the page using locators, click buttons, fill forms, and make assertions about what’s rendered on screen. For teams that were running Vitest for unit tests and Cypress for integration tests, this consolidation is a major workflow improvement.
Vitest 4 also introduces visual regression testing with the toMatchScreenshot() assertion. You can capture screenshots of UI components and compare them against baseline images to catch unintended visual changes. This used to require third-party tools or a complex Playwright setup; now it’s a first-class Vitest feature
Getting started with Vitest
The fastest way to start with Vitest is using the Vite CLI. Open your terminal and run:
npm create vite
Name your project, select Vanilla as the framework and TypeScript as the variant. Then run the following commands:
cd app
npm install
npm install --save-dev vitest
Create a simple function in src/add.ts:
// src/add.ts
export default function add(...numbers: number[]) {
  return numbers.reduce((acc, curr) => acc + curr, 0);
}
Create a test file src/add.test.ts:
// src/add.test.ts
import add from "./add";
import { describe, expect, it } from "vitest";

describe("#Add", () => {
  it("returns 0 with no numbers", () => {
    expect(add()).toBe(0);
  });

  it("returns correct value when numbers are passed", () => {
    expect(add(25, 40, 1)).toBe(66);
  });
});
Update your package.json to add a test script:
{
  "scripts": {
    "test": "vitest"
  }
}
Run npm test. Vitest enables watch mode by default, so your tests will rerun automatically when you make changes. That’s it — you’re testing. You can get the source code for the examples above on GitHub.
Further reading:
Key Vitest features to know
Vitest isn’t just used to write simple tests, as we demonstrated in the code above. You can also use it to write more complex tests, as well as for unit tests, test coverages, snapshots, mocking, and even test reporting. Let’s talk about some standout Vitest features:
Test filtering
Vitest provides a very useful feature that gives us the ability to filter tests by a particular name. Normally, we can run tests by running vitest (or npm run vitest) in the terminal. However, Vitest allows us to filter tests using a word in the path. This means that when we do vitest add, it will run any test with the add in its path.
Vitest CLI
The Vitest command line interface provides us with a ton of options that we can use to perform certain actions. What this means is that when running tests using vitest, we can also provide a follow-up action, which may include:
vitest --watch — Enables watch mode. It ensures that Vitest monitors file changes and only reruns tests for affected files. You should note that this option is enabled by default
vitest --silent — Hides console output for tests
vitest --dom — Ensures Vitest uses the happy-dom package to mock some browser APIs
vitest --run — Disables watch mode. It’s used to run the test at once instead of waching for file changes
vitest --standalone — Starts Vitest without running tests, which means that tests will be run only when files relating to a test changes
vitest --clearScreen — Clears the terminal screen before running a new test
Snapshot testing
Snapshots let you track changes in function output over time. When you use toMatchSnapshot(), Vitest creates a __snapshots__folder with a .snap file containing the expected output:
it("returns correct value when numbers are passed", () => {
  const output = add(25, 40, 2);
  expect(output).toMatchSnapshot();
});
Vitest generates __snapshots__/add.test.ts.snap:
exports[`#Add > returns correct value when numbers are passed 1`] = `67`;
If the output changes on subsequent runs, your test fails. This is useful for catching unintended changes in complex data structures or rendered output.
Test coverage
Run coverage reports with:
npm run vitest --coverage
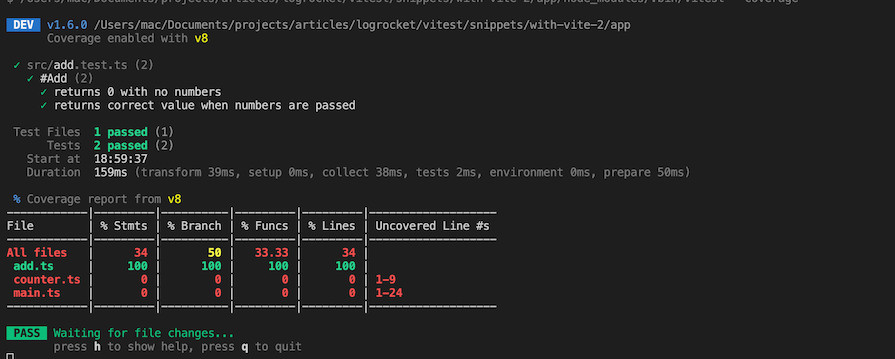
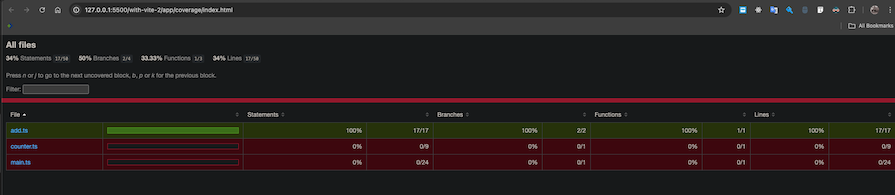
By default, coverage prints to the terminal. You can output it as HTML instead by updating your config:
// vitest.config.ts
import { defineConfig } from "vitest/config";

export default defineConfig({
  test: {
    coverage: {
      reporter: ["html"],
    },
  },
});
The report saves to a coverage folder. Open index.html in a browser to see detailed line-by-line coverage metrics:
Multiple helper functions
The Vitest testing library comes with a bunch of helper functions that make testing easier and more efficient. Some of the functions include:
afterEach— Used to run an operation after each test has been run individuallyafterAll— Used to run an operation after all the test has been runbeforeAll— Used to run an operation before all the test has been runexpect— Used to perform assertions on operations and valuesit— Used to hold a single block of testtest— Similar to theitfunctionbeforeEach— Used to run an operation before each test is run individually
Here’s an example of how to use beforeEach:
  beforeEach(() => {
    console.log("Hello");
  });
Coverage provider
You should be aware that by default, Vitest makes use of the @vitest/coverage-v8 package to process and output the coverage. However, you can also use a different or custom provider such as @vitest/coverage-istanbul. To configure the use of other providers, you can modify the vitest.config.ts or vite.config.ts files like so:
// vitest.config.ts or vite.config.ts
import { defineConfig } from "vitest/config";

export default defineConfig({
  test: {
    coverage: {
      reporter: ["html"],
      provider: "instabul"
    },
  },
});
You can also pass a different folder location to output your coverage report, like so:
// vitest.config.ts or vite.config.ts
import { defineConfig } from "vitest/config";

export default defineConfig({
  test: {
    coverage: {
      reporter: ["html"],
      provider: "instabul",
      reportsDirectory: "./some-custom-directory/coverage"
    },
  },
});
Function mocking
Vitest provides two main mocking utilities: vi.fn() for creating mock functions and vi.spyOn() for observing existing functions.
Use vi.fn() to create a completely fake function:
const mock = vi.fn().mockImplementation(add);
expect(mock(1, 2, 3)).toEqual(6);
expect(mock).toHaveBeenCalledTimes(1);
Use vi.spyOn() to observe a real function without changing its behavior:
const calculation = { add };
const spy = vi.spyOn(calculation, "add");
calculation.add(6, 10, 20);
expect(spy).toHaveBeenCalledTimes(1);
Note that to use the spy method, the method or function to be spied on should be in a module.
API request mocking
Even though Vitest doesn’t run on the web, we can use Mock Service Worker (MSW) to intercept REST and GraphQL API requests. The essence of mocking API calls is to avoid calling the real API unnecessarily during the development of a functionality. To use this feature, install MSW:
npm install -D msw
Create a setup.ts file to define mock handlers:
// setup.ts
import { afterAll, afterEach, beforeAll } from "vitest";
import { setupServer } from "msw/node";
import { HttpResponse, http } from "msw";

const names = ["John", "Jane", "Megan", "Stewie", "Peter"];

export const restHandlers = [
  http.get("https://list-family-guy.com", () => {
    return HttpResponse.json(names);
  }),
];

const server = setupServer(...restHandlers);

beforeAll(() => server.listen({ onUnhandledRequest: "error" }));
afterAll(() => server.close());
afterEach(() => server.resetHandlers());
Link the setup file in your config:
// vitest.config.ts
export default defineConfig({
  test: {
    setupFiles: ["./setup.ts"],
  },
});
Now you can test API-dependent code without hitting real endpoints:
const fetchFamilyGuy = async () => {
  const res = await fetch("https://list-family-guy.com");
  return await res.json();
};

it("fetches family guy names", async () => {
  const list = await fetchFamilyGuy();
  expect(list).toEqual(["John", "Jane", "Megan", "Stewie", "Peter"]);
});
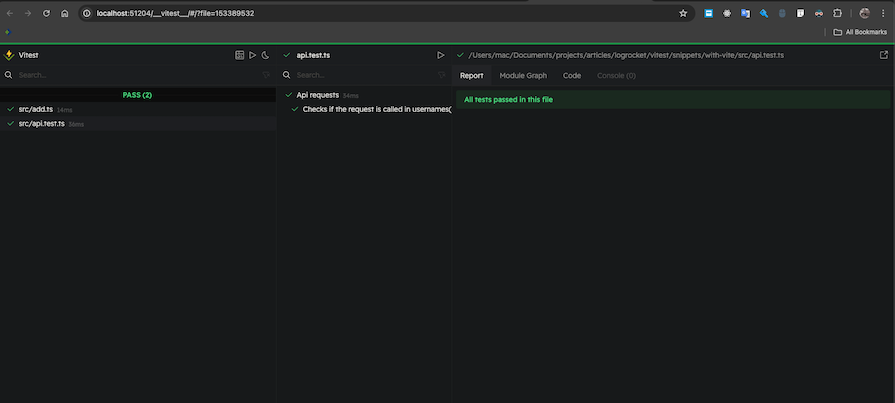
Vitest UI
We can use the Yarn Vitest UI, which is powered by @vitest/ui, to view tests and their results in the browser in an aesthetic format. To use this feature, simply install @vitest/ui and attach the --ui option when we want to run a test, like so:
npm run vitest --ui
This will output a beautiful UI on the browser with our tests, like this:
Type testing
Vitest 4 lets you test your TypeScript types themselves using expectTypeOf:
import { describe, expectTypeOf, it } from "vitest";

type ManTypes = {
  name: string;
  age: number;
  schools: { college: string; grade: string }[];
};

describe("some types", () => {
  it("matches the expected type", () => {
    const man: ManTypes = {
      name: "John",
      age: 98,
      schools: [{ college: "Harvard", grade: "first class" }],
    };
    expectTypeOf(man).toEqualTypeOf<ManTypes>();
  });
});
This catches type regressions in your codebase just like unit tests catch logic regressions.
Further reading:
- A guide to Vitest automated testing with Vue components
- A guide to visual debugging with Vitest Preview
- Testing a Svelte app with Vitest
Vitest vs. other popular testing libraries
Vitest isn’t the only option, but it’s often the best one for modern JavaScript projects. Here’s how it compares to the main alternatives.
Vitest vs. Jest
Jest is still the most popular JavaScript testing library, but Vitest has clear advantages. Vitest supports TypeScript and ESM out of the box, meaning no configuration, no plugins, no ts-jest. However, Jest requires extra setup for both. Vitest’s HMR-powered watch mode only reruns affected tests, making it significantly faster than Jest in large codebases. The APIs are nearly identical, so switching is straightforward, especially with automated codemods.
If you’re starting a new project or already using Vite, choose Vitest. If you have a massive Jest codebase and don’t want to migrate, Jest still works fine.
Vitest vs. Cypress
Cypress is actually an end-to-end testing library. It’s browser-based and is mostly used to test the accessibility, visibility, and interactiveness of applications on the web.
Cypress complements Vitest nicely — the Vitest team even recommends it as an end-to-end and component testing library to be used alongside Vitest.
Vitest vs. uvu
uvu is a very fast test runner, but it has a lot of drawbacks. For instance, it does not feature HMR, which comes by default with Vitest. It also uses a single thread to run tests, which means that files can sometimes be accidentally leaked on the browser, which is not good for a security-conscious team.
uvu can be used for very small projects and will work just fine, but it’s not recommended to be used in a big application.
Comparison table: Vitest vs. Jest vs. Cypress vs. uvu
In this table, we’ll summarize the comparison between Vitest and other popular testing libraries so you can evaluate them at a high level at a glance:
| Features | Vitest | Jest | Cypress | uvu |
|---|---|---|---|---|
| Use case | Unit, snapshot, integration testing | Unit, snapshot, integration testing | End-to-end testing | Unit testing |
| Parallel testing | Built-in | Built-in | Built-in | Not available |
| Assertions | Built-on | Built-in | External library (Chai) | Built-in |
| TypeScript support | Out of the box | Extra configuration | Extra configuration | Extra configuration |
| ESM support | Out of the box | Extra configuration | Extra configuration | Extra configuration |
| Performance | Fast | Moderate | Slow | Very fast |
| HMR | Yes | No | No | No |
Further reading:
Conclusion
Vitest 4 removes the last real barrier to migration: effort. With mature codemods that automate the Jest-to-Vitest transition, you can migrate a codebase in minutes instead of days. You get native TypeScript and ESM support, dramatically faster test execution through HMR, stable browser testing, and visual regression capabilities — all with a Jest-compatible API that requires almost no relearning.
If you’re starting a new project, use Vitest. If you have an existing Jest codebase and you’ve been putting off migration because it seemed like too much work, run npx codemod jest/vitest and see how far you get. The tooling is ready, the ecosystem is mature, and the performance gains are real.
The post Vitest 4 adoption guide: Overview and migrating from Jest appeared first on LogRocket Blog.
This post first appeared on Read More