
How to build agentic frontend applications with CopilotKit
Introduction
The web is full of AI assistants that appear to understand application UIs, user data, and intent. In practice, however, most of these systems operate outside the application itself. When you try to build one from scratch, you quickly run into a core limitation: large language models have no native understanding of your React state, component hierarchy, or business logic.

CopilotKit bridges this gap with its Direct-to-LLM architecture, allowing you to expose your app’s state and actions directly to language models without building custom APIs or complex orchestration layers.
In this tutorial, we’ll build an AI-powered playlist builder to demonstrate how CopilotKit works in practice. You’ll learn how to make frontend state readable to an LLM, define actions the model can execute, and design natural language interfaces on top of existing React components. By the end, you’ll understand how to integrate CopilotKit into a React application and build agentic features that respond meaningfully to user intent.
Prerequisites
To follow along, you’ll need:
- A React application
- Node.js v18 or higher installed on your machine
- Basic familiarity with React hooks
- An understanding of TypeScript basics
- A Google AI API key
What is CopilotKit?
CopilotKit is a framework for building AI-powered features into React applications. Unlike AI chatbots that operate in isolation, CopilotKit integrates directly with your application’s state and logic, allowing the AI to read your app’s context and take actions.
CopilotKit provides three key capabilities:
- Readable state: Expose your application state to the AI so it understands what’s happening in your app
- Custom actions: Define functions that the AI can execute on behalf of users
- Chat interface: A prebuilt UI component for natural language interactions
Let’s go ahead and set it up.
Project setup
Start by creating a new Next.js project with TypeScript and Tailwind CSS:
npx create-next-app@latest playlist-builder
Inside the project folder, install CopilotKit:
npm install @copilotkit/react-core @copilotkit/react-ui
Next, install the CopilotKit backend runtime:
npm install @copilotkit/runtime
Create a .env.local file in your project root and add your Google AI API key:
GOOGLE_API_KEY="your Api key here"
With the dependencies installed, set up the project structure. If you’re using Next.js, create the following folders inside the app directory:
componentsapi
Setting up the CopilotKit backend
Before building the frontend, create an API route that handles communication between CopilotKit and Google AI.
Inside the api folder, create a copilotkit folder. Then create a route.ts file inside it and add the following code:
import {
  CopilotRuntime,
  GoogleGenerativeAIAdapter,
  copilotRuntimeNextJSAppRouterEndpoint,
} from '@copilotkit/runtime';

import { NextRequest } from 'next/server';

const serviceAdapter = new GoogleGenerativeAIAdapter({ model: 'gemini-3-flash-preview' });
const runtime = new CopilotRuntime();

export const POST = async (req: NextRequest) => {
  const { handleRequest } = copilotRuntimeNextJSAppRouterEndpoint({
    runtime,
    serviceAdapter,
    endpoint: '/api/copilotkit',
  });

  return handleRequest(req);
};
This creates a serverless route that initializes a CopilotKit runtime and configures it to use the gemini-3-flash-preview model.
Building the playlist component structure
First, define the TypeScript types.
In the components folder, create a PlaylistBuilder.tsx file and add the following:
"use client";

import { useState } from "react";

interface Song {
  id: string;
  title: string;
  artist: string;
  duration: string;
  isFavorite: boolean;
}
This interface defines the shape of each song in the playlist. Each song has a unique ID, title, artist, duration, and an isFavorite flag.
Next, set up the PlaylistBuilder component:
export default function PlaylistBuilder() {
  const [songs, setSongs] = useState<Song[]>([]);
  const playlistName = "My Awesome Playlist";

  const [isFormOpen, setIsFormOpen] = useState(false);
  const [newSongTitle, setNewSongTitle] = useState("");
  const [newSongArtist, setNewSongArtist] = useState("");
  const [newSongDuration, setNewSongDuration] = useState("");

  const handleManualToggleFavorite = (id: string) => {
    setSongs((prev) =>
      prev.map((song) =>
        song.id === id ? { ...song, isFavorite: !song.isFavorite } : song
      )
    );
  };

  const handleManualRemove = (id: string) => {
    setSongs((prev) => prev.filter((song) => song.id !== id));
  };

  const handleManualAdd = (e: React.FormEvent) => {
    e.preventDefault();
    if (!newSongTitle.trim() || !newSongArtist.trim()) return;

    const newSong: Song = {
      id: Date.now().toString(),
      title: newSongTitle.trim(),
      artist: newSongArtist.trim(),
      duration: newSongDuration.trim() || "0:00",
      isFavorite: false,
    };

    setSongs((prev) => [...prev, newSong]);
    setNewSongTitle("");
    setNewSongArtist("");
    setNewSongDuration("");
    setIsFormOpen(false);
  };
This code initializes component state using React’s useState hook to manage playlist songs and the visibility of the add-song form. It also defines handlers for manually adding, removing, and favoriting songs.
The return statement for PlaylistBuilder is shown below:
return (
  <>
    ...
  </>
);
In this JSX, we render the playlist header, a list of songs with controls for favoriting and removing items, and an empty state when no songs are present. We also add a floating button that opens a form, allowing users to manually add songs to the playlist.
Integrating CopilotKit
Now for the exciting part: integrating CopilotKit to enable natural language interactions.
Update layout.tsx to wrap your app with the CopilotKit provider:
import type { Metadata } from "next";
import { CopilotKit } from "@copilotkit/react-core";
import "@copilotkit/react-ui/styles.css";
import "./globals.css";

export const metadata: Metadata = {
  title: "Playlist Builder",
  description: "Build playlists with AI assistance",
};

export default function RootLayout({
  children,
}: Readonly<{
  children: React.ReactNode;
}>) {
  return (
    <html lang="en">
      <body>
        <CopilotKit runtimeUrl="/api/copilotkit">
          {children}
        </CopilotKit>
      </body>
    </html>
  );
}
The CopilotKit component wraps your application and connects it to the backend runtime. The runtimeUrl points to the API route created earlier.
Next, update app/page.tsx to render the playlist and the CopilotKit chat interface:
"use client";

import PlaylistBuilder from "./components/PlaylistBuilder";
import { CopilotPopup } from "@copilotkit/react-ui";

export default function Home() {
  return (
    <main className="min-h-screen bg-gradient-to-br from-zinc-50 to-zinc-100 dark:from-zinc-900 dark:to-zinc-800 py-12">
      <PlaylistBuilder />
      <CopilotPopup
        instructions="You are an AI assistant helping users manage their music playlist. Be concise and helpful."
        labels={{
          title: "Playlist Assistant",
          initial: "Hi! I can help you manage your playlist. Try saying 'add a song' or 'remove the first song'.",
        }}
      />
    </main>
  );
}
The CopilotPopup component adds a chat interface to your app. The instructions prop provides role context for the AI, while labels customizes the UI text.
Exposing state to the AI with useCopilotReadable
Before the AI can help manage the playlist, it needs to understand the current state. CopilotKit provides the useCopilotReadable hook for this purpose.
Update the imports in PlaylistBuilder.tsx:
import { useCopilotReadable, useCopilotAction } from "@copilotkit/react-core";
Then add the readable state hook inside the component, right after the state declarations:
useCopilotReadable({
  description: "The current playlist state including all songs, their order, and favorites",
  value: {
    playlistName,
    songs: songs.map((song, index) => ({
      position: index + 1,
      id: song.id,
      title: song.title,
      artist: song.artist,
      duration: song.duration,
      isFavorite: song.isFavorite,
    })),
    totalSongs: songs.length,
  },
});
This exposes the playlist’s current state to the AI. The description provides context, while the value contains the actual data.
Creating AI actions with useCopilotAction
Next, define actions the AI can execute. All code in this section is added to PlaylistBuilder.tsx.
Action: Add a song
useCopilotAction({
  name: "addSong",
  description: "Add a new song to the playlist. Use this when the user wants to add a song with title, artist, and duration.",
  parameters: [
    { name: "title", type: "string", description: "The title of the song", required: true },
    { name: "artist", type: "string", description: "The artist or band name", required: true },
    { name: "duration", type: "string", description: "The duration in MM:SS format (e.g., '3:45')", required: false },
  ],
  handler: async ({ title, artist, duration = "0:00" }) => {
    const newSong: Song = {
      id: Date.now().toString(),
      title,
      artist,
      duration,
      isFavorite: false,
    };
    setSongs((prev) => [...prev, newSong]);
    return `Added "${title}" by ${artist} to the playlist`;
  },
});
This action defines how the AI adds songs to the playlist, including the required parameters and execution logic.
Action: Remove a song
useCopilotAction({
  name: "removeSong",
  description: "Remove a song from the playlist by its title, artist, or position number",
  parameters: [
    {
      name: "identifier",
      type: "string",
      description: "The song title, artist name, or position number (e.g., 'first', '1', 'Bohemian Rhapsody')",
      required: true,
    },
  ],
  handler: async ({ identifier }) => {
    ...
  },
});
This action lets the AI remove songs using flexible identifiers such as position, title, or artist.
Action: Reorder songs
useCopilotAction({
  name: "reorderSong",
  description: "Move a song to a different position in the playlist",
  parameters: [
    { name: "fromPosition", type: "number", description: "The current position of the song (1-indexed)", required: true },
    { name: "toPosition", type: "number", description: "The target position for the song (1-indexed)", required: true },
  ],
  handler: async ({ fromPosition, toPosition }) => {
    ...
  },
});
This action moves a song from one position to another using array splicing, with validation to ensure positions are in range.
Action: Toggle favorites
useCopilotAction({
  name: "toggleFavorite",
  description: "Mark or unmark a song as favorite",
  parameters: [
    {
      name: "identifier",
      type: "string",
      description: "The song title, artist, or position number",
      required: true,
    },
  ],
  handler: async ({ identifier }) => {
    ...
  },
});
This action toggles the isFavorite flag for a song, using the same flexible identification logic as the remove action.
Let’s test it in the browser:
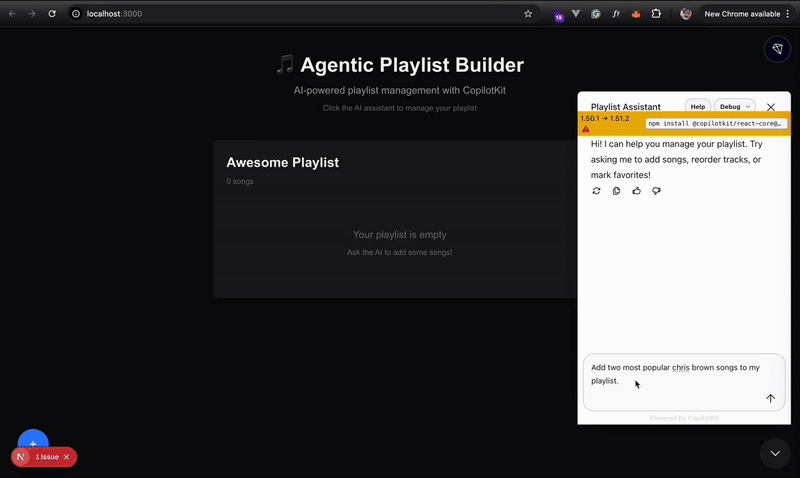
Notice how the AI assistant adds songs to the playlist using natural language. You can find the full demo codebase in the linked GitHub repository.
Conclusion
In this guide, we built an AI-powered playlist manager using CopilotKit to illustrate what it means to design agentic frontend applications. You saw how useCopilotReadable makes live application state available to a language model, and how useCopilotAction turns existing business logic into executable capabilities the model can invoke.
Together, these patterns shift AI from a passive chat layer into an active participant in your UI. Instead of bolting a chatbot onto your app, you give the model structured access to state and intent, enabling it to reason, act, and adapt in real time. The techniques covered here form a practical foundation for building the next generation of AI-powered frontend applications that are genuinely context-aware and user-driven.
The post How to build agentic frontend applications with CopilotKit appeared first on LogRocket Blog.
This post first appeared on Read More