IT support teams face persistent challenge: employees expect instant answers to common questions (VPN setup, single sign-on troubleshooting, new-hire onboarding), but novel or complex issues still require human expertise. An AI agent that confidently answers, “How do I reset my VPN?” but hallucinates a response to “My IAM Identity Center session keeps expiring after last night’s IdP migration” creates more tickets than it resolves.
In this post, we present an IT Service Desk agent that handles routine Level 1 (L1) support requests autonomously and escalates complex issues to Level 2/Level 3 (L2/L3) engineers when confidence is low. The agent is built with LangGraph, an open source (MIT-licensed) framework for stateful AI workflows maintained by the LangChain community. LangGraph’s interrupt() and checkpointing primitives map directly to tiered support escalation. While we demonstrate deployment on Amazon Elastic Kubernetes Service (Amazon EKS) with Amazon DynamoDB for state persistence, this LangGraph pattern runs on any Kubernetes platform; the orchestration layer is portable and the state backend is pluggable.
In addition to LangGraph, this solution builds on FastAPI for the HTTP layer, OpenTelemetry for tracing, and Karpenter for node autoscaling.
Why LangGraph for stateful support workflows
LangGraph models AI workflows as directed graphs, which makes tiered support escalation a natural fit. This implementation pairs LangGraph with Kubernetes for orchestration; for this post, we will use Amazon EKS. Key properties:
Automatic L1 resolution: Well-documented issues (VPN, password resets, software installation) are resolved without human intervention.
Context-preserving escalation: When the knowledge base lacks coverage or the issue is novel, LangGraph escalates with full context: the employee’s question, the AI’s attempted answer, and the retrieved documentation.
Durable state persistence: LangGraph’s checkpointing (implemented here with Amazon DynamoDB, but also supporting PostgreSQL, Redis, or custom backends) keeps escalated tickets intact across pod restarts, scaling events, and multi-replica routing.
Complete execution tracing: OpenTelemetry records every escalation decision: why the agent escalated, what documentation it searched, and who resolved the ticket.
Horizontal scaling: Kubernetes scales the agent based on demand; on Amazon EKS we use Karpenter configured to provision Amazon Elastic Compute Cloud (Amazon EC2) Spot Instances for resource optimization.
Architecture overview
The system consists of a FastAPI application running a LangGraph agent on Amazon EKS. The agent retrieves context from Amazon OpenSearch Serverless (indexed IT runbooks, troubleshooting guides, and onboarding documentation), generates answers using Anthropic’s Claude model on Amazon Bedrock, and conditionally escalates to human L2/L3 engineers when confidence is low. Amazon DynamoDB persists conversation state across pod restarts.
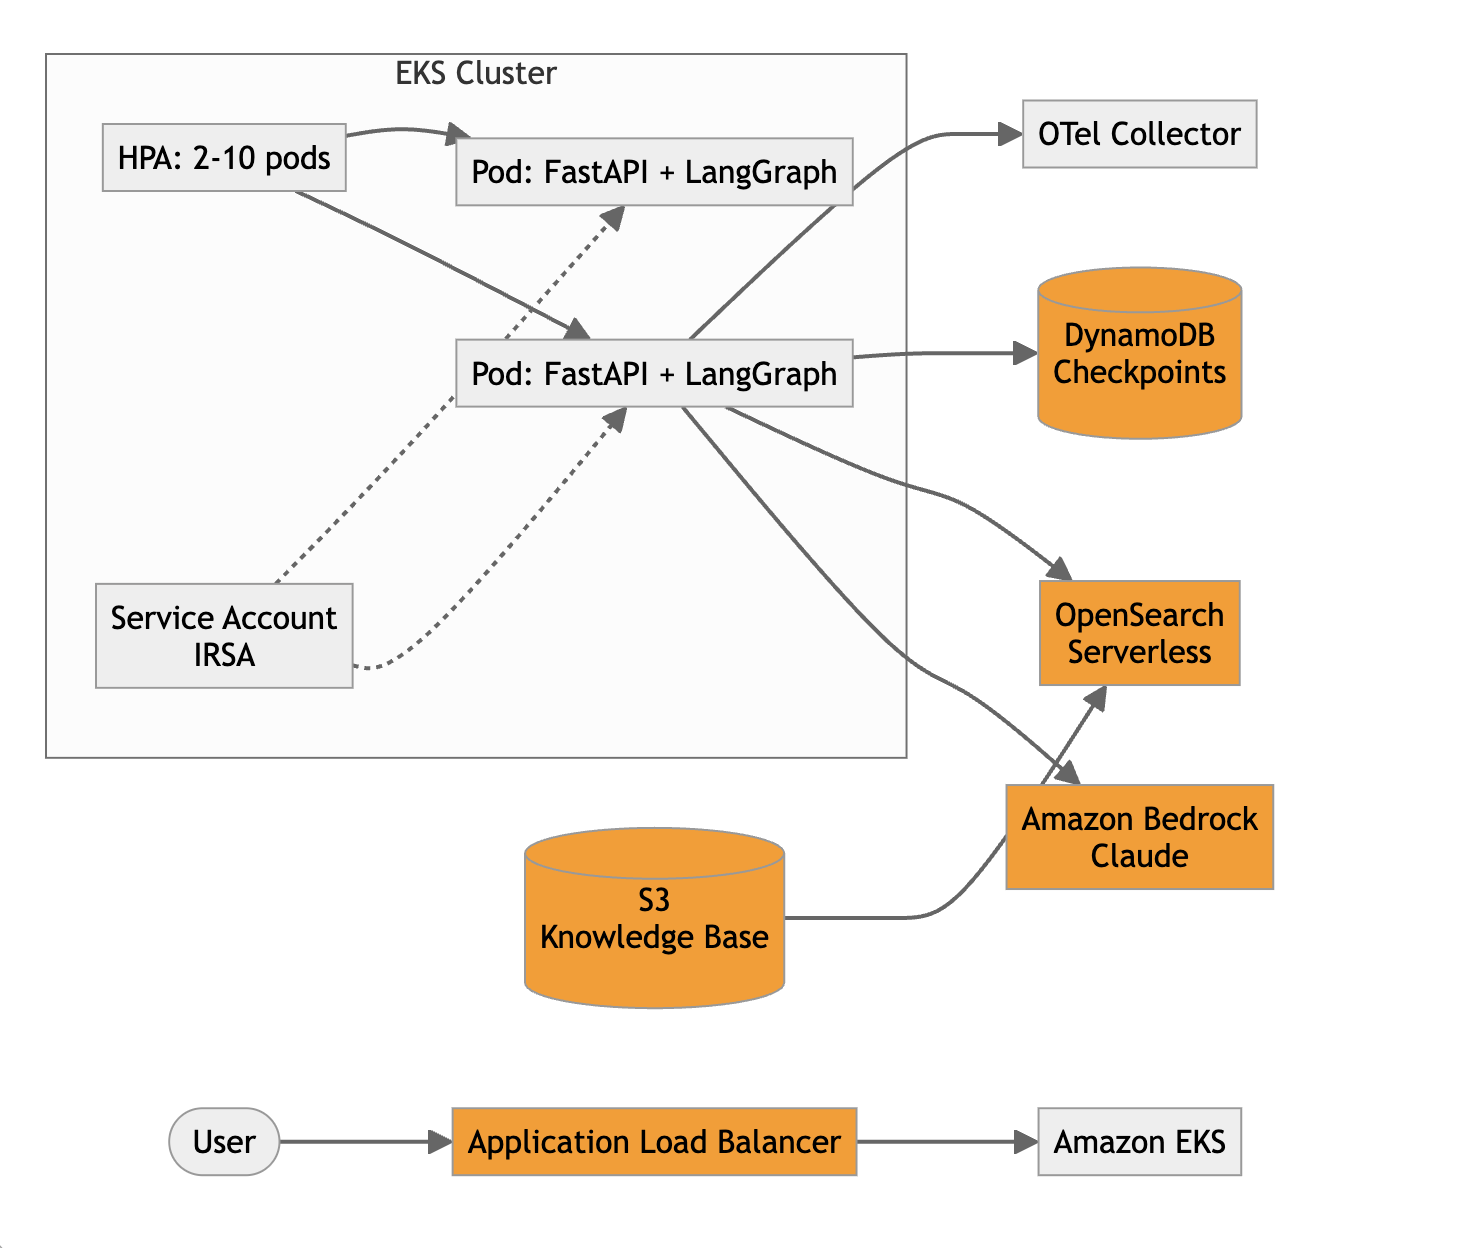
Architecture diagram: overall workflow with Amazon EKS, LangGraph, and Amazon Bedrock.
The knowledge base in Amazon Simple Storage Service (Amazon S3) contains IT runbooks, troubleshooting guides, VPN configuration docs, SSO setup procedures, onboarding checklists, and known-issue bulletins. An indexing pipeline (for example, an AWS Lambda function triggered by S3 PutObject events) chunks each document, generates embeddings using Amazon Titan Text Embeddings v2 on Amazon Bedrock, and writes the resulting vectors to an Amazon OpenSearch Serverless vector index for semantic kNN retrieval.
The architecture uses IAM Roles for Service Accounts (IRSA) so that pods assume an IAM role to access Amazon Bedrock, Amazon DynamoDB, and Amazon OpenSearch Serverless without static credentials. The Horizontal Pod Autoscaler (HPA) scales from 2 to 10 replicas based on CPU utilization, and Karpenter is configured to provision additional nodes using Spot Instances when capacity is needed.
LangGraph agent design
LangGraph models AI workflows as directed graphs where nodes are Python functions and edges define control flow. Three properties make it suitable for IT support escalation:
Checkpointing: Automatic state persistence at every node transition. When an issue is escalated to a human engineer, the full context is preserved in Amazon DynamoDB regardless of pod lifecycle.
interrupt(): Pauses graph execution, persists state, and resumes when the L2/L3 engineer provides a resolution. The escalated ticket can sit for minutes or hours and the state is safe.
Conditional edges: Route to different nodes based on confidence, enabling the L1 (AI) to L2/L3 (human) escalation pattern.
The agent graph has three nodes: Retrieve, Generate, and Escalate.
Confidence routing uses a hybrid approach: if the best retrieval score from Amazon OpenSearch Serverless (cosine similarity over Amazon Titan embeddings) is below 0.7, or the LLM’s self-assessed confidence (extracted via structured output prompting) is below 7/10, the request escalates to a human engineer. These thresholds are starting points, not fixed values; the right settings depend on your runbook coverage and how much escalation volume your L2/L3 team can absorb. Tune them empirically: raise the bar (for example, 0.8 / 8) to escalate more aggressively and protect answer quality while the knowledge base is still thin, then relax it as coverage improves and you see which escalations the AI could have handled confidently. Reviewing a sample of escalated and auto-resolved tickets each week is a practical way to calibrate. This hybrid check catches two failure modes:
Knowledge gap: The issue isn’t documented (for example, a new infrastructure change broke something).
Ambiguous context: The runbook exists but the employee’s situation doesn’t clearly match.
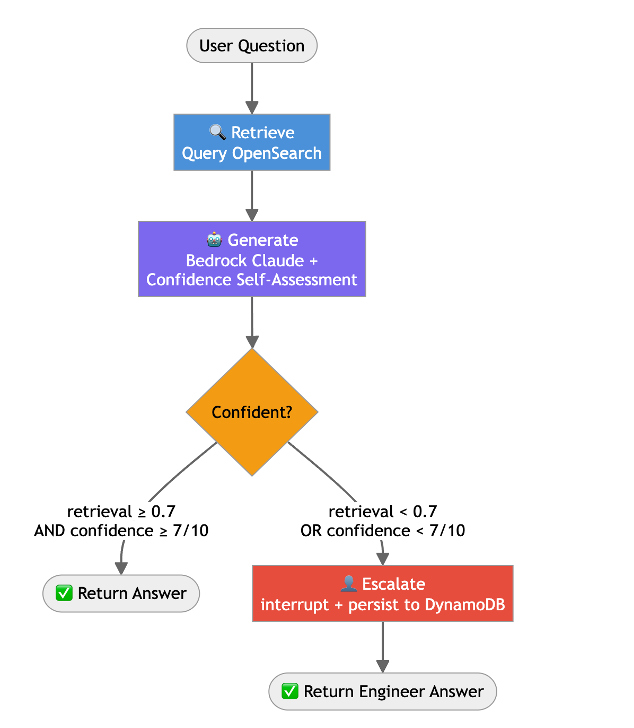
RAG pipeline with confidence-based human escalation.
Building the agent
In this section, we walk through building the LangGraph agent step by step.
State schema
The state flows through every node in the graph. It captures the IT support context needed for both AI resolution and human escalation.
Retrieve node
This node embeds the employee’s question with Amazon Titan Text Embeddings v2 on Amazon Bedrock, then runs a kNN search against the Amazon OpenSearch Serverless vector index built from the runbook corpus. It returns the top 5 documents along with their similarity scores.
Generate node
This node sends the retrieved runbook content and the employee’s question to Anthropic’s Claude model on Amazon Bedrock. The prompt instructs the model to answer as an IT support agent and self-assess its confidence. Note that this self-assessed score is just one input: a model’s own confidence rating may not always reflect whether its answer is actually correct, so it helps to pair it with other signals. The hybrid approach does this by also considering the retrieval score from Amazon OpenSearch Serverless, and you may want to validate the thresholds against real escalation outcomes over time.
Escalation node
The interrupt() function pauses graph execution and persists the full support context to Amazon DynamoDB. The graph remains paused until an L2/L3 engineer provides a resolution, which could be minutes or hours later, on any pod in the cluster. In production, the escalation node also publishes a notification (for example, to an Amazon SQS queue feeding an engineer console) so the on-call engineer is alerted to the new ticket; that notification is omitted here for brevity.
Graph assembly
The graph assembly wires the three nodes into the support flow. Execution starts at retrieve, passes to generate, and then branches: route_after_generate inspects the needs_escalation flag set during generation and routes low-confidence requests to escalate_to_engineer while sending resolved requests straight to END.
FastAPI wrapper
The application exposes two endpoints: one for employees to submit IT support requests, and one for engineers to resolve escalated tickets.
Amazon DynamoDB checkpointing
Amazon DynamoDB checkpointing is what makes the escalation pattern viable on Kubernetes. Without it, an escalated ticket is lost if the handling pod restarts or if the engineer’s resolution routes to a different replica.
The langgraph-checkpoint-aws library persists the full graph state at every node transition. When a request is escalated, the state, including the employee’s question, the AI’s attempted answer, retrieved runbook content, and confidence scores, is already in Amazon DynamoDB. When the engineer resolves the ticket (potentially hours later, on any pod in the cluster), the graph loads the checkpoint and delivers the resolution.
This also provides resilience against infrastructure failures. If a pod crashes mid-execution, the support request can be retried from the last completed node rather than asking the employee to repeat themselves.
Containerize and deploy
Prerequisites
To deploy the IT support agent on Amazon EKS, you need the following:
- An AWS account. If you don’t have one, you can sign up for one.
- An AWS Identity and Access Management (IAM) user with permissions to work with Amazon EKS, Amazon Bedrock, Amazon DynamoDB, and Amazon OpenSearch Serverless.
- The AWS CLI, kubectl, eksctl, and helm installed in your terminal.
- Access to Amazon Bedrock foundation models (example: Anthropic Claude Sonnet) enabled in your account.
Step 1: Containerize the application
Create a Dockerfile that packages the agent and FastAPI app into a slim Python image and serves it with uvicorn on port 8000.
Build the container image and push it to Amazon Elastic Container Registry (Amazon ECR). Replace 111122223333 with your AWS account ID.
Note: Replace 111122223333 with your AWS account ID throughout this post.
Step 2: Set up the Amazon EKS cluster
Create an Amazon EKS cluster using the following cluster-config.yaml. This provisions a private-networking EKS 1.31 cluster with OIDC enabled (for IRSA), a managed node group, Karpenter discovery tags, and core add-ons.
Run this command to create your Amazon EKS cluster:
Verify that nodes are running:
Step 3: Create the Amazon DynamoDB table
Create the DynamoDB table for LangGraph checkpoints, using a composite PK/SK key schema and on-demand (pay-per-request) billing.
Step 4: Deploy with Helm
The Helm chart defines the Kubernetes resources: a Deployment with an IRSA-annotated service account, a ClusterIP Service, an ALB Ingress, and a Horizontal Pod Autoscaler. The values file sets replica count, binds the pod’s service account to the IRSA role, injects environment variables, and configures the HPA to scale 2 to 10 replicas at 70% CPU.
Deploy:
The IAM role attached through IRSA requires the following permissions, defined as an inline policy on the role:
Observability with OpenTelemetry
For an IT Service Desk, observability serves dual purposes: operational monitoring and audit compliance. Every escalation decision is traceable. You can demonstrate why the AI escalated, what documentation it searched, and who resolved the ticket.
Each node records attributes that explain its decisions:
| Span | Attributes |
|---|---|
support.retrieve | question, documents_retrieved, top_score, runbooks_searched |
support.generate | confidence_score, best_retrieval_score, needs_escalation, category |
support.escalate | confidence_score, category, engineer_resolved, resolution_time_ms |
This enables SLA tracking and helps answer questions like: How long from escalation to resolution? Which categories escalate most frequently? Which runbooks have coverage gaps?
Testing the complete flow
Let’s verify the application is working correctly by testing both paths: L1 AI resolution and L2/L3 escalation.
L1 resolution: Routine VPN question
Response:
Escalation: Novel issue after infrastructure change
Response:
Engineer resolves the escalated ticket
Response:
Between the escalation and resolution, the pod could have restarted, scaled down, or the request could have routed to a different replica. Amazon DynamoDB checkpointing makes this transparent.
Cleaning up
To avoid ongoing charges, delete the deployed resources:
If you created an Amazon OpenSearch Serverless collection and Amazon S3 bucket for the IT runbooks, delete those as well through the AWS Management Console.
Conclusion
In this post, we demonstrated a production pattern for stateful IT support that mirrors how support teams already work: handle routine L1 requests automatically, escalate complex issues to human engineers with full context, and maintain a complete execution trace of every decision.
This implementation demonstrates several key points:
- LangGraph’s
interrupt()maps directly to IT support escalation, with no custom ticketing queue infrastructure needed. - LangGraph checkpointing (DynamoDB here, or PostgreSQL/Redis elsewhere) keeps escalated tickets intact across pod restarts, scaling events, and multi-replica routing.
- Confidence-based routing catches both knowledge gaps (undocumented issues) and ambiguous situations (novel problems after infrastructure changes).
- OpenTelemetry provides SLA tracking, escalation analytics, and compliance audit trails.
- The pattern is portable: while shown on Amazon EKS, it runs on any Kubernetes platform.
Next steps
- Add a feedback loop that stores engineer resolutions back into the knowledge base, so the same question gets resolved at L1 next time.
- Implement priority routing using the category field to route escalations to specialized engineers (network team for VPN, identity team for SSO).
- Build SLA dashboards by aggregating OpenTelemetry spans to track mean-time-to-resolution by category.
- Contribute your own checkpoint backends or deployment recipes to the LangGraph community.
To learn more, visit the LangGraph documentation, Amazon EKS documentation, and Amazon Bedrock documentation.
This post first appeared on Read More