Adopting conceptual design enables you to lay the foundation for a product before designing it. In other words, it involves figuring out what you’re building and how it would work before going into detailed aesthetics and implementation.
The core duty of a conceptual designer is to translate a client’s raw ideas into actionable blueprints that guide the design process. Sounds simple enough, right? Not quite. Transforming a mere idea into a functioning product with a good user experience can be extremely challenging.
Think about it: Anyone can conceive a product idea in a flash. Say you’re on a fitness journey and struggling to stay motivated. You could think, “I wish there were an app to pair me with accountability partners that keep me on track.”
Great idea! But how do you turn this lightbulb moment into a reality? This is where a conceptual designer comes in. They take this idea and start shaping it into something tangible by following key steps like these:
- Understanding the problem the product aims to solve
- Defining the customer, brand, and audience
- Researching the market to analyze competitors and spot opportunities
- Brainstorming and ideation
- Evaluating and refining concepts.
Conceptualization comes into play as the designer moves toward sketching the first wireframes. In this phase, they decide whether to build on existing frameworks or start from scratch. Each step matters, ensuring nothing is overlooked and setting the stage for a functional and intuitive product.
At this point, you might be thinking, “Couldn’t I just skip all the planning and dive straight into designing the final product?” The short answer is no, and this article explains why.
Editor’s note: This blog was updated 5 May 2025 by Chinwe Uzegbu to offer a step-by-step breakdown, incorporate real-world examples, and answer FAQs.
What is the purpose of conceptual design?
Just like you wouldn’t embark on a trip without knowing your destination or mapping out your route, you shouldn’t start a design project without a clear direction. Conceptual design defines the end goal and outlines the paths to get there. It has multiple benefits, including:
- Clarifying your vision and goals — Conceptual design helps ensure all stakeholders align on core ideas by defining the project’s purpose, scope, and constraints beforehand
- Encouraging innovation — This phase allows for brainstorming and the exploration of multiple solutions without committing to one, ultimately leading to more creative solutions
- Resulting in more user-centric solutions — Conceptual design puts user needs, functionality, and usability first before considering aesthetics and technical details. This approach ensures that the final product is tailored to users’ needs
- Reducing your project timeline — By identifying potential problems early on, conceptual design can minimize the need for rework, thereby speeding up the design process
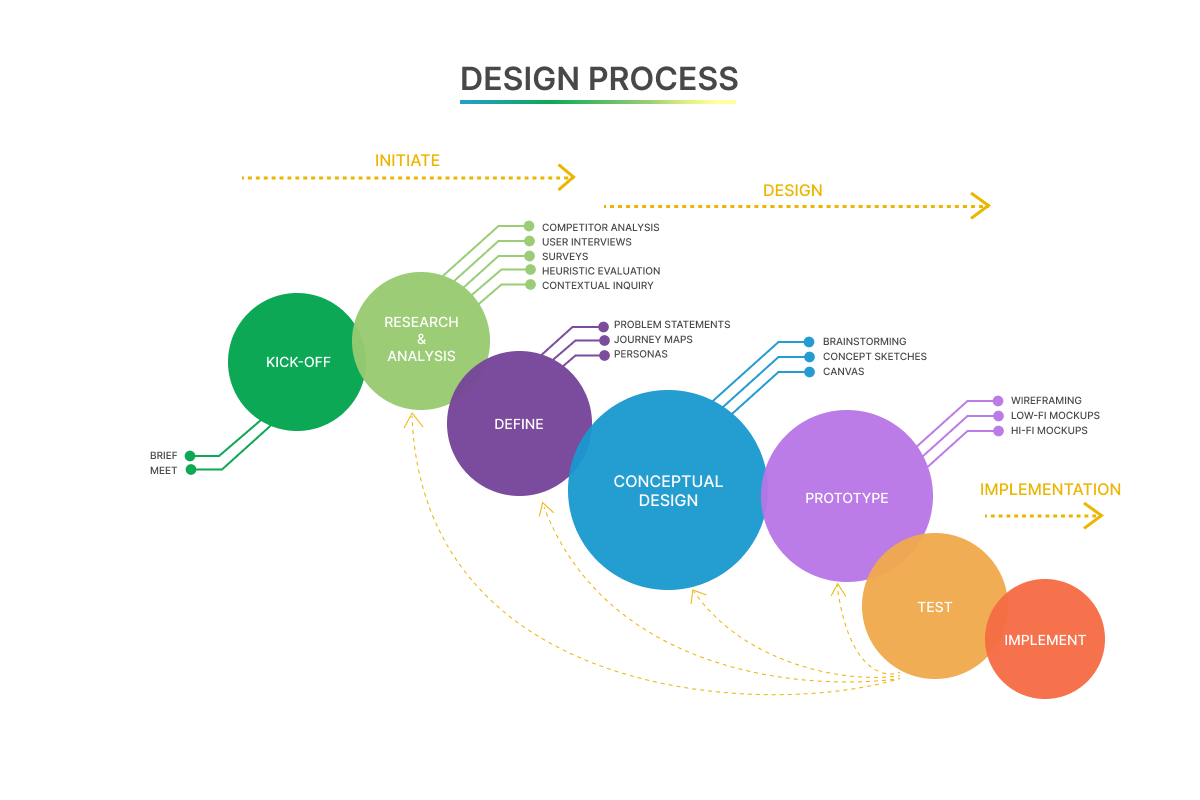
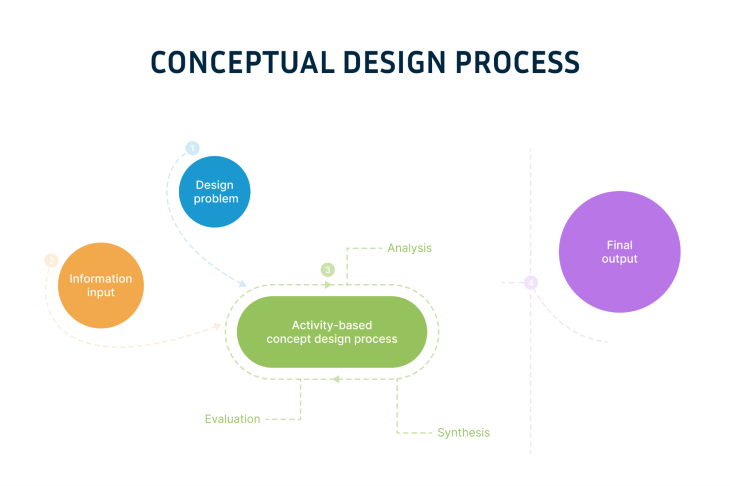
The diagram above shows how conceptual design fits into the broader design process. Now that we’ve explored its meaning and importance, let’s dive into the best practices to execute it effectively.
Best practices for conceptual design: Process and documentation
Every stage of the design process comes with its own challenges, but following a structured approach makes it easier to handle whatever comes your way. Here are some best practices to help keep your conceptual design phase more focused and effective:
Start with a clear understanding of the problem
Use your research insights to define the problem you’re solving. Once you’ve nailed down a solid problem statement, it becomes easier to generate effective ideas.
Just make sure you stick within established constraints when ideating. For example, if you have a $10k budget, don’t propose features that could cost way more than that to implement.
Diverge before converging
In the early stages of ideation, prioritize quantity over quality. The aim is to generate as many ideas as possible before filtering them.
Techniques like Crazy 8s, brainstorming, and the worst possible idea can help uncover innovative solutions. Once you’ve gathered multiple ideas, you can sift through them and narrow down the best ones.
Involve stakeholders early on
Get product owners, developers, and others involved in the process right from the start. That way, everyone can be on the same page regarding goals, constraints, and success metrics.
One key advantage of this is that it reveals technical and business constraints early, saving time and money later.
Visualize early
Use low-fidelity sketches to visualize ideas quickly and cheaply before committing to wireframes or mockups. Storyboards and comics can help show user flows. When documenting these ideas, use simple formats that are easy to understand and discuss.
Create a concept summary
Write a clear and concise summary that captures the essence of your conceptual design. Include key elements like the project’s vision, goals, key features, target users, and design principles. This can act as a reference point for the team throughout the project.
Link your design decisions to supporting research
When documenting your concepts, tie your design decisions to user insights or business needs to strengthen their foundation. Reference specific findings like user feedback or market data to justify your choices. This ensures that your concepts align with real user needs.
Version control your concepts
Record how your conceptual designs evolve by tracking changes and interactions in collaborative tools like Figma, Miro, or Notion. This helps maintain clarity, ensures alignment, and keeps everyone on the same page.
For example, you can use labels like Concept_V1.0_Date, Concept_V1.1_Date, etc, to mark different versions of your work.
Now that we’ve covered best practices to guide the conceptual design process, it’s worth exploring potential limitations that can arise and how to address them effectively.
Limitations of conceptual design
Conceptual design’s main strength lies in its low-stakes, iterative approach, allowing you to churn out and validate ideas quickly. However, this speed and flexibility come with its own set of limitations. Recognizing these challenges and taking proactive steps to address them is key to making conceptual design effective. Here are some potential limitations:
Risk of idea overload
The creative freedom to brainstorm can produce a huge pile of ideas or even overly ambitious concepts. Without clear criteria for evaluation or prioritization, you risk going around in circles, overthinking every option, or even chasing ideas that don’t align with user needs.
To mitigate this risk, establish clear evaluation criteria, such as user value, budget constraints, technical feasibility, and business alignment from the outset. Narrow down ideas based on priority to keep the team focused on the most realistic and impactful ideas.
Early designs can hide real-world challenges
The rough, early-stage designs in this phase don’t fully capture real user interactions or technical limitations, making it hard to verify their practicality. This increases the chance of moving forward with flawed ideas.
To mitigate this risk, conduct lightweight user testing within the contextual phase and iterate based on feedback. It’s also a good idea to involve engineers to check design feasibility.
Open to misinterpretation
As concepts are usually presented as rough, low-fidelity sketches, they risk being misinterpreted by stakeholders and team members if not clearly explained or documented.
To prevent this, present sketches with clear, jargon-free explanations that clarify the concept’s purpose, functionality, and user experience. Also, include detailed documentation like annotated diagrams or user flows to reduce ambiguity.
Now that we’ve covered its best practices and potential limitations, it’s time to zoom in on the stages of conceptual design and how they typically unfold.
The 5 stages of conceptual design
In UX design, conceptual design acts as a bridge between abstract ideas and tangible solutions by shaping a clear path from initial intent to final vision. Through this process, you can figure out the type of UI the client wants, visualize how the final product could look, and get early feedback from your target users.
Implement these five key steps to guide this process:
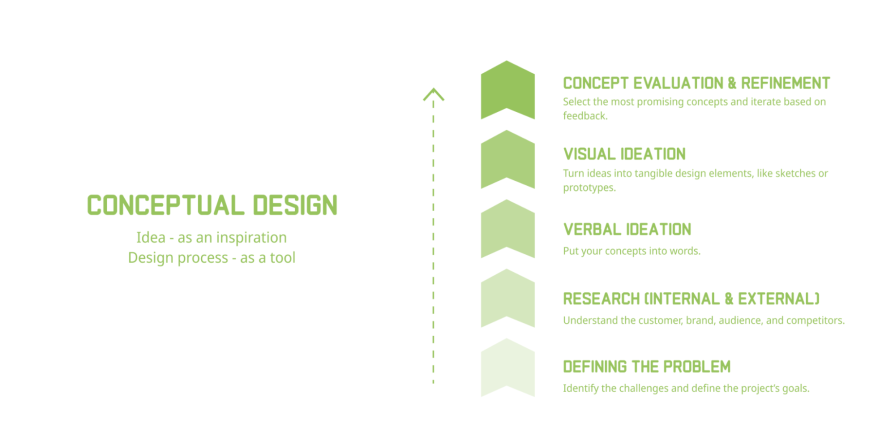
1. Define the problem
The initial steps of conceptual design lay the groundwork for innovative and purpose-driven solutions. In this phase, you identify the specific challenges that need addressing and define the project’s purpose and objectives. A series of fundamental questions guides this process:
- Why is this project needed? (The design process begins by uncovering the motivations and driving forces behind the project)
- What’s the purpose of the project? (Each project has a distinct purpose, whether it’s enhancing user experiences, solving a particular problem, or introducing new functionalities)
- What problem is it intended to solve? (By pinpointing the challenges and obstacles to overcome, designers can formulate innovative solutions that directly address the issues)
It’s essential to define the problem your design is supposed to solve or the specific goals it wants to achieve.
For example, imagine a scenario where your client specializes in creating laser-equipped guns for paintball events. When a player hits a target, laser beams create hit marks and tally points on a specialized “target” vest.
However, the company faces a dilemma. While paintball appeals to various age groups, it’s often associated with images of violence, which clashes with the company’s aim to cater to a broad, family-friendly audience. The company maintains a brand identity that steers clear of violence-related imagery.
At this point, the problem statement becomes clearer:
Paintball, a sport with diverse forms and equipment, attracts participants from different age groups. However, its association with violent imagery is incongruent with the company’s inclusive approach, especially when catering to youth. The challenge is to redefine the image of paintball, highlighting the excitement and strategy it offers without perpetuating negative associations.
The role of a concept designer in this scenario is pivotal. You would be tasked with crafting a website concept that effectively promotes paintball equipment and addresses the company’s branding concerns, ensuring an inclusive and appealing tone.
By grasping the essence of the problem and aligning it with the brand’s values, you set the stage for a design solution that not only meets functional needs but also resonates with your desired audience.
2. Conduct internal and external research
Once you have a problem statement, the next step is to define your customer, brand, and audience. Address the following questions:
- Who is your customer? (brand story)
- What is the mission? (brand personality communicated to the industry or market)
- Who is the target audience?
- What does the target audience expect in the design?
- What innovative ideas will distinguish the brand?
Answering these questions makes it easier to generate design ideas, explore different options, and spot any limits early on:
Another key way to gather inspiration is through competitor analysis. There’s a trove of information in what has come before. By studying what competitors are doing, you can learn what works and what doesn’t. Aim to address queries such as:
- Which strategies are competitors employing?
- How are they attaining their objectives?
- Which features and functionalities differentiate them from you?
- What do your competitors possess that you don’t?
Carrying out internal user tests on competitors’ apps and assessing which ones prove most effective is crucial. Investigating competitors also provides insights into industry norms. This helps you identify where competitors fall short and find the best strategies to give your client a competitive edge.
3. Run brainstorming sessions
To turn a concept into something tangible, you first need to put it into words. This stage, often called brainstorming, involves talking through your ideas. It helps to organize your thoughts in a way that lets your concepts evolve.
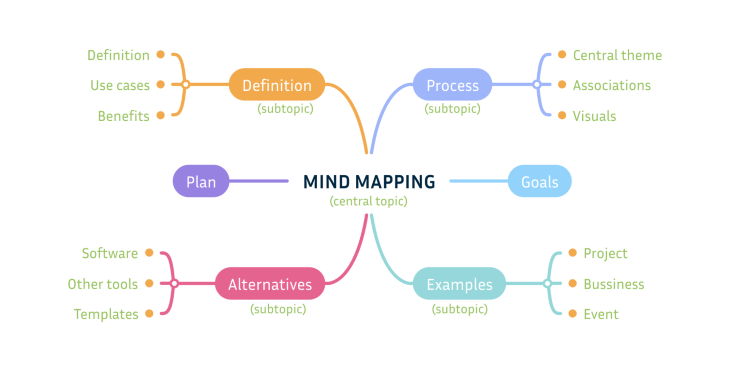
You can use ideation techniques like brainstorming, mind mapping, free association, or analogies. And chances are, you’ve tried some of these before:
To ensure the effectiveness of any ideation technique, structure your sessions thoughtfully and foster a judgment-free environment. Encourage wild ideas, equal participation, and collaborative thinking. This way, every voice is heard, and ideas can evolve together.
4. Ideate on the visuals
Next, it’s time to give form to your ideas. Begin by outlining your concepts and sketching out layouts. Low-fidelity sketching on paper is a straightforward way to bring your ideas to life.
Consider multiple options and arrangements (ideally three variations). A tried-and-true approach involves generating several smaller thumbnails that fit on a single page for effortless comparison and analysis.
Techniques you can use for this include:
- Outlining
- Storyboarding
- Prototyping
- Crafting moodboards
At this stage, detailed refinement of initial sketches isn’t necessary. The primary objective is to visualize your concepts effectively. This is important as even though you might feel you have a clear mental image of your concept, putting it on paper is the ultimate test of its viability.
5. Evaluate and refine your concept
Once you’ve etched out initial sketches, you need to assess how well they align with the project goals, user needs, and the overall brand. At this stage, you can also gather feedback from users and stakeholders through light-weight testing, then refine the most promising concepts by updating the sketches or prototypes.
These refined designs, while not final, should give the client a clear sense of the eventual design’s appearance:
Keep in mind that conceptual design is a dynamic process that demands continuous refinement and is grounded in user and stakeholder feedback. Seek feedback early and consistently to guide design choices throughout the entire process.
Final thoughts
In conclusion, conceptual design is the cornerstone upon which successful products are built. When properly implemented, it can greatly enhance the product design process and create innovative and user-friendly products. By embracing the best practices covered in this guide, staying grounded in research, and being mindful of potential limitations, you can build experiences that truly meet users’ needs.
The next time you’re faced with a design challenge, don’t jump straight into pixels and prototypes. Rather, follow these key steps:
- Define the problem
- Conduct internal and external research
- Run brainstorming sessions
- Ideate on the visuals
- Evaluate and refine your concept
Good luck and make sure to come back for our next article!
Header image source: IconScout
The post Conceptual design: Definition, step-by-step breakdown appeared first on LogRocket Blog.
This post first appeared on Read More