
Authentication and authorization in Astro
Authentication and authorization concepts like JWTs, RBAC, and client-side components are common across frameworks like Vue, React, and Svelte. But Astro’s islands architecture presents unique challenges for authentication because it needs to be carefully handled between static content and interactive client-side components. Unlike Next.js or Nuxt, Astro doesn’t inherently handle API routes, requiring a different approach to authentication. Astro requires manual handling of protected routes using middleware.

This tutorial will specifically show how to integrate authentication in a partially static, partially dynamic framework, leveraging Astro’s server-side rendering (SSR) support and protecting static and dynamic routes in Astro. We’ll also explore using Astro’s new SSR capabilities to store sessions, refresh tokens, and manage user state efficiently.
Prerequisites
- Node.js v18.17.1 or v20.3.0, v22.0.0 or higher ( v19 and v21 are not supported by Astro)
- Knowledge of JavaScript
- Prior experience building web apps with frontend frameworks; we’ll use React for this project
Demo project
We will build a vehicle rental app with JWT authentication and Role-Based Access Control with Astro. This is what the final application will look like:
This app’s features include user authentication (registration, login, logout), product/vehicle listings, detailed product views, and an administrative dashboard for editing product details.
Here is the GitHub repository for the final build.
Setting up the Astro project
Run the following command in your terminal to scaffold an Astro project:
npm create astro@latest
Then, choose the basic template.
Next, update the project’s package.json file with the following dependencies:
{
  "dependencies": {
    "@astrojs/db": "^0.14.11",
    "@astrojs/netlify": "^6.2.6",
    "@astrojs/react": "^4.2.4",
    "@auth/core": "^0.37.4",
    "@tailwindcss/vite": "^4.1.4",
    "@types/bcryptjs": "^2.4.6",
    "@types/react": "^19.1.2",
    "@types/react-dom": "^19.1.2",
    "astro": "^5.6.2",
    "auth-astro": "^4.2.0",
    "bcryptjs": "^3.0.2",
    "react": "^19.1.0",
    "react-dom": "^19.1.0",
    "tailwindcss": "^4.1.4",
    "uuid": "^11.1.0"
  }
}
@astrojs/tailwind: For utility-first CSS styling@astrojs/db: A local-first ORM/ SQL database layer for database interactions, defining schema, and seeding dataauth-astro: For handling user authentication, integrating between Astro and@auth/core@astrojs/react: To enable the use of React components within the Astro application@astrojs/netlify: Integration for deploying Astro projects on Netlifybcryptjs: For hashing and comparing passwords securelyjs-cookie: A utility for managing cookies in the browser (storing tokens, sessions)uuid: Used to generate universally unique IDs
Database configuration (astro:db)
During development, Astro uses your database configuration to automatically generate local TypeScript types and autocompletion based on your defined schemas each time the dev server is started. We’ll configure and use Astro DB for the app database. Let’s begin by defining the database tables and their relationships.
Create a db/config.ts file at the root of your project where you will define a schema for the database tables and their relationships. Then add the following:
import { column, defineDb, defineTable } from "astro:db";
const User = defineTable({
  columns: {
    id: column.text({ primaryKey: true, unique: true }),
    name: column.text(),
    email: column.text(),
    password: column.text(),
    createdAt: column.date({ default: new Date() }),
    role: column.text({ references: () => Role.columns.id }),
  },
});
const Role = defineTable({
  columns: {
    id: column.text({ primaryKey: true }),
    name: column.text(),
  },
});
const Product = defineTable({
  columns: {
    id: column.text({ primaryKey: true }),
    description: column.text(),
    price: column.number(),
    brand: column.text(),
    slug: column.text({ unique: true }),
    stock: column.number(),
    tags: column.text(),
    name: column.text(),
    type: column.text(),
    user: column.text({ references: () => User.columns.id }),
  },
});
const ProductImage = defineTable({
  columns: {
    id: column.text({ primaryKey: true }),
    productId: column.text({ references: () => Product.columns.id }),
    image: column.text(),
  },
});
export default defineDb({
  tables: {
    User,
    Role,
    Product,
    ProductImage,
  },
});
This defines a schema for our database tables and relationships using Astro DB. It’s similar to how ORMs like Prisma or Sequelize work. Each User has one Role, each Product belongs to one User, and each ProductImage belongs to one Product. Also, a Product can have multiple associated ProductImages, forming a one-to-many relationship.
Next, update astro.config.mjs as follows:
import { defineConfig } from 'astro/config';
import db from '@astrojs/db';

export default defineConfig({
  integrations: [db()],
});
Seeding your database with data for development
To seed the database with initial data, create a seed-data.ts file in the db folder with the following:
interface SeedVehicle {
  description: string;
  images: string[];
  stock: number;
  price: number;
  brand: string;
  slug: string;
  name: string;
  type: VehicleTypes;
  tags: string[];
}
type VehicleTypes = 'COUPE' | 'SEDAN' | 'SPORTS CAR' | 'CONVERTIBLE' | 'TRUCK' | 'STATION WAGON';
export const seedVehicles: SeedVehicle[] = [
  {
    description:
      'Sleek burgundy luxury car with multi-spoke rims in a minimalist beige and brown indoor setting, exuding elegance and modern design.',
    images: ['burgundy_1.jpeg', 'burgundy_2.jpeg'],
    stock: 7,
    price: 750,
    brand: 'Tesla',
    slug: 'luxury_burgundy_car',
    name: 'Luxury Burgundy Car',
    type: 'COUPE',
    tags: ['sleek vehicle', 'luxury car', 'modern design']
  },
  {
    description:
      'Sleek black SUV with futuristic design parked in front of a modern building with warm lighting and glass panels.',
    images: ['luxury_suv_1.jpeg', 'luxury_suv_2.jpeg'],
    stock: 3,
    price: 900,
    brand: 'Tesla',
    slug: 'range_rover_luxury_suv',
    name: 'Range Rover Luxury SUV',
    type: 'COUPE',
    tags: ['SUV', 'luxury car', 'modern design']
  },
  {
    description:
      'Front view of a vibrant orange sports car with sharp LED headlights, bold grille, and dramatic lighting in a dark setting.',
    images: ['nissan_sport_1.jpeg', 'nissan_sport_2.jpeg'],
    stock: 6,
    price: 1200,
    brand: 'Nissan',
    slug: 'nissan_sport_car',
    name: 'Nissan Sport Car',
    type: 'SPORTS CAR',
    tags: ['aerodynamics', 'sports', 'speed']
  },
]
This interface describes the shape of a single vehicle object used for seeding. The VehicleTypes union type defines a limited set of allowed vehicle types.
Download the image files from the final project’s GitHub repo.
Next, create a seed.ts file in the db folder with the following:
import { db, Role, User, Product, ProductImage } from "astro:db";
import { v4 as UUID } from "uuid";
import bcrypt from "bcryptjs";
import { seedVehicles } from "./seed-data";
// https://astro.build/db/seed
export default async function seed() {
  const roles = [
    { id: "admin", name: "Administrator" },
    { id: "user", name: "User" },
  ];
  const paulPlay = {
    id: "001-002-PAUL",
    name: "Paul Play",
    email: "[email protected]",
    password: bcrypt.hashSync("password"),
    role: "admin",
  };
  const peterParker = {
    id: "001-002-PETER",
    name: "Peter Parker",
    email: "[email protected]",
    password: bcrypt.hashSync("password"),
    role: "user",
  };
  await db.insert(Role).values(roles);
  await db.insert(User).values([paulPlay, peterParker]);
  const queries: any = [];
  seedVehicles.forEach((p) => {
    const product = {
      id: UUID(),
      description: p.description,
      price: p.price,
      brand: p.brand,
      slug: p.slug,
      stock: p.stock,
      tags: p.tags.join(","),
      name: p.name,
      type: p.type,
      user: paulPlay.id,
    };
    queries.push(db.insert(Product).values(product));
    p.images.forEach((img) => {
      const image = {
        id: UUID(),
        image: img,
        productId: product.id,
      };
      queries.push(db.insert(ProductImage).values(image));
    });
  });
  db.batch(queries);
}
This populates the database with the initial data. It adds user and admin roles to the Role table, adds sample users to the User table, uses bcryptjs to hash initial user passwords, and uuid to generate unique IDs for products and images. It iterates through seedVehicles from db/seed-data.ts to create a Product and an associated ProductImage and uses db.batch() for efficient insertion of multiple product/image records.
Astro server-side rendering (SSR) configuration
To enable SSR in the Astro project, add the following to astro.config.mjs:
import { defineConfig } from 'astro/config';
import netlify from "@astrojs/netlify";
export default defineConfig({
  output: "server",
  adapter: netlify(),
});
The netlify adapter allows the server to render any page on demand when a route is visited.
React and Tailwind setup
To use React and Tailwind in the Astro project, add the following to astro.config.mjs:
import { defineConfig } from 'astro/config';
import react from "@astrojs/react";
import tailwindcss from "@tailwindcss/vite";
export default defineConfig({
  integrations: [react()],
  output: "server",
  vite: {
    plugins: [tailwindcss()]
  }
});
Next, update the tsconfig.json file as follows:
{
  "extends": "astro/tsconfigs/strict",
  "compilerOptions": {
    "baseUrl": ".",
    "paths": {
      "@/*": [
        "src/*"
      ]
    },
    "jsx": "react-jsx",
    "jsxImportSource": "react"
  }
}
This config enables strict TypeScript settings with React JSX support and a cleaner import alias for the src directory.
Next, create styles/global.css in the asset folder and add the following:
@import "tailwindcss";
Implementing components in Astro
Astro supports creating components with Svelte, Vue, React, SolidJS, and Preact. It’s also framework agnostic, meaning developers can choose and combine different frameworks and libraries for their projects.
Create shared/Navbar.astro in the components folder and add the following:
---
const { isLoggedIn, isAdmin, user } = Astro.locals;
---
<!-- component -->
<nav
  class="flex justify-between px-20 py-10 items-center fixed top-0 w-full z-10 h-20"
  style="background-color: #000000;"
>
  <h1 class="text-xl text-white font-bold">
    <a href="/">AutoRentals</a>
  </h1>
  <div class="flex items-center">
    <ul class="flex items-center space-x-6">
      <li class="font-semibold text-white">
        <p>{user && user.email}</p>
      </li>
      {
        isAdmin && (
          <li class="font-semibold text-white">
            <a href="/admin/dashboard">Dashboard</a>
          </li>
        )
      }
      {
        !isLoggedIn ? (
          <li class="font-semibold text-white">
            <a href="/login">Login</a>
          </li>
        ) : (
          <li id="logout" class="font-semibold cursor-pointer text-white">
            <a>Log out</a>
          </li>
        )
      }
    </ul>
  </div>
</nav>
<script>
  const { signOut } = await import("auth-astro/client");
  const logoutElem = document.querySelector("#logout") as HTMLLIElement;
  logoutElem?.addEventListener("click", async () => {
    await signOut();
    window.location.href = "/";
  });
</script>
The Navbar component displays the logged-in user’s email, shows an admin dashboard link if the user has admin privileges, and toggles between “Login” and “Log out” links depending on whether the user is authenticated. The logout button triggers a signOut() function from auth-astro/client and redirects the user to the homepage.
Implementing layouts in Astro
Layouts are Astro components that provide a reusable UI structure for sharing UI elements like navigation bars, menus, and footers across multiple pages.
Create MainLayout.astro in the layouts folder and add the following:
---
import Navbar from "@/components/shared/Navbar.astro";
import "@/assets/styles/global.css";
import { ClientRouter } from "astro:transitions";
interface Props {
  title?: string;
  description?: string;
  image?: string;
}
const {
  title = "AutoRentals",
  description = "One stop shop for all your vehicle rentals",
  image = "/vehicles/images/no-image.png",
} = Astro.props;
---
<html lang="en">
  <head>
    <meta charset="utf-8" />
    <link rel="icon" type="image/svg+xml" href="/favicon.svg" />
    <meta name="viewport" content="width=device-width" />
    <meta name="generator" content={Astro.generator} />
    <title>{title}</title>
    <!-- Meta tags -->
    <meta name="title" content={title} />
    <meta name="description" content={description} />
    <!-- Open Graph / Facebook -->
    <meta property="og:title" content={title} />
    <meta property="og:url" content={Astro.url} />
    <meta property="og:description" content={description} />
    <meta property="og:type" content="website" />
    <meta property="og:image" content={image} />
    <!-- Twitter -->
    <meta property="twitter:card" content="summary_large_image" />
    <meta property="twitter:url" content={Astro.url} />
    <meta property="twitter:title" content={title} />
    <meta property="twitter:description" content={description} />
    <meta property="twitter:image" content={image} />
    <ClientRouter />
  </head>
  <body>
    <Navbar />
    <main class="container m-auto max-w-5xl px-5 pt-24 pb-10">
      <slot />
    </main>
  </body>
</html>
The MainLayout component accepts optional title, description, and image props for setting dynamic SEO and social media meta tags, providing better discoverability and sharing. The <ClientRouter /> enables smooth page transitions with astro:transitions.
Next, create AuthLayout.astro in the layouts folder and add the following:
---
---
<html lang="en">
  <head>
    <meta charset="utf-8" />
    <link rel="icon" type="image/svg+xml" href="/favicon.svg" />
    <meta name="viewport" content="width=device-width" />
    <meta name="generator" content={Astro.generator} />
    <title>Auth</title>
  </head>
  <body>
    <link
      href="https://unpkg.com/tailwindcss@^2/dist/tailwind.min.css"
      rel="stylesheet"
    />
    <div
      class=" relative"
    >
      <div
        class="absolute bg-gradient-to-b from-black to-black opacity-75 inset-0 z-0"
      >
      </div>
      <div class="min-h-screen sm:flex sm:flex-row mx-0 justify-center">
        <slot />
      </div>
    </div>
  </body>
</html>
The AuthLayout component wraps the page content in a slot, which will be shared between the login and registration pages.
Defining the interface for products
Create a interface/product-with-images.interface.ts file in the src folder and add the following:
export interface ProductWithImages {
  id: string;
  description: string;
  images: string;
  price: number;
  brand: string;
  slug: string;
  stock: number;
  tags: string;
  name: string;
  type: string;
  user: string;
}
Currency formatting utility
To display prices with corresponding currencies, we need a currency formatting utility.
Create a utils/formatter.ts file in the src folder and add the following:
export class Formatter {
  static currency(value: number, decimals = 2): string {
    return new Intl.NumberFormat("en-US", {
      style: "currency",
      currency: "USD",
      maximumFractionDigits: decimals,
    }).format(value);
  }
}
The Formatter class formats a number into a U.S. dollar currency string using the built-in Intl.NumberFormat API.
Understanding server actions in Astro
Astro v4.15 introduced actions for seamless communication between your client and server code. Actions automatically handle JSON parsing and form data validation using Zod validation. It also allows you to define server functions for data fetching, custom logic, and standardize backend errors with the ActionError object, reducing the amount of boilerplate compared to using an API endpoint.
Astro actions are defined as follows:
import { defineAction } from 'astro:actions';
import { z } from 'astro:schema';

export const myAction = defineAction({...})
To make your actions accessible across the project, create an index.ts file in the actions folder and export a server containing all your actions:
import { myFirstAction, mySecondAction } from "./my-action";

export const server = {
  myFirstAction,
  mySecondAction
};
Now, your actions are available as functions in the astro:actions module. To access them, import actions from astro:actions and call them on the client-side using a <script> tag in an Astro component, or within a UI framework component, or a form POST request:
src/pages/index.astro
---
---

<script>
import { actions } from 'astro:actions';

async () => {
  const { data, error } = await actions.myFirstAction();
}
</script>
To access it on the server, wrap the action with Astro.callAction as follows:
import { actions } from 'astro:actions';
const { data, error } = await Astro.callAction(actions.myFirstAction,{});
Understanding authentication in Astro
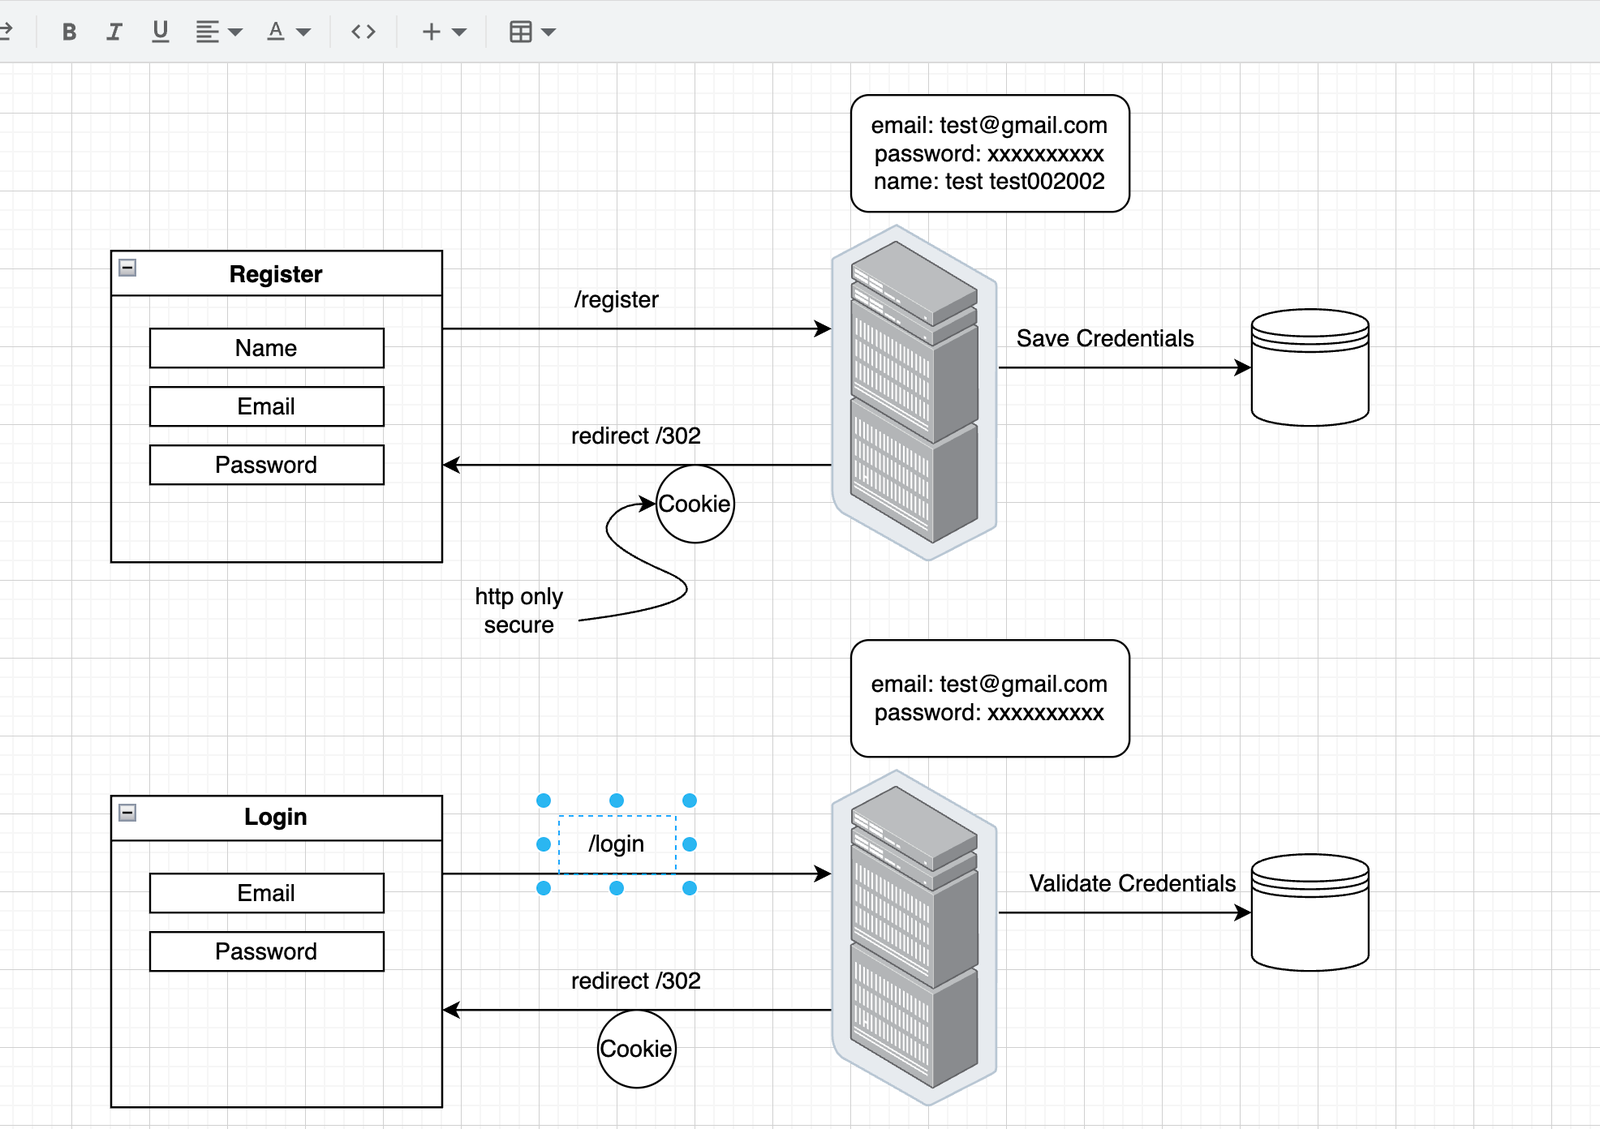
Before we dive into the implementation of authentication in Astro, let’s review the project’s authentication flow. As you can see in the diagram above, we have login and register pages for entering user credentials.
As users navigate to the register page and submit their credentials, the server receives those credentials, hashes the password for security, and stores the credentials in the database. Then the server sends a response to the browser to set a cookie to track the active user and verify a visitor’s identity. As users navigate to the login page and submit their credentials, the server receives those credentials, validates the credentials by comparing the email and password against the email and password in the database.
Implementing authentication in Astro
This section covers building a user authentication system with pages and server actions for user registration and login, hashing user passwords securely using bcrypt.
By default, Auth.js doesn’t include custom properties like role in its types. So we’ll augment Auth.js properties so TypeScript recognizes those additions.
Create auth.d.ts in the project’s root folder and add the following:
import { DefaultSession, DefaultUser } from "@auth/core/types";
declare module "@auth/core/types" {
  interface User extends DefaultUser {
    role?: string;
  }
  interface Session extends DefaultSession {
    user: User;
  }
}
This gives you type safety and autocompletion when accessing session.user.role in your project.
Next, create env.d.ts in the project’s src folder and add the following:
/// <reference path="../.astro/db-types.d.ts" />
/// <reference path="../.astro/actions.d.ts" />
/// <reference types="astro/client" />
interface User {
  email: string;
  name: string;
}
declare namespace App {
  interface Locals {
    isLoggedIn: boolean;
    isAdmin: boolean;
    user: User | null;
  }
}
This adds type safety to your server-side logic in Astro so that TypeScript knows what to expect when accessing locals in Astro’s server-side context.
Next, set up user authentication using the auth-astro package, with a custom credentials-based login system (email and password).
Create auth.config.mts in the project’s root folder and add the following:
import { defineConfig } from "auth-astro";
import Credentials from "@auth/core/providers/credentials";
import { db, User, eq } from "astro:db";
import bcrypt from "bcryptjs";

export default defineConfig({
  providers: [
    Credentials({
      credentials: {
        email: { label: "Mail", type: "email" },
        password: { label: "Password", type: "password" },
      },
      authorize: async ({ email, password }) => {
        const [user] = await db
          .select()
          .from(User)
          .where(eq(User.email, `${email}`));
        if (!user) throw new Error("User not found");
        if (!bcrypt.compareSync(password as string, user.password))
          throw new Error("Invalid credentials");
        const { password: _, ...rest } = user;
        return rest;
      },
    }),
  ],
});
The credentials property enables a login form where users can enter their email and password used in the authorize function to authenticate the user. The authorize function queries the database for a user matching the provided email. If no user is found, it throws a "User not found" error. If a user is found, it verifies the password by comparing the provided one with the hashed password stored in the database using bcrypt.compareSync(). If the password doesn’t match, it throws an "Invalid credentials" error. When the credentials are valid, it returns the user object without the password field for security.
Next, implement callback functions to handle user sessions. Update auth.config.mts with the following:
...
import type { AdapterUser } from "@auth/core/adapters";

export default defineConfig({
  providers: [
    ...
  ],
  callbacks: {
    jwt: ({ token, user }) => {
      if (user) {
        token.user = user;
      }
      return token;
    },
    session: ({ session, token }) => {
      session.user = token.user as AdapterUser;
      return session;
    },
  },
});
The jwt callback runs when a JWT (JSON Web Token) is created or updated. If a user is present (usually right after login), it attaches the user info to the token.
The session callback adds the user info from the token into the session object so it’s accessible throughout your app.
Now, register the auth configurations in astro.config.mjs as follows:
import { defineConfig } from 'astro/config';
import auth from "auth-astro";
export default defineConfig({
  integrations: [
    auth({
      configFile: './auth.config.mts'  // Explicitly specify the .mts extension
    })
  ],
});
Implementing authentication middleware
Because Astro middleware runs on every incoming request, in order not to fetch the session each time, we’ll define a middleware to store locals values (isLoggedIn, isAdmin, user) that will be used across the app.
Next, create middleware.ts in the project’s src folder and add the following:
import { defineMiddleware } from "astro:middleware";
import { getSession } from "auth-astro/server";
const notAuthenticatedRoutes = ["/login", "/register"];

export const onRequest = defineMiddleware(
  async ({ url, locals, redirect, request }, next) => {
    const session = await getSession(request);
    const isLoggedIn = !!session;
    const user = session?.user;
    locals.isLoggedIn = isLoggedIn;
    locals.user = null;
    locals.isAdmin = false;
    if (isLoggedIn && user) {
      locals.user = {
        name: user.name!,
        email: user.email!,
      };
      locals.isAdmin = user.role === "admin";
    }

    return next();
  }
);
With this, if the user is authenticated, their name and email are saved in locals.user and accessed across the app.
Now, we can create the login and register pages.
Login page
Create login.astro in the pages folder and add the following:
---
import AuthLayout from "@/layouts/AuthLayout.astro";
---
<AuthLayout>
  <div class="flex justify-center self-center z-10">
    <div class="p-12 bg-white mx-auto rounded-lg w-[500px]">
      <div class="mb-4">
        <h3 class="font-semibold text-2xl text-gray-800">Login</h3>
        <p class="text-gray-500">Sign in to your account.</p>
      </div>
      <form class="space-y-5">
        <div class="space-y-2">
          <label class="text-sm font-medium text-gray-700 tracking-wide"
            >Email</label
          >
          <input
            class="w-full text-base px-4 py-2 border border-gray-300 rounded-lg focus:outline-none focus:border-black"
            type="email"
            name="email"
            placeholder="Enter your email"
          />
        </div>
        <div class="space-y-2">
          <label class="mb-5 text-sm font-medium text-gray-700 tracking-wide">
            Password
          </label>
          <input
            class="w-full content-center text-base px-4 py-2 border border-gray-300 rounded-lg focus:outline-none focus:border-black"
            type="password"
            name="password"
            placeholder="Enter your password"
          />
        </div>
        <div class="flex items-center justify-between">
          <div class="text-sm flex items-center space-x-2">
            <p>Don't have an account?</p>
            <a href="/register" class="text-black font-semibold underline">
              register
            </a>
          </div>
        </div>
        <div>
          <button
            type="submit"
            id="btn-submit"
            class="disabled:bg-gray-300 w-full flex justify-center bg-black text-white p-3 rounded-md tracking-wide font-semibold shadow-lg cursor-pointer transition ease-in duration-500"
          >
            Login
          </button>
        </div>
      </form>
    </div>
  </div>
</AuthLayout>
This creates the UI for the login page using Astro and Tailwind CSS, wrapped inside the AuthLayout.
Next, update login.astro with the following:
...
<script>
  const form = document.querySelector("form") as HTMLFormElement;
  const btnSubmit = document.querySelector("#btn-submit") as HTMLButtonElement;
  const { signIn } = await import("auth-astro/client");
  form.addEventListener("submit", async (e) => {
    e.preventDefault();
    btnSubmit.setAttribute("disabled", "disabled");
    const formData = new FormData(form);
    const resp = await signIn("credentials", {
      email: formData.get("email") as string,
      password: formData.get("password") as string,
      redirect: false,
    });

    if (resp) {
      alert(resp)
      btnSubmit.removeAttribute("disabled");
      return;
    }
    window.location.replace("/");
  });
</script>
This script uses the signIn function from auth-astro/client for credentials-based login with the "credentials" provider. It sends the email and password from the form, disabling the submit button during the request, handling errors, and redirecting the user on success.
Register page
Create register.astro in the pages folder and add the following:
---
import AuthLayout from "@/layouts/AuthLayout.astro";
---
<AuthLayout>
  <div class="flex justify-center self-center z-10">
    <div class="p-12 bg-white mx-auto rounded-lg w-[500px]">
      <div class="mb-4">
        <h3 class="font-semibold text-2xl text-gray-800">Register</h3>
        <p class="text-gray-500">Create an account.</p>
      </div>
      <form class="space-y-5">
        <div class="space-y-2">
          <label class="text-sm font-medium text-gray-700 tracking-wide"
            >Name</label
          >
          <input
            class="w-full text-base px-4 py-2 border border-gray-300 rounded-lg focus:outline-none focus:border-black"
            type="text"
            name="name"
            placeholder="Enter your name"
          />
        </div>
        <div class="space-y-2">
          <label class="text-sm font-medium text-gray-700 tracking-wide"
            >Email</label
          >
          <input
            class="w-full text-base px-4 py-2 border border-gray-300 rounded-lg focus:outline-none focus:border-black"
            type="email"
            name="email"
            placeholder="Enter your email"
          />
        </div>
        <div class="space-y-2">
          <label class="mb-5 text-sm font-medium text-gray-700 tracking-wide">
            Password
          </label>
          <input
            class="w-full content-center text-base px-4 py-2 border border-gray-300 rounded-lg focus:outline-none focus:border-black"
            type="password"
            name="password"
            placeholder="Enter your password"
          />
        </div>
        <div class="flex items-center justify-between">
          <div class="text-sm flex items-center space-x-2">
            <p>Already have an account?</p>
            <a href="/login" class="text-black font-semibold underline">
              Login
            </a>
          </div>
        </div>
        <div>
          <button
            type="submit"
            id="btn-submit"
            class="disabled:bg-gray-300 w-full flex justify-center bg-black text-white p-3 rounded-md tracking-wide font-semibold shadow-lg cursor-pointer transition ease-in duration-500"
          >
            Register
          </button>
        </div>
      </form>
    </div>
  </div>
</AuthLayout>
Similarly, this creates the UI for the register page using Astro and Tailwind CSS wrapped inside the AuthLayout.
Next, update register.astro with the following:
<script>
  import { actions } from "astro:actions";
  const form = document.querySelector("form") as HTMLFormElement;
  const btnSubmit = document.querySelector("#btn-submit") as HTMLButtonElement;
  form.addEventListener("submit", async (e) => {
    e.preventDefault();
    btnSubmit.setAttribute("disabled", "disabled");
    const formData = new FormData(form);
    const { error } = await actions.registerUser(formData);
    if (error) {
      alert(error);
      btnSubmit.removeAttribute("disabled");
      return;
    }
    window.location.replace("/login");
  });
</script>
This script handles the registration form submission on the client side using Astro server actions. It disables the button during processing, sends the form data to a secure server-side handler (registerUser action), handles errors gracefully, and redirects the user on success.
Create the registerUser server actions
Create auth/register.action.ts in the actions folder and add the following:
import { defineAction } from 'astro:actions';
import { z } from "astro:schema";
import { db, User } from 'astro:db';
import { signIn } from 'auth-astro/client';
import bcrypt from "bcryptjs";
export const registerUser = defineAction({
  accept: 'form',
  input: z.object({
    name: z.string().min(2),
    email: z.string().email(),
    password: z.string().min(6),
  }),
  handler: async ({ name, email, password }) => {
    const user = {
      name,
      email,
      password: bcrypt.hashSync(password),
      role: "user",
    }
    return { ok: true };
  },
});
The registerUser server action handles user registration by validating input, hashing passwords, inserting the user into the DB, and logging them in.
Implementing the product list for the homepage
The homepage will require a server action and a component to render product data.
Implement a getProducts server action
We need to implement a server action that retrieves a list of products from the database, including their associated images.
Create products/get-products.action.ts in the actions folder and add the following:
import type { ProductWithImages } from "@/interfaces";
import { defineAction } from "astro:actions";
import { db, sql } from "astro:db";
export const getProducts = defineAction({
  accept: "json",
  handler: async () => {
    const productsQuery = sql`
        select a.*,
        ( select GROUP_CONCAT(image,',') from
          ( select * from ProductImage where productId = a.id)
        ) as images
        from Product a;
    `;
    const { rows } = await db.run(productsQuery);
    const products = rows.map((product) => {
      return {
        ...product,
        images: product.images ? product.images : "no-image.png",
      };
    }) as unknown as ProductWithImages[];
    return {
      products: products,
    };
  },
});
This action accepts JSON requests and runs a raw SQL query that selects all fields from the Product table and, for each product, retrieves all associated images from the ProductImage table where productId = a.id, combining the image values into a single comma-separated string using GROUP_CONCAT.
After executing the query and retrieving the results as rows, it maps through each product, preserving all fields and assigning a fallback value of "no-image.png" to the images field if none exist. Finally, it returns the formatted product list as an object.
Homepage
Update index.astro with the following:
---
import { actions } from "astro:actions";
import MainLayout from "@/layouts/MainLayout.astro";
import { ProductList } from "@/components";

const { data, error } = await Astro.callAction(actions.getProducts, {});
if (error) {
  return Astro.redirect("/");
}
const { products } = data;
---
<MainLayout>
  <h1 class="text-3xl text-center my-4">Luxury Cars</h1>
  <ProductList products={products} client:idle />
</MainLayout>
This page fetches product data via the getProducts Astro action, handles errors with a redirect, and displays the results using the ProductList component, all wrapped in MainLayout (a shared layout).
ProductList component
import type { ProductWithImages } from "@/interfaces";
import { ProductCard } from "./ProductCard";
interface Props {
  products: ProductWithImages[];
}
export const ProductList = ({ products }: Props) => {
  return (
    <div className="grid grid-cols-1 sm:grid-cols-2 md:grid-cols-3 place-items-center">
      {products.map((product) => (
        <ProductCard key={product.id} product={product} />
      ))}
    </div>
  );
};
This React component receives a list of products (products) as a prop. For each product in the array, it passes the product data to ProductCard component as a prop.
ProductCard component
import type { ProductWithImages } from "@/interfaces";
import { Formatter } from "@/utils";
import { useState } from "react";
interface Props {
  product: ProductWithImages;
}
export const ProductCard = ({ product }: Props) => {
  const images = product.images.split(",").map((img) => {
    return img.startsWith("http")
      ? img
      : `${import.meta.env.PUBLIC_URL}/images/vehicles/${img}`;
  });
  const [currentImage, setCurrentImage] = useState(images[0]);
  return (
    <a href={`/products/${product.slug}`}>
      <img
        src={currentImage}
        alt={product.name}
        className="h-[350px] w-[300px] object-cover"
        onMouseEnter={() => setCurrentImage(images[1] ?? images[0])}
        onMouseLeave={() => setCurrentImage(images[0])}
      />
      <div className="space-y-1">
        <h4>{product.name}</h4>
        <p className="font-medium">
          Charges: <span className="font-bold">{Formatter.currency(product.price)}</span> per day
        </p>
        <p className="font-medium">
          Brand:<span>{product.brand}</span>
        </p>
        <div>
          {(Array.isArray(product.tags)
            ? product.tags
            : product.tags.split(",")
          ).map((tag) => (
            <span className="bg-black text-white text-sm py-1.5 px-2 capitalize rounded-md mr-2">
              {tag}
            </span>
          ))}
        </div>
      </div>
    </a>
  );
};
This React component, ProductCard, accepts a product prop of type ProductWithImages and handles displaying the product’s image, name, price, brand, and tags.
Implementing a dynamic route (dynamic page) in Astro
To create a dynamic route for the product detail page, create the following file:
/pages/products/[...slug].astro
[...slug] is a dynamic segment that Astro uses to render different content based on the URL.
When a user visits /products/tesla-model-3, the [slug].tsx page gets the slug from the URL, fetches the product details using that slug, and renders a single product (vehicle) view.
Add the following to [...slug].astro:
---
import MainLayout from "@/layouts/MainLayout.astro";
import { Formatter } from "@/utils";
import { actions } from "astro:actions";

const { slug } = Astro.params;
const { data, error } = await Astro.callAction(actions.getProductBySlug, slug ?? "");
if (error) return Astro.redirect("/404");
const { product, images } = data;
const image = images[0].image.startsWith("http")
  ? images[0].image
  : `${import.meta.env.PUBLIC_URL}/images/vehicles/${images[0].image}`;
---
<MainLayout
  title={product.name}
  description={product.description}
  image={image}
>
  <div>
    <h2 class="text-2xl mt-4 font-bold">{product.name}</h2>
      <img src={image} alt="product-detail image" class="w-full h-full object-cover"/>
      <section class="grid grid-cols-1 sm:grid-cols-2 w-full gap-4">
        <div class="space-y-4">
          <div>
            <p class="mb-1 font-semibold">Tags</p>
            {(Array.isArray(product.tags)
              ? product.tags
              : product.tags.split(","))
              .map((tag) => (
                <span
                  class="bg-black text-white text-sm py-1.5 px-2 capitalize rounded-md mr-2 mb-2"

                >
                  {tag}
                </span>
              ))
            }
          </div>
          <p class="font-medium">Daily Charges: <span class="font-bold text-2xl">{Formatter.currency(product.price)}</span></h2>

          <p class="text-lg">Brand: <span class="bg-black text-sm text-white py-1.5 px-3 rounded-md">{product.brand}</span></h3>
            <div>
              <h3 class="mt-5">Description</h3>
              <p>{product.description}</p>
            </div>
          </div>
  <div>
    <h3 class="mt-5">Quantity</h3>
        <div>
          <button class="btn-quantity">-</button>
          <input type="number" min="1" value="1" />
          <button class="btn-quantity">+</button>
        </div>
        <button
          class="mt-5 bg-black text-white p-3 w-full disabled:bg-gray-500"
          >Proceed to Rent</button
        >
  </div>

      </section>
  </div>
</MainLayout>
This creates the UI for a single product (vehicle) page using Astro and Tailwind CSS, wrapped inside the MainLayout.
Implement a getProductBySlug server action
Now, we’ll implement a server action that retrieves a single product from the database, including its associated images.
Create products/get-products-by-slug.action.ts in the actions folder and add the following:
import { defineAction} from "astro:actions";
import { z } from "astro:schema";
import { Product, ProductImage, db, eq } from "astro:db";
export const getProductBySlug = defineAction({
  accept: "json",
  input: z.string(),
  handler: async (slug) => {
    const [product] = await db
      .select()
      .from(Product)
      .where(eq(Product.slug, slug));
    if (!product) throw new Error(`Product with slug ${slug} not found.`);
    const images = await db
      .select()
      .from(ProductImage)
      .where(eq(ProductImage.productId, product.id));
    return {
      product: product,
      images: images,
    };
  },
});
Implementing authorization in Astro

Authorization ensures that users can only access resources or perform actions they are allowed to, based on their authenticated identity or assigned roles. We’ll ensure only authorized (Admin) users can access the dashboard features.
Dashboard page
Create an admin/dashboard.astro file in the pages folder and add the following:
---
import { actions } from "astro:actions";
import MainLayout from "@/layouts/MainLayout.astro";
import { Formatter } from "@/utils";

const { data, error } = await Astro.callAction(actions.getProducts, {});
if (error) {
  return Astro.redirect("/");
}
const { products } = data;
---
<MainLayout title="Admin Dashboard">
  <h1 class="font-bold text-2xl">Dashboard</h1>
  <pclass="font-semibold text-lg">Product List</p>
  <table class="w-full mt-5">
    <thead>
      <tr>
        <th class="text-left">Image</th>
        <th class="text-left">Title</th>
        <th class="text-left">Daily Charges</th>
        <th class="text-left">Inventory</th>
      </tr>
    </thead>
    <tbody>
      {
        products.map((product) => (
          <tr>
            <td>
              {
                product.images.length > 0 ? (
                  <img
                      src={`/images/vehicles/${product.images.split(',')[0]}`}
                      alt={product.name}
                      class="w-16 h-16 mb-2"
                  />
                ) : (
                  <img src=`/images/products/no-image.png` alt="No image">
                )
              }
            </td>
            <td>
              <a
                class="hover:underline cursor-pointer"
                href={`/admin/products/${product.slug}`}
              >
                {product.name}
              </a>
            </td>
            <td>{Formatter.currency(product.price)}</td>
            <td class="justify-end">{product.stock}</td>
          </tr>
        ))
      }
    </tbody>
  </table>
</MainLayout>
This renders an admin dashboard page that displays a list of products from the server. It retrieves a list of products using the getProducts action, processes the data, and dynamically displays the products in a table format.
Update product/vehicle page
We’ll create a dynamic route for the Update Product page, such that when a user visits /admin/products/tesla-model-3, the [slug].tsx page gets the slug from the URL, fetches the product data using that slug and renders a prefilled form with vehicle data.
Create product/[…slug].astro in the admin folder and add the following:
---
import MainLayout from "@/layouts/MainLayout.astro";
import { actions } from "astro:actions";

const { slug } = Astro.params;
const { data, error } = await Astro.callAction(actions.getProductBySlug, slug ?? "");
if (error) {
  return Astro.redirect("/404");
}
const { product, images } = data;
---
<MainLayout title="Product update page">
  <form >
    <input type="hidden" name="id" value={product.id} />
    <div class="flex justify-between items-center">
      <h1 class="font-bold text-2xl">{product.name}</h1>
      <button type="submit" class="bg-black mb-5 p-2 rounded text-white"
        >Save Changes</button
      >
    </div>
    <div class="grid grid-cols-1 sm:grid-cols-2 gap-4">
      <div>
      <div class="mb-4">
        <label for="name" class="block">Name</label>
        <input
          type="text"
          id="name"
          name="name"
          value={product.name}
          class="w-full p-2 border border-gray-300 rounded"
        />
      </div>
      <div class="mb-4">
        <label for="slug" class="block">Slug</label>
        <input
          type="text"
          id="slug"
          name="slug"
          value={product.slug}
          class="w-full p-2 border border-gray-300 rounded"
        />
      </div>
      <div class="mb-4">
        <label for="description" class="block">Description</label>
        <textarea
          id="description"
          name="description"
          class="w-full p-2 border border-gray-300 rounded"
          rows="8">{product.description}</textarea
        >
      </div>
      </div>
      <div>
        <div class="grid grid-cols-1 sm:grid-cols-2 gap-5">
          <div class="mb-4">
            <label for="price" class="block">Daily Charges</label>
            <input
              type="number"
              id="price"
              name="price"
              value={product.price}
              class="w-full p-2 border border-gray-300 rounded"
            />
          </div>
          <div class="mb-4">
            <label for="stock" class="block">Inventory</label>
            <input
              type="number"
              id="stock"
              name="stock"
              value={product.stock}
              class="w-full p-2 border border-gray-300 rounded"
            />
          </div>
        </div>
        <div class="mb-4">
          <label for="brand" class="block">Brand</label>
          <input
            type="text"
            id="brand"
            name="brand"
            value={product.brand}
            class="w-full p-2 border border-gray-300 rounded"
          />
        </div>
        <div class="mb-4">
          <label for="tags" class="block"
            >Tags <small class="text-gray-500">(Separate with comas)</small
            ></label
          >
          <input
            type="text"
            id="tags"
            name="tags"
            value={product.tags}
            class="w-full p-2 border border-gray-300 rounded"
          />
        </div>

        <div class="grid grid-cols-2 gap-4">
          <div class="mb-4">
            <label for="tags" class="block">Type</label>
            <select class="w-full p-2 border border-gray-300 rounded" name="type">
              <option value="">[ Select ]</option>
              {
                [
                  "COUPE",
                  "SEDAN",
                  "SPORTS CAR",
                  "CONVERTIBLE",
                  "TRUCK",
                  "STATION WAGON",
                ].map((type) => (
                  <option
                    value={type}
                    class="capitalize"
                    selected={type === product.type}
                  >
                    {type.toUpperCase()}
                  </option>
                ))
              }
            </select>
          </div>
        </div>
      </div>
    </div>
  </form>
</MainLayout>
This creates the UI for the Product Update Page for an admin to edit product details using Astro and Tailwind CSS, wrapped inside the MainLayout. It uses the slug from the URL to fetch a product’s data using the getProductBySlug action. If no product is found (error is returned), the user is redirected to a 404 page:
<script>
  import { actions } from "astro:actions";
  import { navigate } from "astro:transitions/client";
  document.addEventListener("astro:page-load", () => {
    const form = document.querySelector("form") as HTMLFormElement;
    if (!form) {
      return;
    }
    form.addEventListener("submit", async (e) => {
      e.preventDefault();
      const formData = new FormData(form);
      const { data, error } = await actions.updateProduct(formData);
      if (error) {
        return alert(error.message);
      }
      navigate(`/admin/products/${data.slug}`);
    });
  });
</script>
This script enables client-side handling of a product update form. It calls the updateProduct server action through astro:actions to submit the updated data. If the server returns an error, it displays an alert with the error message. If the update is successful, it uses astro:transitions/client’s navigate() function to redirect the user to the updated product’s admin page, all without a full page reload.
Implement a updateProduct server action
We’ll implement a server action that modifies product data in the database. Create products/update-product.action.ts in the actions folder and add the following:
import { defineAction } from "astro:actions";
import { z } from "astro:schema";
import { Product, db, eq, ProductImage } from "astro:db";
import { getSession } from "auth-astro/server";
import { v4 as UUID } from "uuid";
export const updateProduct = defineAction({
  accept: "form",
  input: z.object({
    id: z.string().optional(),
    description: z.string(),
    price: z.number(),
    brand: z.string(),
    slug: z.string(),
    stock: z.number(),
    tags: z.string(),
    name: z.string(),
    type: z.string(),
  }),
  handler: async (form, { locals, request }) => {
    const session = await getSession(request);
    const user = session?.user;
    const { isAdmin } = locals;
    if (!user && !isAdmin) {
      throw new Error("Unauthorized");
    }
    const { id = UUID(), ...rest } = form;
    rest.slug = rest.slug.toLowerCase().replaceAll(" ", "_").trim();
    const product = {
      id: id,
      user: user?.id!,
      ...rest,
    };
        await db.update(Product).set(product).where(eq(Product.id, id))
    return product;
  },
});
The updateProduct action handles form submissions for updating a product in the database, allowing only authenticated Admin users to operate.
Handling Astro route protection
Route protection is one of the easiest features to implement in Astro. Because Astro middleware runs on every incoming request, the route protection logic should be in the middleware.
Update middleware.ts with the following:
export const onRequest = defineMiddleware(
  async ({ url, locals, redirect, request }, next) => {
   ...
    if (!locals.isAdmin && url.pathname.startsWith("/admin")) {
      return redirect("/");
    }
    if (isLoggedIn && notAuthenticatedRoutes.includes(url.pathname)) {
      return redirect("/");
    }

    return next();
  }
);
This middleware protects admin-only pages and prevents logged-in users from accessing login/register routes. If the user is not an admin (locals.isAdmin is false) and they try to access any route that starts with /admin, they are redirected to the homepage ("/").
Conclusion
In this tutorial, we explored integrating authentication in a partially static, partially dynamic environment, leveraging Astro’s server-side rendering (SSR) support and protecting static and dynamic routes in Astro. We also explored using Astro’s new SSR capabilities to store sessions, refresh tokens, and manage user state efficiently.
If you encounter any issues while following this tutorial or need expert help with web/mobile development, don’t hesitate to reach out on LinkedIn. I’d love to connect and am always happy to assist!
The post Authentication and authorization in Astro appeared first on LogRocket Blog.
This post first appeared on Read More