What’s actually happening under the hood when you spin up Anthropic’s AI coding agent

I’ve used GitHub Copilot, Cursor, and various GPT-based coding tools. Most are autocomplete engines with a chat sidebar bolted on. Claude Code is architecturally different — it’s a stateful, tool-calling agent that operates with direct access to your environment. This post documents the setup process and, more importantly, what you’re actually enabling when you do it.
The Architecture Before You Install Anything
It helps to understand what Claude Code is before installing it. Claude Code is built on the Claude Agent SDK — Anthropic’s framework for building agents that can take multi-step actions using tools. When you run a session, you’re not sending a prompt to a stateless API endpoint. You’re running an agent loop:
User message
  → Claude reasons about what tools to call
  → Tools execute (read file, run bash, search codebase...)
  → Results fed back into context
  → Claude reasons again
  → ... until the task is complete
The tools available to the agent include filesystem reads/writes, glob pattern matching, grep/ripgrep search, bash execution, web fetch, and sub-agent spawning. This is what separates it from autocomplete: the model can act on your codebase, not just comment on a snippet you paste.
The VS Code extension and CLI are two surfaces on the same underlying system. The extension adds IDE integration (clickable file references, inline diffs, a persistent sidebar) but runs the same agent loop as claude in a terminal.
Step 0: Windows Prerequisites
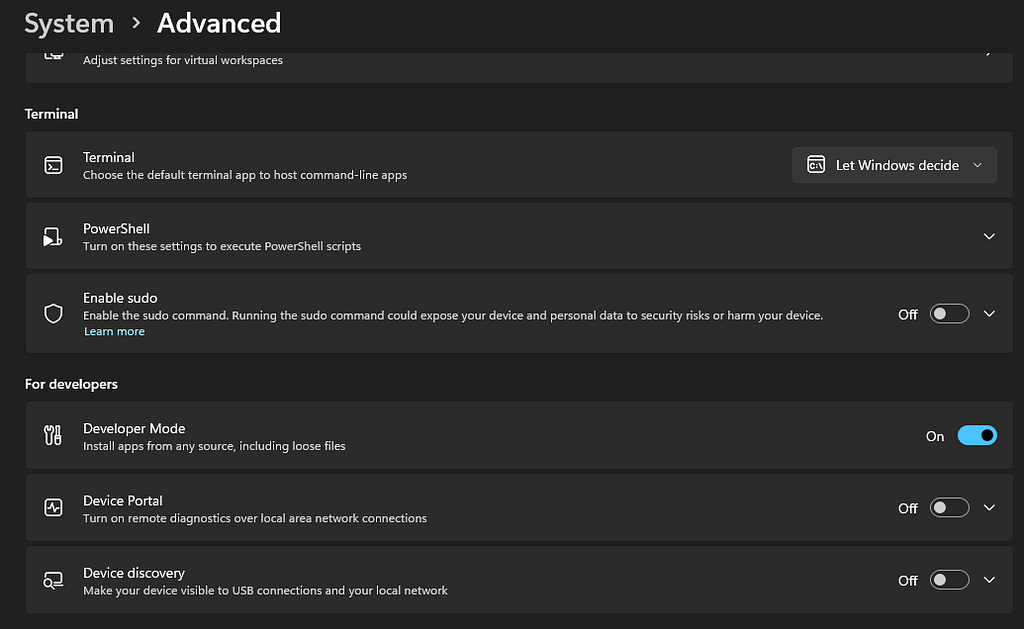
On Windows 11, enable Developer Mode before anything else:
Settings → System → Advanced → For Developers → Developer Mode: On
This allows sideloading and is required for some of Claude Code’s filesystem and shell operations to work correctly. The PowerShell execution policy also needs to permit scripts. Check your current policy:
Get-ExecutionPolicy -List
If CurrentUser is Restricted, update it:
Set-ExecutionPolicy -ExecutionPolicy RemoteSigned -Scope CurrentUser
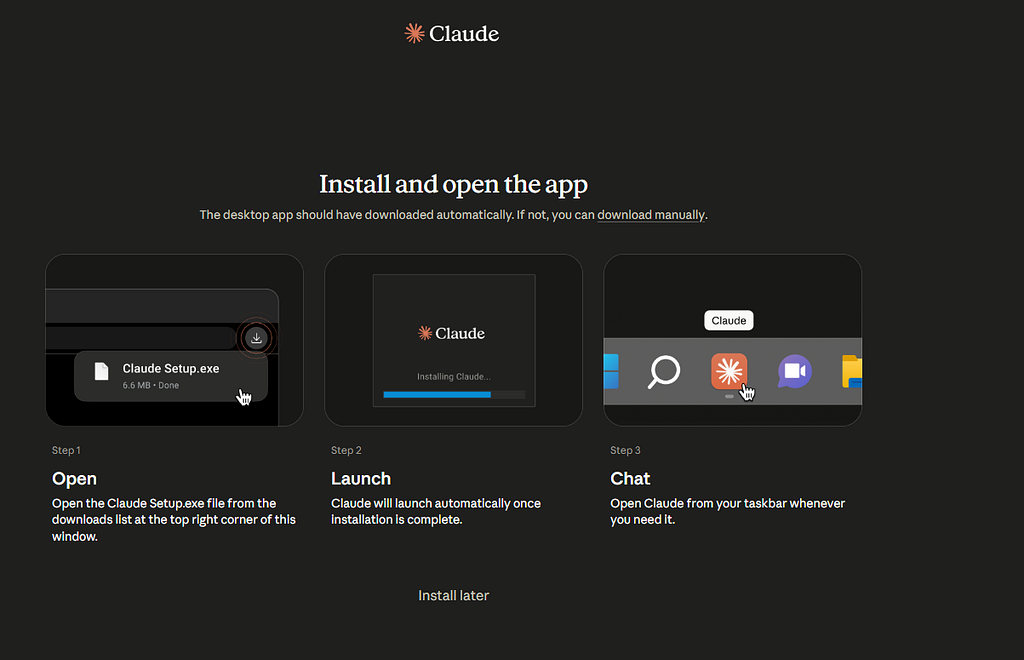
Step 1: Install the Desktop App and Choose Your Auth Model
Claude Code supports three authentication paths:
PathBillingBest forClaude Pro / Team / Enterprise subscriptionFlat monthly rateIndividual developersAnthropic Console (API key)Per-tokenTeams, CI/CD, productionBedrock / Foundry / VertexCloud provider billingEnterprise infra
The Pro subscription is the lowest-friction starting point. It routes all Claude Code usage through your subscription quota with no per-token tracking. The downside: you share quota with your regular Claude.ai chat usage. For heavy agentic workloads, Console API credits give you cleaner cost visibility and no quota contention.

The Desktop app (Claude Setup.exe, ~6 MB) installs and auto-launches. Default model on first load: claude-sonnet-4-6.
Step 2: Model Selection Matters
As of May 2026, the Claude 4.x family:
ModelIDUse caseOpus 4.7claude-opus-4–7Complex reasoning, long-horizon tasksSonnet 4.6claude-sonnet-4–6Balanced — default for Claude CodeHaiku 4.5claude-haiku-4–5–20251001Fast, lightweight
Claude Code defaults to Sonnet 4.6, which is the right call for most coding work — strong reasoning, fast enough for interactive use, and cost-efficient on Pro. Fast Mode (toggle with /fast) switches to Opus with faster output streaming for when you need the heavy model without the latency penalty.
For API builds, always specify the full model ID. Model aliases like claude-sonnet-latest exist but are unstable across releases.
Step 3: Install and Configure the VS Code Extension
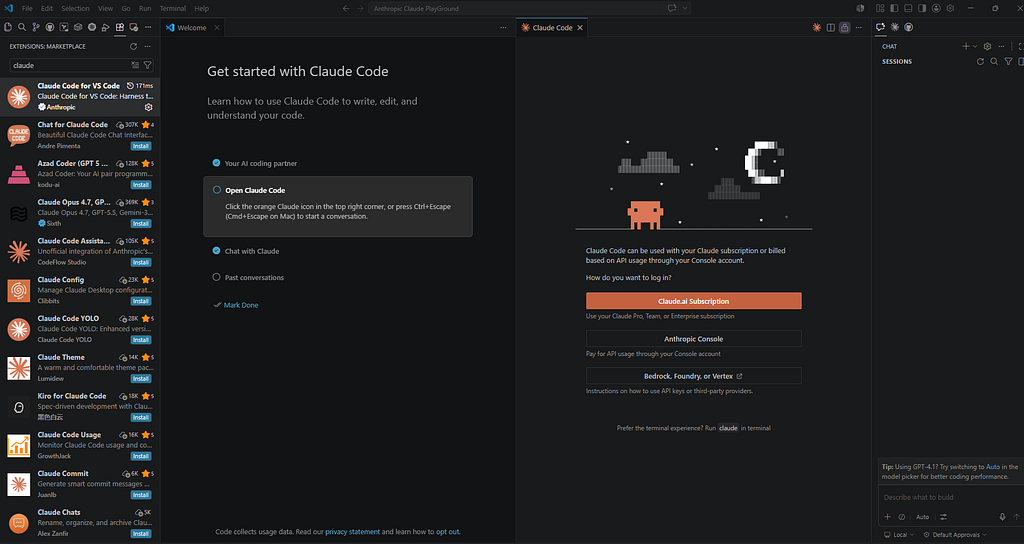
Search for claude in the Extensions Marketplace and install Claude Code for VS Code (publisher: Anthropic). The extension adds:
- A persistent Chat panel in the Activity Bar
- A Claude Code tab alongside your terminal
- Inline diff rendering for file edits
- Clickable file:line references in responses
After install, open Claude Code with Ctrl+Escape. The first launch triggers an OAuth flow:
Claude Code → connects to → your claude.ai account

Permissions granted during OAuth:
- Read Anthropic profile and subscription data
- Log usage against your subscription
- Read/write Claude Code sessions
- Manage MCP connectors
- Upload files on your behalf
This is a standard OAuth token exchange — not an API key. The token is stored locally and used to authenticate every agent session.
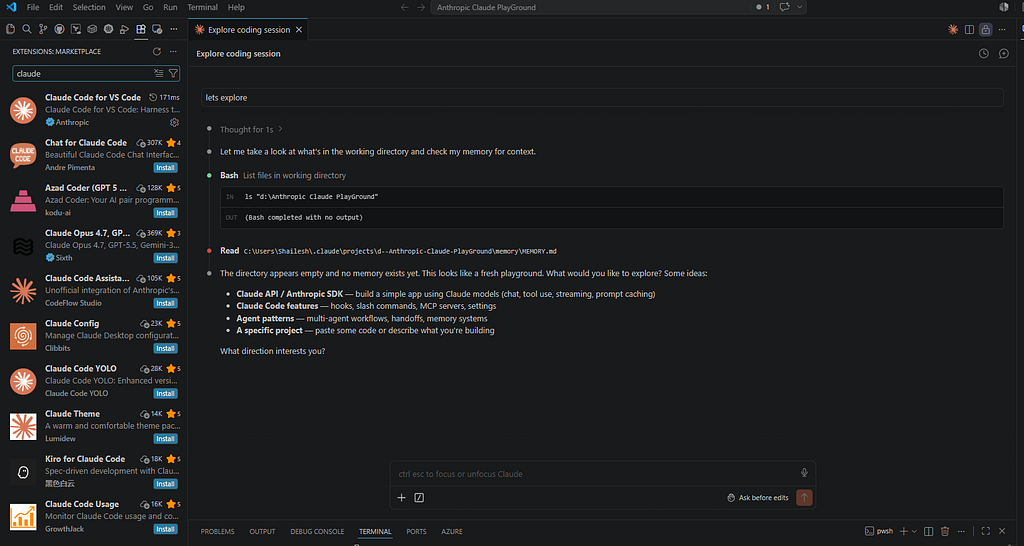
Step 4: What the Agent Can Actually Do
Once authorized, Claude Code has access to a tool suite that runs in your local environment.
Filesystem tools
- Read — reads files with line numbers, supports PDF/images/notebooks
- Write — creates or overwrites files
- Edit — targeted string replacement (preferred over full rewrites)
- Glob — pattern-based file search (**/*.ts, src/**/*.py)
- Grep — ripgrep-backed content search with regex support
Execution tools
- Bash — runs shell commands in PowerShell or bash
- WebFetch — fetches URLs and returns content
- WebSearch — web search with structured results
Agent tools
- Agent — spawns sub-agents (Explore, Plan, code-reviewer, etc.) with isolated context
- TodoWrite — task tracking within a session
Every tool call that touches your system goes through a permission layer. Lock down or expand permissions per-project in .claude/settings.json:
{
  "permissions": {
    "allow": ["Bash(npm run *)", "Read", "Edit"],
    "deny":  ["Bash(rm -rf *)"]
  }
}
Step 5: Memory and Context Persistence
Claude Code maintains a session memory system at:
~/.claude/projects/<project-path>/memory/
Each memory file has YAML frontmatter with name, description, and type (user, feedback, project, reference), and a MEMORY.md index loaded into every new session. This is how context persists across conversations — not magic, just structured files the agent reads at startup.
Project-level instructions live in CLAUDE.md at the repo root. This file is automatically loaded into every session and is the right place for code style preferences, test commands, architecture notes, and off-limits directories.
Step 6: MCP Servers — Extending the Tool Suite
Claude Code supports Model Context Protocol (MCP) — a standardized interface for connecting external tools and data sources to the agent. Think of it as a plugin system. Configure MCP servers in ~/.claude/settings.json:
{
  "mcpServers": {
    "postgres": {
      "command": "npx",
      "args": ["-y", "@modelcontextprotocol/server-postgres"],
      "env": { "DATABASE_URL": "postgresql://localhost/mydb" }
    }
  }
}
With an MCP server connected, Claude Code can query your database, call internal APIs, or interact with any system that exposes an MCP-compatible interface — all within the same agent loop.
Step 7: Hooks — Automating Around the Agent
Hooks are shell commands that execute in response to agent lifecycle events. They run in the harness, not in the model, so they’re reliable and composable. Example: run your linter every time Claude edits a file:
{
  "hooks": {
    "PostToolUse": [{
      "matcher": "Edit|Write",
      "hooks": [{
        "type": "command",
        "command": "npm run lint -- --fix"
      }]
    }]
  }
}
Available hook events: PreToolUse, PostToolUse, Stop, SubagentStop, Notification. This is how you wire Claude Code into your existing toolchain — format on save, run tests after edits, post to Slack when a session completes.
The Mental Model Shift
The most important thing to internalize: Claude Code is an agent, not an assistant.
An assistant answers questions. An agent takes actions, checks results, adjusts, and takes more actions until a goal is achieved. This means:
- Give it tasks, not questions: “Refactor the auth module to use JWT” not “How would I refactor auth to use JWT?”
- It will read your whole codebase before acting — let it
- Failed tool calls feed back into the loop; the agent self-corrects
- Long-horizon tasks (multi-file refactors, adding a full feature) are the sweet spot
The first session that clicked for me was pointing it at an unfamiliar repo and asking it to explain the data flow from API request to database write. It read 12 files, traced the call stack, and produced a diagram — in about 90 seconds.
Quick Reference: First Session Checklist
✓ Developer Mode enabled (Windows)
✓ PowerShell execution policy: RemoteSigned
✓ Claude Pro subscription active
✓ Claude Desktop installed
✓ Claude Code VS Code extension installed
✓ OAuth authorization completed
✓ CLAUDE.md created at repo root
✓ First task: explain this codebase to me
Claude Code’s source and issue tracker are at github.com/anthropics/claude-code. The Agent SDK docs cover building custom agents on the same tool infrastructure.
![]()
Getting Started with Claude Code was originally published in Javarevisited on Medium, where people are continuing the conversation by highlighting and responding to this story.
This post first appeared on Read More